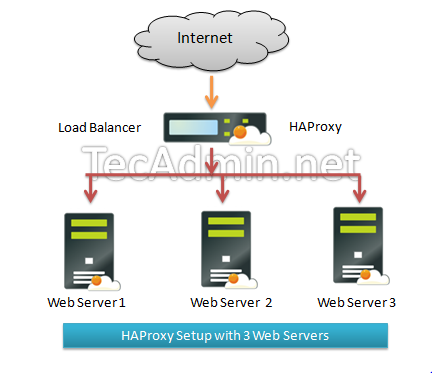
This article will help you to install HAProxy on CentOS, RHEL servers and will configure a Layer 4 Load Balancing (Transport Layer). Which will balance load and transfer requests to different-2 servers based on IP address and port numbers.
Step 1 – Install HAProxy
HAProxy package is available under the default yum repository for CentOS, Redhat systems. Use the following yum package manager command to install HAProxy on your system.
sudo yum install haproxy
Step 2 – Configure HAProxy
Update your HAProxy configuration file /etc/haproxy/haproxy.cfg as per your requirement, You may also use below given configuration file as an example of setup and modify it.
vim /etc/haproxy/haproxy.cfg
[ Update red mark values as per your network setup ]
global log 127.0.0.1 local0 log 127.0.0.1 local1 debug maxconn 45000 # Total Max Connections. daemon nbproc 1 # Number of processing cores.defaults timeout server 86400000 timeout connect 86400000 timeout client 86400000 timeout queue 1000s # [HTTP Site Configuration]listen http_web192.168.10.10:80 mode http balance roundrobin # Load Balancing algorithm option httpchk option forwardfor server server1192.168.10.100:80 weight 1 maxconn 512 check server server2192.168.10.101:80 weight 1 maxconn 512 check # [HTTPS Site Configuration]listen https_web192.168.10.10:443 mode tcp balance source# Load Balancing algorithm reqadd X-Forwarded-Proto: http server server1192.168.10.100:443 weight 1 maxconn 512 check server server2192.168.10.101:443 weight 1 maxconn 512 check
Change the ips in configuration file as per your network setup. In HTTP Site Configuration section if any request on ip 192.168.10.10 on port 80, this will be redirected to port 80 of 192.168.10.100 or 192.168.10.101 servers. Similarly in HTTPS Site Configuration if any request on ip 192.168.10.10 on port 443, this will be redirected to port 443 of 192.168.10.100 or 192.168.10.101 servers.
You also need to make a few changes in the configuration file as per your system configuration.
nbproc <value> # Number of processing cores in your system.mode <value> # ‘http’ for http site and ‘tcp’ for https sitebalance <value> # Type of load balancing like ‘source’, ’roundrobin’ etc.
Step 3 – Start HAProxy Service
Start HAProxy service using the following command, also configure it to auto-start on system boot.
systemctl start haproxy
systemctl enable haproxy
And You have done it.
Congratulation’s! you have successfully configured HAProxy load balancer. Read next article to enable haproxy stats and setup ACL in HAProxy.
For more configuration details check below url. http://haproxy.1wt.eu/download/1.4/doc/configuration.txt


21 Comments
Hi Rahul,
I have installed haproxy as root and created a non root user lbAdmin in my rhel 7.6
I am planning to give permission to lbAdmin user to configure haproxy.cfg in /etc/haproxy and also start and stop haproxy service.
please provide steps to configure haproxy for a particular non root user
ha proxy is not listening in any port for me. How to confirm its listening.
My Conf:
#———————————————————————
# Example configuration for a possible web application. See the
# full configuration options online.
#
# http://haproxy.1wt.eu/download/1.4/doc/configuration.txt
#
#———————————————————————
#———————————————————————
# Global settings
#———————————————————————
global
# to have these messages end up in /var/log/haproxy.log you will
# need to:
#
# 1) configure syslog to accept network log events. This is done
# by adding the ‘-r’ option to the SYSLOGD_OPTIONS in
# /etc/sysconfig/syslog
#
# 2) configure local2 events to go to the /var/log/haproxy.log
# file. A line like the following can be added to
# /etc/sysconfig/syslog
#
# local2.* /var/log/haproxy.log
#
log 127.0.0.1 local2
chroot /var/lib/haproxy
pidfile /var/run/haproxy.pid
maxconn 4000
user haproxy
group haproxy
daemon
# turn on stats unix socket
stats socket /var/lib/haproxy/stats
#———————————————————————
# common defaults that all the ‘listen’ and ‘backend’ sections will
# use if not designated in their block
#———————————————————————
defaults
mode http
log global
option httplog
option dontlognull
option http-server-close
option forwardfor except 127.0.0.0/8
option redispatch
retries 3
timeout http-request 10s
timeout queue 1m
timeout connect 10s
timeout client 1m
timeout server 1m
timeout http-keep-alive 10s
timeout check 10s
maxconn 3000
#———————————————————————
# main frontend which proxys to the backends
#———————————————————————
frontend main *:5000
acl url_static path_beg -i /static /images /javascript /stylesheets
acl url_static path_end -i .jpg .gif .png .css .js
use_backend static if url_static
default_backend app
#———————————————————————
# static backend for serving up images, stylesheets and such
#———————————————————————
backend static
balance roundrobin
server static 127.0.0.1:4331 check
#———————————————————————
# round robin balancing between the various backends
#———————————————————————
backend app
balance roundrobin
server app1 127.0.0.1:5001 check
server app2 127.0.0.1:5002 check
server app3 127.0.0.1:5003 check
server app4 127.0.0.1:5004 check
frontend rserve_frontend
bind *:81
mode tcp
option tcplog
timeout client 1m
default_backend rserve_backend
backend rserve_backend
mode tcp
option tcplog
option log-health-checks
option redispatch
log global
balance roundrobin
timeout connect 10s
timeout server 1m
server rserve1 127.0.0.1:7000 check
server rserve2 127.0.0.1:7001 check
Is there any document available to install HA-Proxy 1.8 on Centos 7 ?
My haproxy not starting
Hi Rohit,
What is the error?
unable to access application through 443 port
global
log 127.0.0.1 local0 notice
maxconn 50000
daemon
defaults
log global
mode http
option httplog
option dontlognull
contimeout 120000
clitimeout 120000
srvtimeout 120000
option forwardfor
option http-server-close
# Configuration for HTTP site
frontend http-in
bind *:80
acl is_oems url_beg /oems
use_backend http_oems if is_oems
default_backend http_back
backend http_oems
mode http
balance roundrobin # Load Balancing algorithm
option httpchk
option forwardfor
server WEB2 192.168.40.61:443 weight 1 maxconn 512 check
server WEB1 192.168.40.60:443 weight 1 maxconn 512 check
backend http_back
mode http
balance roundrobin # Load Balancing algorithm
option httpchk
option forwardfor
server WEB2 192.168.40.61:8080 weight 1 maxconn 512 check
server WEB1 192.168.40.60:8080 weight 1 maxconn 512 check
Hi Rohit, It looks you have not used the configuration shown in the tutorial. To access the site with https required “mode tcp“. Please check step 2 in the tutorial.
after using your configuration i am getting this error in haproxy service
[root@cloud032 ~]# systemctl status haproxy.service
● haproxy.service – SYSV: HA-Proxy is a TCP/HTTP reverse proxy which is particularly suited for high availability environments.
Loaded: loaded (/etc/rc.d/init.d/haproxy; bad; vendor preset: disabled)
Active: failed (Result: exit-code) since Thu 2017-08-17 15:50:20 IST; 51s ago
Docs: man:systemd-sysv-generator(8)
Process: 23234 ExecStop=/etc/rc.d/init.d/haproxy stop (code=exited, status=0/SUCCESS)
Process: 23223 ExecReload=/etc/rc.d/init.d/haproxy reload (code=exited, status=0/SUCCESS)
Process: 23536 ExecStart=/etc/rc.d/init.d/haproxy start (code=exited, status=1/FAILURE)
Main PID: 20332 (code=exited, status=0/SUCCESS)
Aug 17 15:50:20 cloud032 haproxy[23536]: [ALERT] 228/155020 (23540) : parsing [/etc/haproxy/haproxy.cfg:23] : ‘listen’ cannot han…5:443′.
Aug 17 15:50:20 cloud032 haproxy[23536]: [ALERT] 228/155020 (23540) : parsing [/etc/haproxy/haproxy.cfg:23] : please use the ‘bin…resses.
Aug 17 15:50:20 cloud032 haproxy[23536]: [ALERT] 228/155020 (23540) : parsing [/etc/haproxy/haproxy.cfg:26] : ‘reqadd’ : Expectin…’http’.
Aug 17 15:50:20 cloud032 haproxy[23536]: [ALERT] 228/155020 (23540) : Error(s) found in configuration file : /etc/haproxy/haproxy.cfg
Aug 17 15:50:20 cloud032 haproxy[23536]: [ALERT] 228/155020 (23540) : Fatal errors found in configuration.
Aug 17 15:50:20 cloud032 haproxy[23536]: Errors found in configuration file, check it with ‘haproxy check’.
Aug 17 15:50:20 cloud032 systemd[1]: haproxy.service: control process exited, code=exited status=1
Aug 17 15:50:20 cloud032 systemd[1]: Failed to start SYSV: HA-Proxy is a TCP/HTTP reverse proxy which is particularly suited for…nments..
Aug 17 15:50:20 cloud032 systemd[1]: Unit haproxy.service entered failed state.
Aug 17 15:50:20 cloud032 systemd[1]: haproxy.service failed.
Hint: Some lines were ellipsized, use -l to show in full.
My Question to you plz answer this
1. I am using CENTos7 through VMWare
2. I have a single private IP which is generated/assigned by VMWare
3. I want to create multiple DNS by using this single IP. Is it possible ? if possible can you describe how to install and configure this DNS.
4. Is there any alternate way where I can create multiple name server by using single IP address. If it is then plz write the steps
Hope you will answer to my queries
PC Panda
Senior System Administrator
IIIT, Bhubaneswar
Please my below command not working
global
log 127.0.0.1 local0 notice
maxconn 50000
daemon
defaults
log global
mode http
option httplog
option dontlognull
contimeout 120000
clitimeout 120000
srvtimeout 120000
option forwardfor
option http-server-close
# Configuration for HTTP site
frontend http-in
bind *:80
acl is_oems url_beg /oems
use_backend http_oems if is_oems
default_backend http_back
backend http_oems
mode http
balance roundrobin # Load Balancing algorithm
option httpchk
option forwardfor
server WEB2 192.168.40.61:443 weight 1 maxconn 512 check
server WEB1 192.168.40.60:443 weight 1 maxconn 512 check
backend http_back
mode http
balance roundrobin # Load Balancing algorithm
option httpchk
option forwardfor
server WEB2 192.168.40.61:8080 weight 1 maxconn 512 check
server WEB1 192.168.40.60:8080 weight 1 maxconn 512 check
Hi,
How to make ha proxy route the traffic if the URL has paths after ‘/’ ? My web app URL is like this http://abc.com:8080/xyz. In my front-end settings I have used ‘path_beg’ to identify ‘/xyz’ but couldn’t set something similar in the back-end settings. Any thoughts ?
Can this solution be used to support failover for non-http processes? All we want to achieve is an automatic failover from host_a to host_b if there is a problem with host_a. A very simplistic failover. The app uses a network drive to store its configuration files ,etc. so the host_b can take over with minimal disruption (users can wait upto a minute or so , but the transition needs to be automatic). I was thinking of using a virtual IP address configured on both hosts and a simple script to start the app on host_b when host_a is down. Any ideas?
Thanks in Advance.
Hi,
If you are thinking about that you add 2 hosts but only one host serve requests continuously and second host keep as spare. In any case first host goes down, then second take place of them.
This you can do by adding host_a as active and host_b as backup. Configuration looks like below
listen http_web 192.168.10.10:80
mode http
balance source
option httpchk
option forwardfor
server host_a 192.168.10.100:80 weight 1 maxconn 512 check
server host_b 192.168.10.101:80 weight 1 maxconn 512 check backup
Also you can use this configuration for non http requests.
How would you configure this, if you need the ability to failover from A to B, then after repairing A, A should then become the backup for B.
To put this a different way, A is primary, and B is failover. But, after failing over to B, B then becomes primary, and A then becomes failover.
How would you configure this, if you need the ability to failover from A to B, then after repairing A, A should then become the backup for B.
To put this a different way, A is primary, and B is failover. But, after failing over to B, B then becomes primary, and A then becomes failover.
Also, this load balancer is not using http.
It will only ever use TCP, for HL7 messaging.
easy to follow explanation. thanks
how to configure haproxy explanation of this?
server server1 192.168.10.100:443 weight 1 maxconn 512 check
server server2 192.168.10.101:443 weight 1 maxconn 512 check
thanks..
HaProxy seems to be not available on EPEL for RHEL6/CentOS6.
It is no longer on EPEL. haproxy was moved to the base load for RHEL/CentOS 6.4 and above. You will find it in the base repo, or on your DVD if you have 6.4 or later.
Very nice blog, Simple and precise..
Whoa! This blog looks just like my old one!
It’s on a completely different topic but it has pretty much the same page layout and design. Outstanding choice of colors!