Apache Kafka is a distributed streaming platform. It is useful for building real-time streaming data pipelines to get data between the systems or applications. Another useful feature is real-time streaming applications that can transform streams of data or react on a stream of data.
This tutorial will help you to install Apache Kafka CentOS 8 or RHEL 8 Linux systems.
Prerequisites
- The newly installed system’s recommended to follow initial server setup.
- Shell access to the CentOS 8 system with sudo privileges account.
Step 1 – Install Java
You must have Java installed on your system to run Apache Kafka. You can install OpenJDK on your machine by executing the following command. Also, install some other required tools.
sudo dnf install java-11-openjdk wget vim
Step 2 – Download Apache Kafka
Download the Apache Kafka binary files from its official download website. You can also select any nearby mirror to download.
wget https://dlcdn.apache.org/kafka/3.2.0/kafka_2.13-3.2.0.tgz
Then extract the archive file
tar xzf kafka_2.13-3.2.0.tgzsudo mv kafka_2.13-3.2.0 /usr/local/kafka
Step 3 – Setup Kafka Systemd Unit Files
CentOS 8 uses systemd to manage its services state. So we need to create systemd unit files for the Zookeeper and Kafka service. Which helps us to manage Kafka services to start/stop.
First, create systemd unit file for Zookeeper with below command:
vim /etc/systemd/system/zookeeper.service
Add below contnet:
[Unit]
Description=Apache Zookeeper server
Documentation=http://zookeeper.apache.org
Requires=network.target remote-fs.target
After=network.target remote-fs.target

[Service]
Type=simple
ExecStart=/usr/bin/bash /usr/local/kafka/bin/zookeeper-server-start.sh /usr/local/kafka/config/zookeeper.properties
ExecStop=/usr/bin/bash /usr/local/kafka/bin/zookeeper-server-stop.sh
Restart=on-abnormal

[Install]
WantedBy=multi-user.target
Save the file and close it.
Next, to create a Kafka systemd unit file using the following command:
vim /etc/systemd/system/kafka.service
Add the below content. Make sure to set the correct JAVA_HOME path as per the Java installed on your system.
[Unit]
Description=Apache Kafka Server
Documentation=http://kafka.apache.org/documentation.html
Requires=zookeeper.service

[Service]
Type=simple
Environment="JAVA_HOME=/usr/lib/jvm/jre-11-openjdk"
ExecStart=/usr/bin/bash /usr/local/kafka/bin/kafka-server-start.sh /usr/local/kafka/config/server.properties
ExecStop=/usr/bin/bash /usr/local/kafka/bin/kafka-server-stop.sh

[Install]
WantedBy=multi-user.target
Save the file and close it.
Reload the systemd daemon to apply changes.
systemctl daemon-reload
Step 4 – Start Kafka Server
Kafka required ZooKeeper so first, start a ZooKeeper server on your system. You can use the script available with Kafka to get start a single-node ZooKeeper instance.
sudo systemctl start zookeeper
Now start the Kafka server and view the running status:
sudo systemctl start kafka
sudo systemctl status kafka
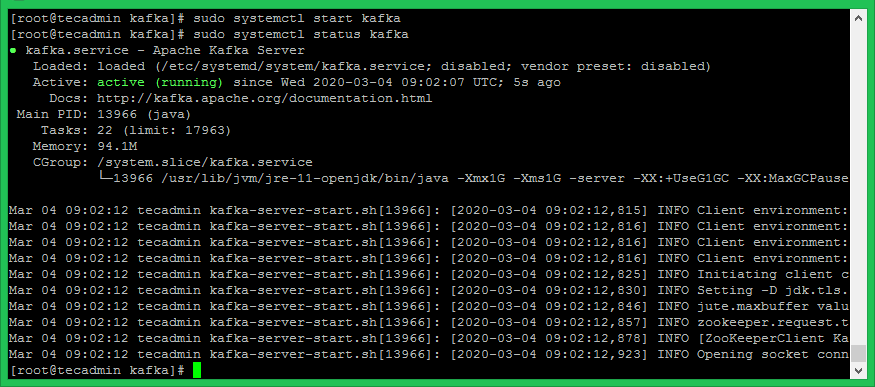
All done. You have successfully installed Kafka on your CentOS 8. The next part of this tutorial will help you to create topics in the Kafka cluster and work with the Kafka producer and consumer service.
Step 5 – Creating Topics in Apache Kafka
Apache Kafka provides multiple shell script to work on it. First, create a topic named “testTopic” with a single partition with single replica:
cd /usr/local/kafka
bin/kafka-topics.sh --create --bootstrap-server localhost:9092 --replication-factor 1 --partitions 1 --topic testTopic

Created topic testTopic.
The replication-factor describes how many copies of data will be created. As we are running with a single instance keep this value 1.
Set the partitions options as the number of brokers you want your data to be split between. As we are running with a single broker keep this value 1.
You can create multiple topics by running the same command as above. After that, you can see the created topics on Kafka by the running below command:
bin/kafka-topics.sh --list --zookeeper localhost:9092

testTopic
KafkaonCentOS8
TutorialKafkaInstallCentOS8
Alternatively, instead of manually creating topics you can also configure your brokers to auto-create topics when a non-existent topic is published to.
Step 6 – Apache Kafka Producer and Consumer
The “producer” is the process responsible for put data into our Kafka. The Kafka comes with a command-line client that will take input from a file or from standard input and send it out as messages to the Kafka cluster. The default Kafka sends each line as a separate message.
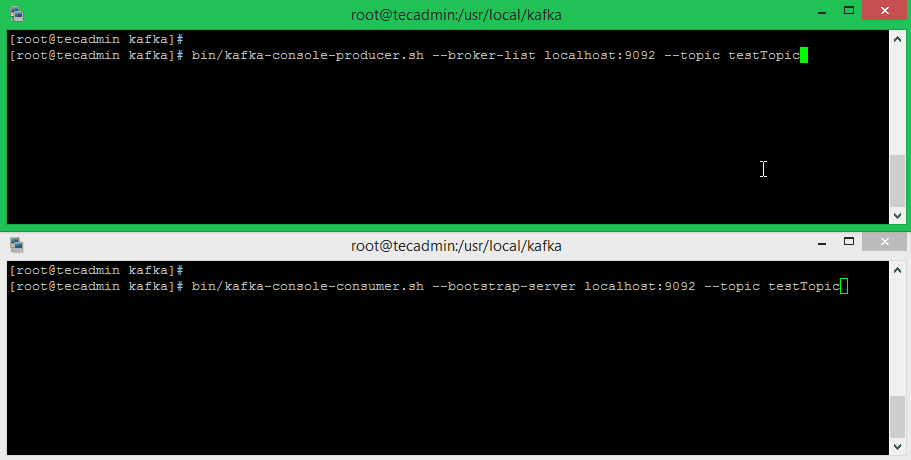
Let’s run the producer and then type a few messages into the console to send to the server.
bin/kafka-console-producer.sh --broker-list localhost:9092 --topic testTopic

>Welcome to kafka
>This is my first topic
>
Now open a new terminal to run the Apache Kafka consumer process. Kafka also provides and command-line consumer to read data from the Kafka cluster and display messages to the standard output.
bin/kafka-console-consumer.sh --bootstrap-server localhost:9092 --topic testTopic --from-beginning

Welcome to kafka
This is my first topic
The –from-beginning option is used to read messages from the beginning of the selected topic. You can skip this option to read the latest messages only.
For example, Run the Kafka producer and consumer in the separate terminals. Just type some text on that producer terminal. it will immediately visible on the consumer terminal. See the below screenshot of Kafka producer and consumer in working:
Conclusion
You have successfully installed and configured the Kafka service on the CentOS 8 Linux machine.


6 Comments
One thing I want to comment on.
The line
Environment=”JAVA_HOME=/usr/lib/jvm/jre-11-openjdk”
in file /etc/systemd/system/zookeeper.service is missing which causing a fail start.
How can I add one more node ?
Thanks – very good article. Typically, I would also like to do the following before I use kafka, and I am sharing these so anyone continuing from here has a list to start off with.
1. Get kafka to run as OS User ‘kafka’ with OS Group ‘kafka’ (a user other than root)
2. Tune ulimit for kafka user to support a large file descriptor count (Partitions and replicas can use too many of these)
3. Make Kafka use a specific JDK (there could be many installed)
4. Set higher heap size for the JVM
5. Configure zookeeper and kafka to use a different directory for dataDir
6. Create a 3 Node cluster with separate broker ids using 3 separate VMs
7. Tune info/error log rotation aspects so we don’t fill disks
8. Enable kafka and zookeeper service to start at boot (using systemctl)
On my fresh Centos 8, I needed to add /usr/bin/bash prefix to all of the systemd scripts, otherwise I got a 203 EXEC error. Like so:
ExecStart=/usr/bin/bash /usr/local/kafka/bin/kafka-server-start.sh /usr/local/kafka/config/server.properties
ExecStop=/usr/bin/bash /usr/local/kafka/bin/kafka-server-stop.sh
May be helpful to update this post if other’s face the same issue.
Thanks Alex! I wonder how much time it takes for the author update the article 🙂
Hi Alex,
Thanks for your reminder. Took 10 seconds to update article 🙂