
Dovecot is an open-source service for IMAP and POP3 on Unix-like operating systems. It focused on lightweight and secure mail server available for most of the Linux operating system.
POP3 (Post Office Protocol 3) and IMAP (Internet Message Access Protocol) both are protocols works as message accessing agent. These protocols are used to the fetch email message from user inbox on mail servers. In simple words, POP3 and IMAP are responsible to fetch messages from mailboxes and show you on your mobile device or web interface.
This tutorial will help you to install and configure Dovecot service on Debian 10 system.
Prerequisites
- A running Debian 10 system
- Pre-configured mail server and user Mailboxes
- Shell access with root or sudo privileged account
Step 1 – Install Dovecot on Debian
Debian based systems have separate packages of Dovecot for IMAP and POP3 protocols. To install Dovecot server with the POP3 and IMAP functions support, run the following command:
sudo apt install dovecot-imapd dovecot-pop3d
You can also install various Dovecot modules like, MySQL and PostgreSQL database support, mail filtering, full text search, spam filter training and ldap directory. To install additional modules run:
sudo apt install dovecot-sieve dovecot-solr dovecot-antispam
Step 2 – Dovecot Basic Settings
Once the installation finished, configure Dovecot server as per your requirements. Here is the quick and useful configuration of Dovecot to work on your system.
- Enable Protocols: By default Dovecot has enabled POP3 and IMAP protocols in main configuration file. You can edit main configuration file and see:
sudo nano /etc/dovecot/dovecot.conf
!include_try /usr/share/dovecot/protocols.d/*.protocol
- Listen Interface: By default Dovecot listen on all interfaces including IPV6. But if you need to restrict them to specific interface edit:
sudo nano /etc/dovecot/dovecot.conf
listen = *, ::
Change “*” with the interface IP like “192.168.1.10”
- Authentication: Then edit the authentication file for Dovecot and update following values.
sudo nano /etc/dovecot/conf.d/10-auth.conf
disable_plaintext_auth = no
auth_mechanisms = plain login
- Setup Mailbox Directory: After that, edit mail configuration file to configure location of the Mailbox. Make sure to set this to correct location where your email server is configure to save users emails.
sudo nano /etc/dovecot/conf.d/10-mail.conf
mail_location = maildir:~/Maildir
- Setup User: Next, edit below configuration file and set the username and group name of the mail server is running with.
sudo nano /etc/dovecot/conf.d/10-master.conf
unix_listener /var/spool/postfix/private/auth { mode = 0666 user = postfix group = postfix } - Setup SSL: It is an good idea to enable SSL for the Dovecot. Edit file and set SSL to yes or required. By default it uses self singed certificate, if you have your own certificates update them as followings.
sudo nano /etc/dovecot/conf.d/10-ssl.conf
ssl = yes

ssl_cert =
Step 3 - Manage Dovecot Service
We can manage dovecot using systemctl command line tool. Use the following command to enable Dovecot service.
sudo systemctl enable dovecot.service
Use the following commands to start/stop or restart Dovecot service:
sudo systemctl start dovecot.service
sudo systemctl stop dovecot.service
Use the below command to view the current status of the service
sudo systemctl status dovecot.service
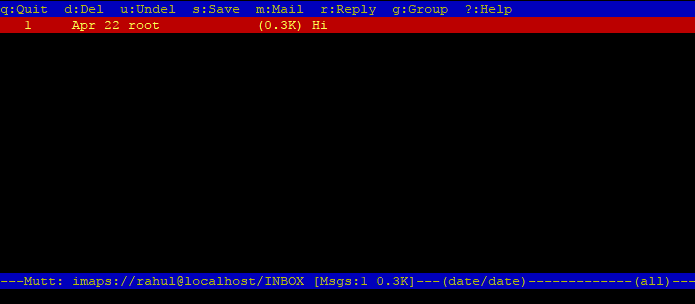
Step 4 - Test Mailbox Connection
To test this setup, I have created an account with name "rahul" on my Debian system. The mbox setting on Postfix server is configured to ~/Maildir directory.
Next, you need mutt command line utility to connect mailbox using imaps protocol.
sudo apt install mutt
Then connect to mailbox using below command:
mutt -f imaps://rahul@localhost
This will prompt to accept certificate (Press a for accept always). After that it will prompt for the password. Enter user password and press enter. You will see the emails of your account.
Step 5 - Adjust FirewallD Rules
For the systems running with firewalld need to allow following ports to allow access from network. Below is the list of port used by the POP3 and IMAP protocols:
- IMAP - 143
- IMAPS - 993
- POP3 - 110
- POP3S - 995
To add the firewall rules, execute the following commands:
sudo firewall-cmd --add-service={pop3,imap} --permanent
sudo firewall-cmd --add-service={pop3s,imaps} --permanent
Then reload the changes.
sudo firewall-cmd --reload
Conclusion
In this tutorial, you have learned to install and configure Dovecot server on Debian 10 system. You have configured your server to access user mailbox via POP3 or IMAP protocols.


2 Comments
BTW in your comment form, the giant SUBMIT button covers the CAPTCHA.
This is really interesting. I’m able to connect from the local machine with imap, but when I connect from home with Thunderbird it fails to authenticate. Any clues to how to turn on more debug logging so I can find out why it doesn’t authenticate? Hard to believe the current Thunderbird is broken.