Dovecot is an open-source IMAP and POP3 email server that is widely used for its reliability, scalability, and ease of use. POP3 (Post Office Protocol 3) and IMAP (Internet Message Access Protocol) both are protocols works as message accessing agent. These protocols are used to fetch email messages from user inboxes on mail servers. In simple words, POP3 and IMAP are responsible to fetch messages from mailboxes and show them on your mobile device or web interface.
In this article, we will guide you through the process of installing and configuring Dovecot on Ubuntu systems.
Prerequisites
- A running Ubuntu system
- Pre-configured mail server and user Mailboxes
- Shell access with root or sudo privileged account
Step 1: Install Dovecot on Ubuntu
Debian-based systems have separate packages of Dovecot for IMAP and POP3 protocols. To install Dovecot server with the POP3 and IMAP functions support, run the following command:
sudo apt updatesudo apt install dovecot-imapd dovecot-pop3d
This will install the core components of Dovecot, along with the IMAP and POP3 protocols. The dovecot-core package provides the core Dovecot server, while the dovecot-imapd and dovecot-pop3d packages provide support for the IMAP and POP3 protocols, respectively.
You can also install various Dovecot modules like MySQL and PostgreSQL database support, mail filtering, full-text search, spam filter training, and LDAP directory. To install additional modules run:
sudo apt install dovecot-sieve dovecot-solr dovecot-antispam
Step 2: Configure Dovecot
The default Dovecot configuration file is located at /etc/dovecot/dovecot.conf. Before making any changes to this file, it’s a good idea to create a backup copy. To do this, run the following command:
sudo cp /etc/dovecot/dovecot.conf /etc/dovecot/dovecot.conf.bak
The Dovecot configuration file is quite extensive, so we will focus on some of the most important settings.
- Enable Protocols
By default Dovecot has enabled POP3 and IMAP protocols in main configuration file. You can edit main configuration file and see:
sudo nano /etc/dovecot/dovecot.confUncomment the following entry from configuration file.
1!include_try /usr/share/dovecot/protocols.d/*.protocol - Configure Authentication
One of the first settings you will want to configure is authentication. Dovecot supports a variety of authentication mechanisms, including plain text, CRAM-MD5, and OAuth2. To enable authentication, uncomment the following line in the “/etc/dovecot/dovecot.conf” configuration file:
1!include auth-system.conf.extSave file and close it.
Then edit the authentication file for Dovecot and update following values.
sudo nano /etc/dovecot/conf.d/10-auth.conf12disable_plaintext_auth = noauth_mechanisms = plain login - Listen Interface
By default Dovecot listen on all interfaces including IPV6. But if you need to restrict them to specific interface edit:
sudo nano /etc/dovecot/dovecot.conf1listen = *, ::Replace “*” with the interface IP like “192.168.1.10”
- Configure Mailbox Location
By default, Dovecot stores user mailboxes in /var/mail. If you prefer to store mailboxes in a different location, you can modify the mail_location setting in the configuration file.
sudo nano /etc/dovecot/conf.d/10-mail.confFor example, if you want to store mailboxes in /home/Maildir, you can add the following line to the configuration file:
1mail_location = maildir:~/Maildir - Setup User
Next, edit below configuration file and set the username and group name of the mail server is running with.
sudo nano /etc/dovecot/conf.d/10-master.conf12345unix_listener /var/spool/postfix/private/auth {mode = 0666user = postfixgroup = postfix} - Enable SSL/TLS
To secure email communications, you should enable SSL/TLS encryption. To do this, open the /etc/dovecot/conf.d/10-ssl.conf file and make the following changes:
sudo nano /etc/dovecot/conf.d/10-ssl.conf123ssl = yesssl_cert = </etc/ssl/certs/ssl-cert-snakeoil.pemssl_key = </etc/ssl/private/ssl-cert-snakeoil.keyThese settings enable SSL/TLS encryption and specify the location of the SSL certificate and key files. In this example, we are using the default self-signed certificate that comes with Ubuntu.
Step 3: Start and Enable Dovecot
Once you have finished configuring Dovecot, you can start the Dovecot service using the following command:
sudo systemctl start dovecot
To ensure that Dovecot starts automatically at boot, run the following command:
sudo systemctl enable dovecot
This will enable Dovecot to start automatically whenever the system boots up.
Step 4: Test Configuration
To test whether your Dovecot installation is working correctly, you can use an email client such as Thunderbird or Outlook. You will need to configure your email client to connect to your Dovecot server using the IMAP or POP3 protocol, depending on which one you enabled in the configuration file.
When configuring your email client, be sure to use the correct server hostname and port number. By default, Dovecot listens on port 143 for IMAP and port 110 for POP3. If you enabled SSL/TLS encryption, you will need to use the SSL-enabled ports, which are 993 for IMAP and 995 for POP3.
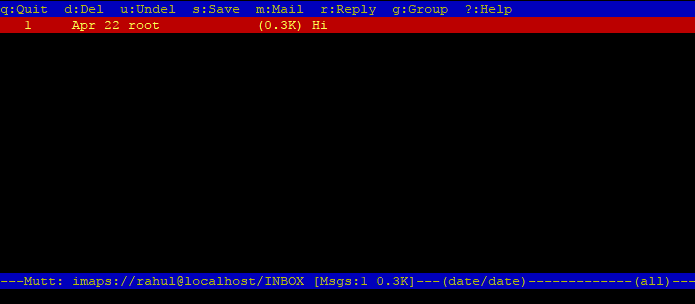
To test this setup, I have created an account with name “rahul” on Ubuntu system. The mbox setting on Postfix server is configured to ~/Maildir directory.
Next, you need a mutt command-line utility to connect the mailbox using IMAP protocol.
sudo apt install mutt
Then connect to mailbox using below command:
mutt -f imaps://rahul@localhost
This will prompt to accept certificate (Press a for accept always). After that, it will prompt for the password. Enter user password and press enter. You will see the emails of your account.
Step 5: Open Ports with FirewallD
For the systems running with firewalld need to allow following ports to allow access from network. Below is the list of port used by the POP3 and IMAP protocols:
- IMAP – 143
- IMAPS – 993
- POP3 – 110
- POP3S – 995
To add the firewall rules, execute the following commands:
sudo firewall-cmd --add-service={pop3,imap} --permanentsudo firewall-cmd --add-service={pop3s,imaps} --permanent
Then reload the changes.
sudo firewall-cmd --reload
Conclusion
In this article, we have shown you how to install and configure Dovecot on Ubuntu. By following these steps, you should now have a fully functional email server that supports both the IMAP and POP3 protocols and provides SSL/TLS encryption for secure communication. Dovecot is a powerful and flexible email server that can be customized to meet the needs of almost any organization, so feel free to experiment with the settings to find the configuration that works best for you.


1 Comment
What’s this code all about
unix_listener /var/spool/postfix/private/auth {
mode = 0666
user = postfix
group = postfix
}
and why is there an error thrown at the mode line ?
There’s no explanation at all of how to put email for each Postfix address into separate mailboxes and then connect to each mailbox from a local mail client like Outlook or Thunderbird.