
Hadoop is a free, open-source, and Java-based software framework used for the storage and processing of large datasets on clusters of machines. It uses HDFS to store its data and process these data using MapReduce. It is an ecosystem of Big Data tools that are primarily used for data mining and machine learning.
Apache Hadoop 3.3 comes with noticeable improvements and many bug fixes over the previous releases. It has four major components such as Hadoop Common, HDFS, YARN, and MapReduce.
This tutorial will explain you to how to install and configure Apache Hadoop on Ubuntu 20.04 LTS Linux system.


Step 1 – Installing Java
Hadoop is written in Java and supports only Java version 8. Hadoop version 3.3 and the latest also support Java 11 runtime as well as Java 8.
You can install OpenJDK 11 from the default apt repositories:
sudo apt updatesudo apt install openjdk-11-jdk
Once installed, verify the installed version of Java with the following command:
java -version
You should get the following output:
openjdk version "11.0.11" 2021-04-20
OpenJDK Runtime Environment (build 11.0.11+9-Ubuntu-0ubuntu2.20.04)
OpenJDK 64-Bit Server VM (build 11.0.11+9-Ubuntu-0ubuntu2.20.04, mixed mode, sharing)
Step 2 – Create a Hadoop User
It is a good idea to create a separate user to run Hadoop for security reasons.
Run the following command to create a new user with name hadoop:
sudo adduser hadoop
Provide and confirm the new password as shown below:
Adding user `hadoop' ...
Adding new group `hadoop' (1002) ...
Adding new user `hadoop' (1002) with group `hadoop' ...
Creating home directory `/home/hadoop' ...
Copying files from `/etc/skel' ...
New password:
Retype new password:
passwd: password updated successfully
Changing the user information for hadoop
Enter the new value, or press ENTER for the default
        Full Name []:
        Room Number []:
        Work Phone []:
        Home Phone []:
        Other []:
Is the information correct? [Y/n] y
Step 3 – Configure SSH Key-based Authentication
Next, you will need to configure passwordless SSH authentication for the local system.
First, change the user to hadoop with the following command:
su - hadoop
Next, run the following command to generate Public and Private Key Pairs:
ssh-keygen -t rsa
You will be asked to enter the filename. Just press Enter to complete the process:
Generating public/private rsa key pair.
Enter file in which to save the key (/home/hadoop/.ssh/id_rsa):
Created directory '/home/hadoop/.ssh'.
Enter passphrase (empty for no passphrase):
Enter same passphrase again:
Your identification has been saved in /home/hadoop/.ssh/id_rsa
Your public key has been saved in /home/hadoop/.ssh/id_rsa.pub
The key fingerprint is:
SHA256:QSa2syeISwP0hD+UXxxi0j9MSOrjKDGIbkfbM3ejyIk hadoop@ubuntu20
The key's randomart image is:
+---[RSA 3072]----+
| ..o++=.+        |
|..oo++.O         |
|. oo. B .        |
|o..+ o * .       |
|= ++o o S        |
|.++o+  o         |
|.+.+ + . o       |
|o . o * o .      |
|   E + .         |
+----[SHA256]-----+
Next, append the generated public keys from id_rsa.pub to authorized_keys and set proper permission:
cat ~/.ssh/id_rsa.pub >> ~/.ssh/authorized_keyschmod 640 ~/.ssh/authorized_keys
Next, verify the passwordless SSH authentication with the following command:
ssh localhost
You will be asked to authenticate hosts by adding RSA keys to known hosts. Type yes and hit Enter to authenticate the localhost:
The authenticity of host 'localhost (127.0.0.1)' can't be established.
ECDSA key fingerprint is SHA256:JFqDVbM3zTPhUPgD5oMJ4ClviH6tzIRZ2GD3BdNqGMQ.
Are you sure you want to continue connecting (yes/no/[fingerprint])? yes
Step 4 – Installing Hadoop
First, change the user to hadoop with the following command:
su - hadoop
Next, download the latest version of Hadoop using the wget command:
wget https://downloads.apache.org/hadoop/common/hadoop-3.3.0/hadoop-3.3.0.tar.gz
Once downloaded, extract the downloaded file:
tar -xvzf hadoop-3.3.0.tar.gz
Next, rename the extracted directory to hadoop:
mv hadoop-3.3.0 hadoop
Next, you will need to configure Hadoop and Java Environment Variables on your system.
Open the ~/.bashrc file in your favorite text editor:
nano ~/.bashrc
Append the below lines to file. You can find JAVA_HOME location by running dirname $(dirname $(readlink -f $(which java))) command on terminal.
export JAVA_HOME=/usr/lib/jvm/java-11-openjdk-amd64
export HADOOP_HOME=/home/hadoop/hadoop
export HADOOP_INSTALL=$HADOOP_HOME
export HADOOP_MAPRED_HOME=$HADOOP_HOME
export HADOOP_COMMON_HOME=$HADOOP_HOME
export HADOOP_HDFS_HOME=$HADOOP_HOME
export HADOOP_YARN_HOME=$HADOOP_HOME
export HADOOP_COMMON_LIB_NATIVE_DIR=$HADOOP_HOME/lib/native
export PATH=$PATH:$HADOOP_HOME/sbin:$HADOOP_HOME/bin
export HADOOP_OPTS="-Djava.library.path=$HADOOP_HOME/lib/native"
Save and close the file. Then, activate the environment variables with the following command:
source ~/.bashrc
Next, open the Hadoop environment variable file:
nano $HADOOP_HOME/etc/hadoop/hadoop-env.sh
Again set the JAVA_HOME in the Hadoop environment.
export JAVA_HOME=/usr/lib/jvm/java-11-openjdk-amd64
Save and close the file when you are finished.
Step 5 – Configuring Hadoop
First, you will need to create the namenode and datanode directories inside Hadoop home directory:
Run the following command to create both directories:
mkdir -p ~/hadoopdata/hdfs/namenodemkdir -p ~/hadoopdata/hdfs/datanode
Next, edit the core-site.xml file and update with your system hostname:
nano $HADOOP_HOME/etc/hadoop/core-site.xml
Change the following name as per your system hostname:
1 2 3 4 5 6 | <configuration> <property> <name>fs.defaultFS</name> <value>hdfs://hadoop.tecadmin.com:9000</value> </property> </configuration> |
Save and close the file. Then, edit the hdfs-site.xml file:
nano $HADOOP_HOME/etc/hadoop/hdfs-site.xml
Change the NameNode and DataNode directory path as shown below:
1 2 3 4 5 6 7 8 9 10 11 12 13 14 15 16 17 | <configuration> <property> <name>dfs.replication</name> <value>1</value> </property> <property> <name>dfs.name.dir</name> <value>file:///home/hadoop/hadoopdata/hdfs/namenode</value> </property> <property> <name>dfs.data.dir</name> <value>file:///home/hadoop/hadoopdata/hdfs/datanode</value> </property> </configuration> |
Save and close the file. Then, edit the mapred-site.xml file:
nano $HADOOP_HOME/etc/hadoop/mapred-site.xml
Make the following changes:
1 2 3 4 5 6 | <configuration> <property> <name>mapreduce.framework.name</name> <value>yarn</value> </property> </configuration> |
Save and close the file. Then, edit the yarn-site.xml file:
nano $HADOOP_HOME/etc/hadoop/yarn-site.xml
Make the following changes:
1 2 3 4 5 6 | <configuration> <property> <name>yarn.nodemanager.aux-services</name> <value>mapreduce_shuffle</value> </property> </configuration> |
Save and close the file when you are finished.
Step 6 – Start Hadoop Cluster
Before starting the Hadoop cluster. You will need to format the Namenode as a hadoop user.
Run the following command to format the Hadoop Namenode:
hdfs namenode -format
You should get the following output:
2020-11-23 10:31:51,318 INFO namenode.NNStorageRetentionManager: Going to retain 1 images with txid >= 0
2020-11-23 10:31:51,323 INFO namenode.FSImage: FSImageSaver clean checkpoint: txid=0 when meet shutdown.
2020-11-23 10:31:51,323 INFO namenode.NameNode: SHUTDOWN_MSG:
/************************************************************
SHUTDOWN_MSG: Shutting down NameNode at hadoop.tecadmin.net/127.0.1.1
************************************************************/
After formatting the Namenode, run the following command to start the Hadoop cluster:
start-dfs.sh
Once the HDFS started successfully, you should get the following output:
Starting namenodes on [hadoop.tecadmin.com]
hadoop.tecadmin.com: Warning: Permanently added 'hadoop.tecadmin.com,fe80::200:2dff:fe3a:26ca%eth0' (ECDSA) to the list of known hosts.
Starting datanodes
Starting secondary namenodes [hadoop.tecadmin.com]
Next, start the YARN service as shown below:
start-yarn.sh
You should get the following output:
Starting resourcemanager
Starting nodemanagers
You can now check the status of all Hadoop services using the jps command:
jps
You should see all the running services in the following output:
18194 NameNode
18822 NodeManager
17911 SecondaryNameNode
17720 DataNode
18669 ResourceManager
19151 Jps
Step 7 – Adjust Firewall
Hadoop is now starting and listening on ports 9870 and 8088. Next, you will need to allow these ports through the firewall.
Run the following command to allow Hadoop connections through the firewall:
firewall-cmd --permanent --add-port=9870/tcpfirewall-cmd --permanent --add-port=8088/tcp
Next, reload the firewalld service to apply the changes:
firewall-cmd --reload
Step 8 – Access Hadoop Namenode and Resource Manager
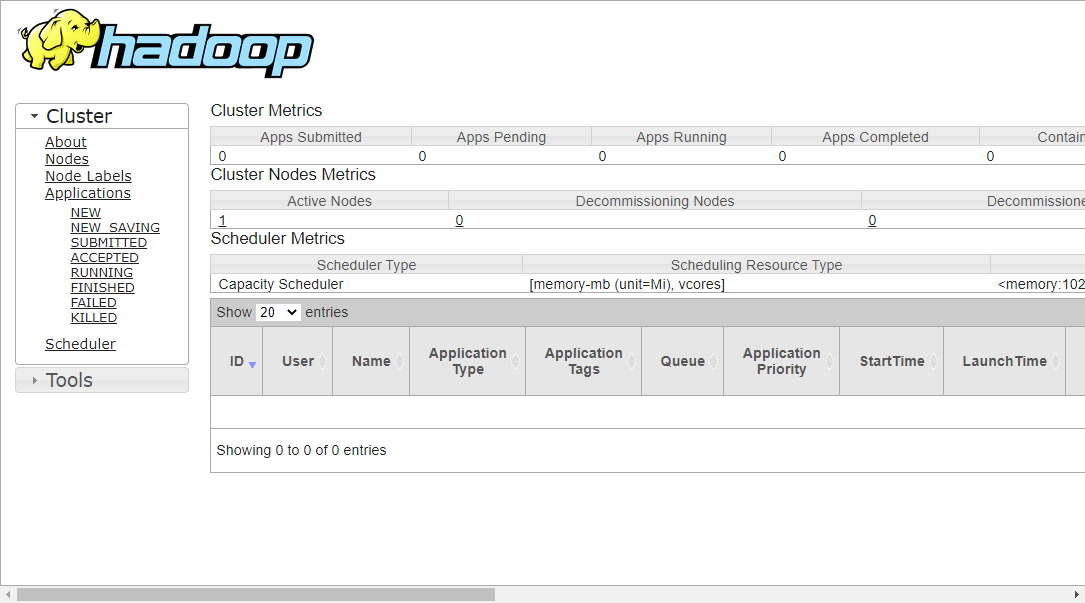
To access the Namenode, open your web browser and visit the URL http://your-server-ip:9870. You should see the following screen:
http://hadoop.tecadmin.net:9870

To access Resource Manage, open your web browser and visit the URL http://your-server-ip:8088. You should see the following screen:
http://hadoop.tecadmin.net:8088
Step 9 – Verify the Hadoop Cluster
At this point, the Hadoop cluster is installed and configured. Next, we will create some directories in the HDFS filesystem to test the Hadoop.
Let’s create some directories in the HDFS filesystem using the following command:
hdfs dfs -mkdir /test1hdfs dfs -mkdir /logs
Next, run the following command to list the above directory:
hdfs dfs -ls /
You should get the following output:
Found 3 items
drwxr-xr-x   - hadoop supergroup          0 2020-11-23 10:56 /logs
drwxr-xr-x   - hadoop supergroup          0 2020-11-23 10:51 /test1
Also, put some files to hadoop file system. For the example, putting log files from host machine to hadoop file system.
hdfs dfs -put /var/log/* /logs/
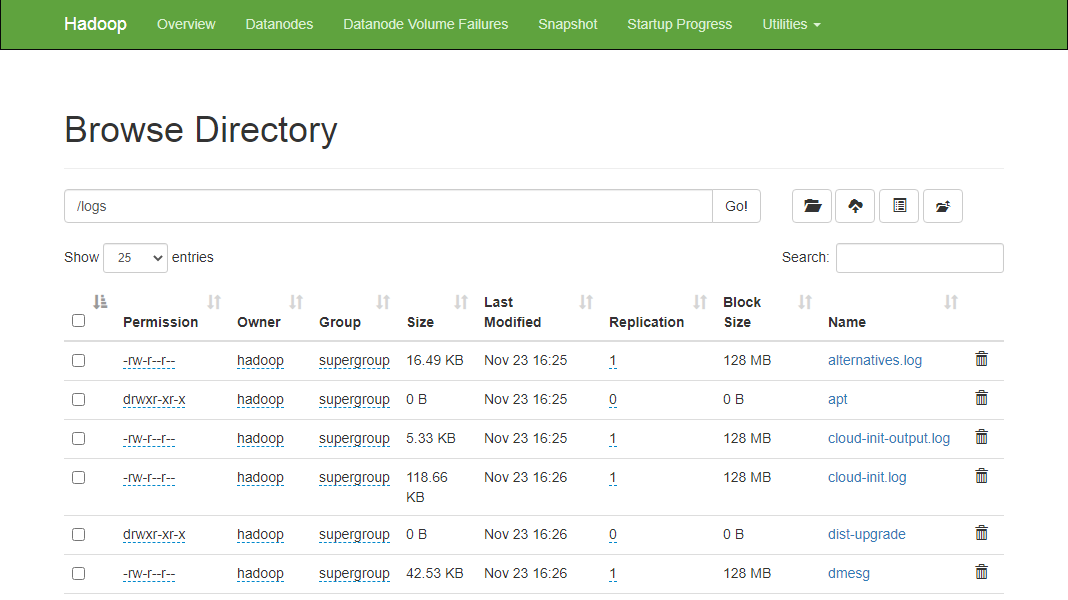
You can also verify the above files and directory in the Hadoop Namenode web interface.
Go to the Namenode web interface, click on the Utilities => Browse the file system. You should see your directories which you have created earlier in the following screen:
http://hadoop.tecadmin.net:9870/explorer.html
Step 10 – Stop Hadoop Cluster
You can also stop the Hadoop Namenode and Yarn service any time by running the stop-dfs.sh and stop-yarn.sh script as a Hadoop user.
To stop the Hadoop Namenode service, run the following command as a hadoop user:
stop-dfs.sh
To stop the Hadoop Resource Manager service, run the following command:
stop-yarn.sh
Conclusion
This tutorial explained to you step-by-step tutorial to install and configure Hadoop on Ubuntu 20.04 Linux system.
9 Comments
Im having a problem that my resourcemanager and nodemanagers show that they start up but donot show in jps. please can you guide me to solve this
Hi sir,
My issue is ,server is not connecting retrying all the time.I don’t know how to solve this .
I need your help.
Great Tutorial saved me alot! Thank yoou
i’m getting this error can you please help!
Starting namenodes on [hadoop.tecadmin.com]
hadoop.tecadmin.com: ssh: connect to host hadoop.tecadmin.com port 22: Connection timed out
Starting datanodes
localhost: ERROR: Cannot set priority of datanode process 17257
Starting secondary namenodes [ankitakrishnan]
Hi Rahul,
I got to this stage:
fs.defaultFS
hdfs://hadoop.tecadmin.com:9000
But I dont know what to replace “hdfs://hadoop.tecadmin.com:9000” with.
Do you mean “hdfs://localhost:9000” or maybe “hdfs://goat-VirtualBox:9000” because “goat-VirtualBox” is my Home folder name.
I’m stuck, any help appreciated, Thanks
Hi Rahul,
I fixed the problem(s) – several mixed issues, not having ssh set up properly, typos in some of the XML files etc. All good now.
Great tutorial, thanks a lot
Giles
fs.default.name
hdfs://127.0.0.1:9000
thank me later
Hello
Would you please help me books or tutorial on Hadoop. I am looking for Hadoop extension so that I have proefficient knowledge of using hadoop.