
In the world of software development and deployment, Java remains a cornerstone technology, powering everything from small-scale applications to large enterprise systems. For those using Amazon Linux, a popular choice in cloud environments for its stability and security, installing Java is a critical first step in setting up a development or production environment.
This guide provides a clear, step-by-step approach to installing Java 21, Java 17, Java 11 and Java 8 on Amazon Linux 2, ensuring you have the necessary runtime environments to compile and run Java applications.
Prerequisites
Before proceeding, ensure you meet the following prerequisites:
- You have an instance of Amazon Linux 2 running.
- You have access to the terminal or command line.
- You have sudo privileges or access to the root user.
Step 1: Setup Yum Repository
Activate the yum repository on Amazon Linux 2. This step is not required for Amazon Linux 2022 and subsequent versions.
sudo amazon-linux-extras enable corretto8
Step 2: Installing Java on Amazon Linux
Java 21, released in September 2023, is a long-term support (LTS) version, making it a preferred choice for applications requiring stability over an extended period. Also some of the applications still require Java 8 due to compatibility reasons. Amazon Linux 2 repositories include OpenJDK 11 as well as OpenJDK 8, an open-source implementation of the Java Platform, Standard Edition.
- To install Java 11, execute the following command:
sudo yum install java-11-amazon-corretto-devel -y - To install Java 21, execute the following command:
sudo yum install java-21-openjdk-devel -y - To install Java 17, execute the following command:
sudo yum install java-17-amazon-corretto-devel -y - To install Java 8, use the following yum command::
ssudo yum install java-1.8.0-amazon-corretto-devel -y
Step 3: Check Active Java Version
After successfully installing Java on Amazon Linux using the above steps, Let’s verify the installed version using the following command.
java -version

openjdk version "11.0.22" 2024-01-16 LTS
OpenJDK Runtime Environment Corretto-11.0.22.7.1 (build 11.0.22+7-LTS)
OpenJDK 64-Bit Server VM Corretto-11.0.22.7.1 (build 11.0.22+7-LTS, mixed mode)
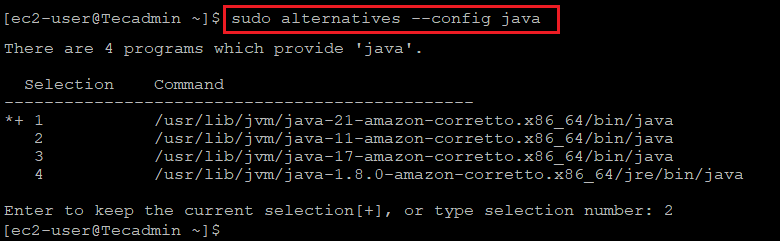
Step 4: Setting the Default Java Version
If you have installed multiple Java versions, you can set the default version using the alternatives system. For example, to set Java 11 as the default, you can use:
sudo alternatives --config java
Follow the on-screen instructions to select the default Java version.

Conclusion
Installing Java on Amazon Linux is a straightforward process that can be completed in just a few steps. Whether you need Java 11 for its long-term support or Java 8 for compatibility with existing applications, following this guide will ensure you have the necessary Java environment set up on your Amazon Linux 2 instance.
13 Comments
Thanks immensely, this has actually helped my team out. We are grateful
permission denied when i tried to run : alternatives –config java
PLEASE BE NOTICED : this installation is not installing JDK8, only JRE is installed !!
whats the command for full jdk?
for java 8:
yum install java-1.8.0-openjdk-devel
not sure with java 11
This was helpful, thank you!
very helpful, thank you very much
It installs Open JRE only and not JDK
javac -version returns nothing
Very helpful, thanks!
Thanks
Gracias
Thank you
This is for amazon linux 2, not amazon linux