Java is the most popular object-oriented, robust, platform-independent programming language. There are multiple applications required for your system that required Java on your system. This guide will help you to install Java (OpenJDK 11 and OpenJDK 8) stable releases or Oracle Java 14 on your Ubuntu 20.04 LTS (Focal Fossa) system. You will also find the instruction’s to switch between multiple installed Java versions.
Install Java on Ubuntu 20.04
Java 11 is the latest LTS release available for installation. The default Ubuntu packages repositories contain the packages for the OpenJDK 11. The default repository also contains OpenJDK 8 previous stable release packages.
The JDK packages provide the full Java development libraries, helpful for the development systems. To run any Java application, you just needed a Java runtime environment (JRE).
1. Install Java 11 on Ubuntu
Run the below command to install OpenJDK 11 package on your system.
sudo apt update
sudo apt install openjdk-11-jdk
Once the installation is complete, you can verify it by checking the Java version:
java -version

openjdk version "11.0.7" 2020-04-14
OpenJDK Runtime Environment (build 11.0.7+10-post-Ubuntu-3ubuntu1)
OpenJDK 64-Bit Server VM (build 11.0.7+10-post-Ubuntu-3ubuntu1, mixed mode, sharing)
OpenJDK 11 has been installed. Continue to install OpenJDK 8.
2. Install Java 8 on Ubuntu
Java 8 is the previous stable release, Most of the java-based applications works on it. Run the below command to install OpenJDK 8 package on your system.
sudo apt update
sudo apt install openjdk-8-jdk
Once the installation is complete, you can verify it by checking the Java version:
java -version

openjdk version "1.8.0_252"
OpenJDK Runtime Environment (build 1.8.0_252-8u252-b09-1ubuntu1-b09)
OpenJDK 64-Bit Server VM (build 25.252-b09, mixed mode)
All done, you have successfully installed Java (OpenJDK) on your Ubuntu system.
3. Install Oracle Java 14
Oracle Java 14 is available to download and install without getting a commercial license. You can visit official download page to download Debian file on your system. Also, you can use the below command to download the Debian file using the command line.
wget --no-cookies --no-check-certificate --header "Cookie: gpw_e24=http%3A%2F%2Fwww.oracle.com%2F; oraclelicense=accept-securebackup-cookie" "https://download.oracle.com/otn-pub/java/jdk/14.0.1+7/664493ef4a6946b186ff29eb326336a2/jdk-14.0.1_linux-x64_bin.deb"
If the above command does not work or you found a file not found error, please go to the official download page. Check for the current version and download it to your system.
Once you download the Debian file, install it on your system using command below:
sudo dpkg -i jdk-14.0.1_linux-x64_bin.deb
The above command installs Oracle Java 14 on your system. All the files will be placed under /usr/lib/jvm directory. Now set an alternative reference to newly installed Java on your system.
update-alternatives --install /usr/bin/java java /usr/lib/jvm/jdk-14.0.1/bin/java 100
Oracle Java 14 has been installed on your Ubuntu system. You can use the next step to switch between multiple Java versions on your system.
Switch Between Multiple Java Versions
Most of the Unix/Linux-based systems allow to the installation of multiple Java versions on one system. If you also have multiple Java versions installed on your system. You can change to the default java version as per your requirements.
The update-alternatives provides you option to maintain symbolic links for the default commands. To change default Java version run command on terminal:
update-alternatives --config java
This will show the list of all java binaries installed on your system. Enter a number to select the default Java version and press enter. See the below screenshot:
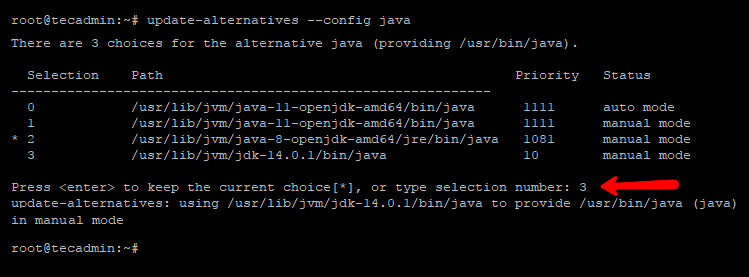
The above command will change the Default Java version on your system by changing the link references to java binary. Now, again run command java -version to view the default Java version.
java -version

java version "14.0.1" 2020-04-14
Java(TM) SE Runtime Environment (build 14.0.1+7)
Java HotSpot(TM) 64-Bit Server VM (build 14.0.1+7, mixed mode, sharing)
Conclusion
In this tutorial, you have learned about the installation of multiple Java on the Ubuntu 20.04 systems. Also found a solution to change the default Java version via the command line.

2 Comments
Thanks so much for this post, it really helped me install multiple jvm. Cheers and keep up the good work
very nice bro