MariaDB ia an enhanced, drop-in replacement for MySQL. MariaDB can be a better choice for choice for database professionals looking for a robust, scalable, and reliable SQL server. MariaDB has a number of updated features over MySQL. Use below links to read features comparison between MariaDB and MySQL

This article will help you to Install MariaDB in Ubuntu 18.04 and 16.04 LTS and Other Systems using the Apt package manager, For older versions use the Apt-get command.
Step 1 – Backup Databases
MariaDB 10.2 has been released with various upgrades and configuration changes than previous releases. So, If you have already run an older MariaDB version, It’s recommended to take all databases backups before upgrading.
You can back up all your databases using the below single command.
mysqldump -u root -p --all-databases > all-db.sql
Step 2 – Add Apt Repository
You can find the MariaDB Apt configuration file from the official website. Import the package singin key for MaraiDB packages on your system.
sudo apt install software-properties-common
sudo apt-key adv --recv-keys --keyserver hkp://keyserver.ubuntu.com:80 0xF1656F24C74CD1D8
After this, create a new Apt configuration file for MariaDB with the following command. You can use any text editor than vim.
sudo vim /etc/apt/sources.list.d/mariadb.list
And add the following values to the configuration file as per your Ubuntu version. To check your Ubuntu system version run ‘lsb-release -a’ command.
For Ubuntu 18.04 “Bionic”
deb [arch=amd64,arm64,ppc64el] http://nyc2.mirrors.digitalocean.com/mariadb/repo/10.4/ubuntu bionic main
deb-src http://nyc2.mirrors.digitalocean.com/mariadb/repo/10.4/ubuntu bionic main
For Ubuntu 16.04 “Xenial”
deb [arch=amd64,arm64,i386,ppc64el] http://nyc2.mirrors.digitalocean.com/mariadb/repo/10.4/ubuntu xenial main
deb-src http://nyc2.mirrors.digitalocean.com/mariadb/repo/10.4/ubuntu xenial main
For Other Ubuntu Versions
For other versions of Ubuntu. Click here to find suitable repository for your system.
Step 3 – Install MariaDB in Ubuntu
After adding the repository to your system and use the following commands to install MariaDB-server on your Ubuntu system. This will remove any previous version of MariaDB packages and install the latest packages on the system. Make sure you have proper backups of databases before running the below commands.
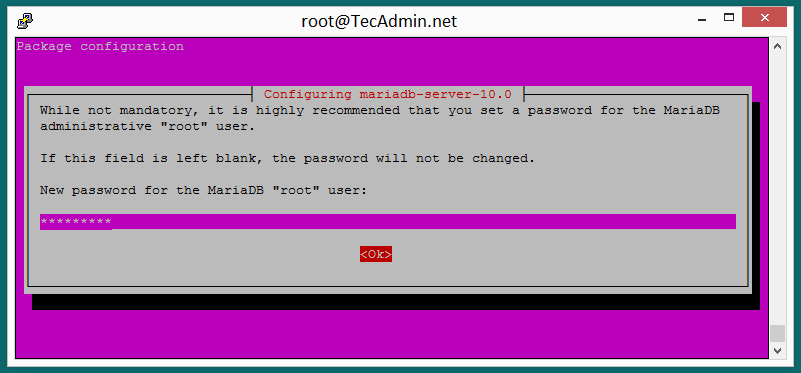
sudo apt update
sudo apt install mariadb-server
While installing MariaDB using the above command installer will prompt for the MariaDB root account password twice like the below snapshot.
Step 4 – Login To MariaDB
After completing installation you can connect to MariaDB using following command. When prompted, use the password entered during installation of MariaDB.
mysql -u root -p

Enter password:
Welcome to the MariaDB monitor.  Commands end with ; or \g.
Your MariaDB connection id is 8
Server version: 10.2.6-MariaDB-10.2.6+maria~xenial mariadb.org binary distribution

Copyright (c) 2000, 2017, Oracle, MariaDB Corporation Ab and others.

Type 'help;' or '\h' for help. Type '\c' to clear the current input statement.

MariaDB [(none)]>
Step 5 – Manage MariaDB Service
Some times we need to stop or start MariaDB service. Use the following commands to stop, start, check status and restart MariaDB servic.
sudo systemctl stop mysql.service      # To Stop MariaDB service
sudo systemctl start mysql.service     # To Start MariaDB service
sudo systemctl status mysql.service    # To Check MariaDB service status
sudo systemctl restart mysql.service   # To Stop then Start MariaDB service
5 Comments
I think this tutorial is great but there is a problem with repository. I think it’s better to use the one from main repo instead of third party like digitalocean.
I download and upgrade the repository but when I tried to install
MariaDB 10.3 the installation was failed. Here is the log (in spanish):
davidl@DM-DAVIDL:~$ sudo apt-get install mariadb-server mariadb-clientLeyendo lista de paquetes… Hecho
Creando árbol de dependencias
Leyendo la información de estado… Hecho
No se pudieron instalar algunos paquetes. Esto puede significar que
usted pidió una situación imposible o, si está usando la distribución
inestable, que algunos paquetes necesarios aún no se han creado o se
han sacado de «Incoming».
La siguiente información puede ayudar a resolver la situación:
Los siguientes paquetes tienen dependencias incumplidas:
mariadb-client : Depende: mariadb-client-10.3 (>= 1:10.3.7+maria~bionic) pero no va a instalarse
mariadb-server : Depende: mariadb-server-10.3 (>= 1:10.3.7+maria~bionic) pero no va a instalarse
E: No se pudieron corregir los problemas, usted ha retenido paquetes rotos.
How can I upgrade MariaDB to 10.3?
Thanks!!
David.
W: Failed to fetch 404 Not Found
repo link is not working , see below error ,
i am running it on ubuntu 12.04 , trying to install mariadb 10.0
W: Failed to fetch 404 Not Found
W: Failed to fetch 404 Not Found
E: Some index files failed to download. They have been ignored, or old ones used instead.
Thanks Rajnish,
We have updated article with latest repository urls.
This doesnt work, the mirrors list you added is out of date. Please update!