MariaDB is an enhanced, drop-in replacement for MySQL database server. It is built by the original developers of MySQL server. MariaDB can be a better choice for database professionals looking for a robust, scalable, and reliable SQL server. MariaDB has a number of updated features over MySQL.
This tutorial describe you to how to install MariaDB server on Debian 10 Linux system.
Step 1 – Prerequsiteis
You can find the MariaDB Apt configuration file from the official website. Import the package singin key for MaraiDB packages on your system.
sudo apt update
sudo aptinstall software-properties-common dirmngr
sudo apt-key adv --recv-keys --keyserver hkp://keyserver.ubuntu.com:80 0xF1656F24C74CD1D8
After this, create a new Apt configuration file for MariaDB with the following command. You can use any text editor than vim.
sudo vim /etc/apt/sources.list.d/mariadb.list
# MariaDB 10.4 for Debain 10
deb [arch=amd64,i386,ppc64el] http://sfo1.mirrors.digitalocean.com/mariadb/repo/10.4/debian buster main
deb-src http://sfo1.mirrors.digitalocean.com/mariadb/repo/10.4/debian buster main
Step 2 – Install MariaDB on Debian 10
After adding the repository to your system and use the following commands to install MariaDB-server on your Ubuntu system. This will remove any previous version of MariaDB packages and install the latest packages on the system. Make sure you have proper backups of databases before running the below commands.
sudo apt update
sudo apt install mariadb-server
This will also install other required dependencies on your system.
While installing MariaDB using above command installer will prompt for MariaDB root account password. Enter a strong password as below.

This will also ask for confirm password. Enter the same as above.
Step 3 – Verify MariaDB Setup
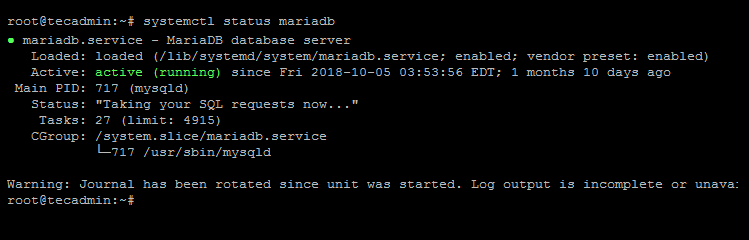
After the successful installation of MariaDB on the Debian 10 (Buster) Linux system. The installer will also start service during the install process. You can verify service by running the below command.
MariaDB also creates a reference for service with name MySQL. You can change MariaDB with MySQL as per your choice.
sudo systemctl status mariadb
You will see the running status like:
Then connect to MariaDB shell by running below command. You need to enter the password configured in the above step.
mysql -u root -p

Enter password:
Welcome to the MariaDB monitor.  Commands end with ; or \g.
Your MariaDB connection id is 8
Server version: 10.4.8-MariaDB-0+deb10u1 Debian 10.1

Copyright (c) 2000, 2017, Oracle, MariaDB Corporation Ab and others.

Type 'help;' or '\h' for help. Type '\c' to clear the current input statement.

MariaDB [(none)]>
Step 4 – Manage MariaDB Service
You can manage MariaDB service using systemd. In order to stop, start, check the status and restart the MariaDB service, use the following commands.
# To Stop MariaDB service
sudo systemctl stop mariadb.service

# To Start MariaDB service
sudo systemctl start mariadb.service

# To Check MariaDB service status
sudo systemctl status mariadb.service

# To Stop then Start MariaDB service
sudo systemctl restart mariadb.service
Conclusion
In this tutorial, you have learned to install MariaDB database server on Debian systems. Next, you may need to install phpMyAdmin to manage MaraiDB using web interface.