Generally, the host manager used a separate server for each PHP version application deployment. Which increases the hosting cost. Some of the host managers are using Docker to run multiple PHP versions on a single server. Also, most of you are aware of the configuration, I used in this tutorial. But some of the system administrators are not aware of this. This tutorial will help you to install multiple PHP version with Apache on Ubuntu 22.04, 20.04, and 18.04 LTS systems without switching PHP versions.
This tutorial describes the installation and configuration of two VirtualHost on Apache with separate PHP versions. First VirtualHost will work with PHP 8.1 and another VirtualHost will run with PHP 7.4. So just go through this tutorial. You can also use more than two PHP versions with Apache as required but this tutorial covers two only.
1. Installing Apache2
Install Apache web server from the official repository. Launch terminal on your system or login with ssh for remote systems. Execute the following commands to install the latest available version of the Apache webserver.
sudo apt updatesudo apt install apache2 libapache2-mod-fcgid
Now enable a few modules required for the configuration of multiple PHP versions with Apache. These modules are necessary to integrate PHP FPM and FastCGI with the Apache server.
sudo a2enmod actions fcgid alias proxy_fcgi
2. Installing PHP Versions
For the installation of PHP versions, we use the PPA maintained here. Use the below couple of commands to add the PPA to your system.
sudo apt install software-properties-commonsudo add-apt-repository ppa:ondrej/php
For this tutorial, we are using PHP 8.1 and PHP 7.4 to configure with the Apache webserver. To use the multiple PHP versions, we will use PHP FPM and FastCGI. Let’s install the following packages on your system.
sudo apt updatesudo apt install php8.1 php8.1-fpmsudo apt install php7.4 php7.4-fpm
After installation, php-fpm services will be started automatically. Use the following commands to make sure both services are running.
sudo systemctl status php8.1-fpmsudo systemctl status php7.4-fpm
- You may like: How to Enable/Disable PHP Modules on Ubuntu
3. Configuring Apache Virtual Hosts
Get ready for the configuration of websites on your Apache server. For the testing purpose, I am configuring two websites to work with two different-2 PHP versions. First, create two directories on your server.
sudo mkdir /var/www/php81sudo mkdir /var/www/php74
Create an index.php file containing the phpinfo() function.
echo "" | sudo tee -a /var/www/php81/index.phpecho "" | sudo tee -a /var/www/php74/index.php
Let’s start the creation of VirtualHost. Apache keeps all the VirtualHost configuration files under /etc/apache2/sites-available with the extension .conf. Create a file for the first virtual host and edit in your favorite text editor.
sudo vim /etc/apache2/sites-available/php81.example.com.conf
Add the following content. Make sure to use the correct ServerName and directory path according to your setup. This website is configured to work with PHP 8.1.
<VirtualHost *:80>
ServerName php81.example.com
DocumentRoot /var/www/php81
<Directory /var/www/php81>
Options -Indexes +FollowSymLinks +MultiViews
AllowOverride All
Require all granted
</Directory>
<FilesMatch \.php$>
# Apache 2.4.10+ can proxy to unix socket
SetHandler "proxy:unix:/var/run/php/php8.1-fpm.sock|fcgi://localhost"
</FilesMatch>
</VirtualHost>
Similarly, create a second VirtualHost configuration file to work with PHP 7.4. Edit configuration file in text editor:
sudo nano /etc/apache2/sites-available/php74.example.com.conf
Add the following content to file with proper ServerName and DocumentRoot.
<VirtualHost *:80>
ServerName php74.example.com
DocumentRoot /var/www/php74
<Directory /var/www/php74>
Options -Indexes +FollowSymLinks +MultiViews
AllowOverride All
Require all granted
</Directory>
<FilesMatch \.php$>
SetHandler "proxy:unix:/var/run/php/php7.4-fpm.sock|fcgi://localhost"
</FilesMatch>
</VirtualHost>
Both of the websites are configured now. But they are still not active. Apache keeps active sites under /etc/apache2/sites-enabled directory. You can simply create a symbolic link of config files to this directory or use the below command to do the same.
sudo a2ensite php81.example.comsudo a2ensite php74.example.com
After making all the changes restart Apache to reload new settings changes.
sudo systemctl restart apache2
Your setup has been completed now. Go to the next step to test your setup.
4. Test Setup
Edit /etc/hosts file on your local system and make an entry like below. This will resolve temporary names to localhost IP address.
sudo nano /etc/hosts
Add following entry to end of file
127.0.0.1 php81.example.com 127.0.0.1 php74.example.com
Open a web browser and visit both of the sites. You will see that php81.example.com shows the version PHP 8.1 and php74.example.com is showing the PHP 7.4 as the configuration.
- http://php81.example.com
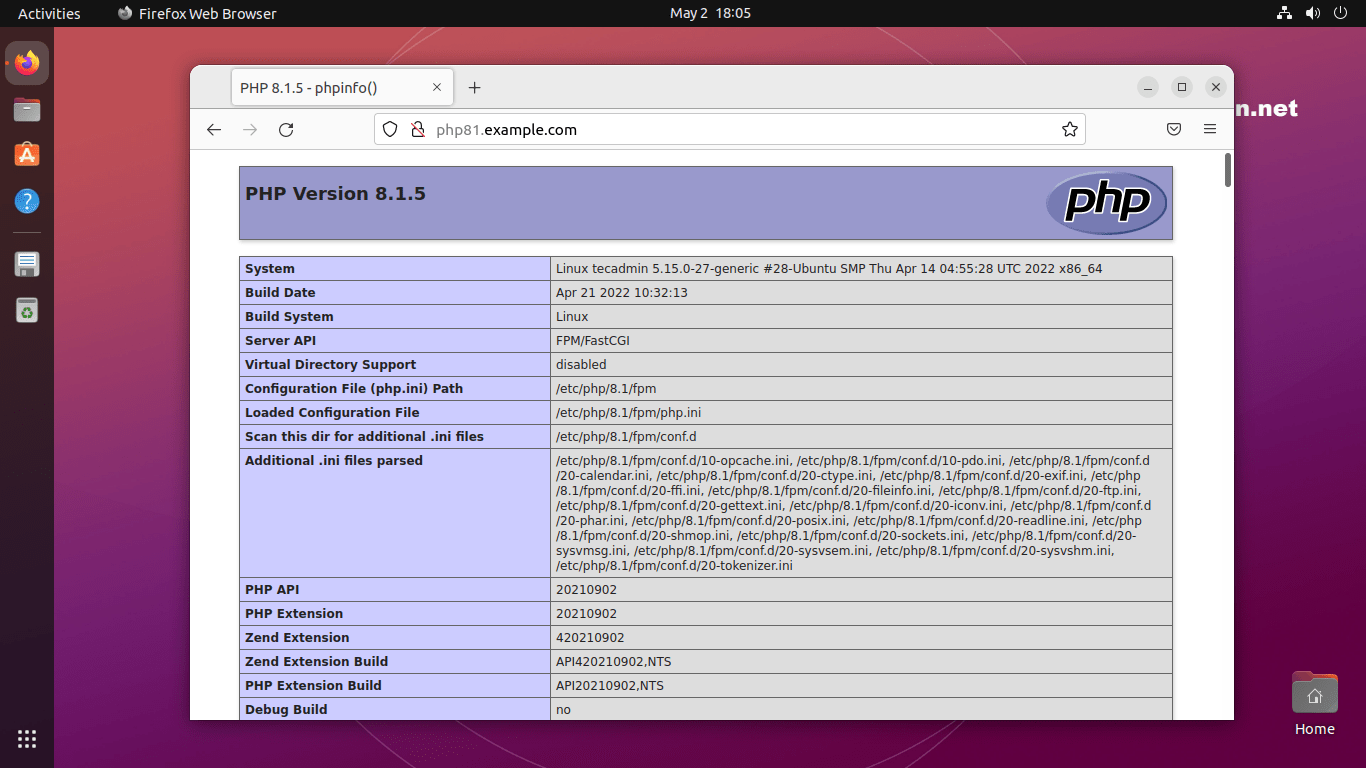
PHP 8.1 with Apache - http://php74.example.com
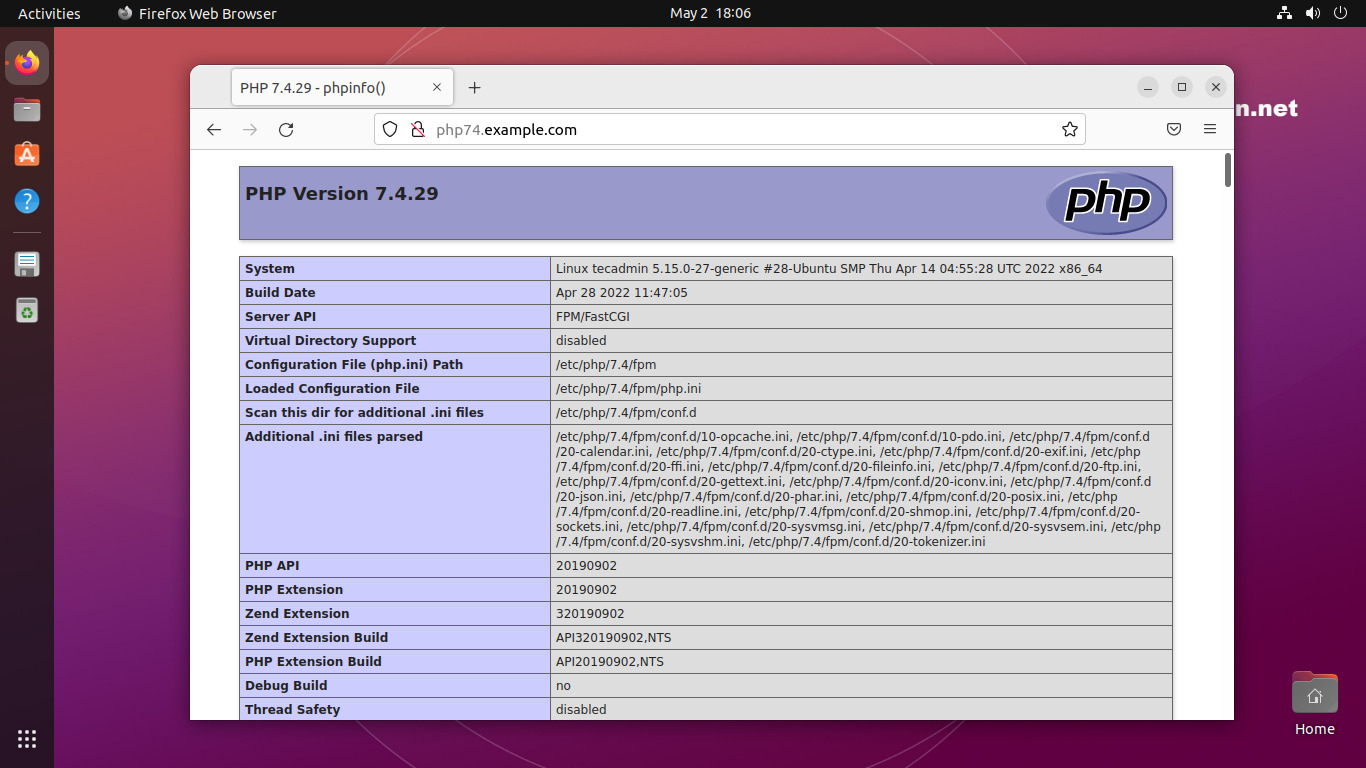
PHP 7.4 with Apache
Conclusion
This tutorial helped you to install and configure multiple PHP versions with Apache on the Ubuntu Linux system. That provides you with a cost-effective solution to deploy different PHP version applications on a single web server.


47 Comments
Excelente… Funcionanado en Deepin 20.2
This was a really nice tutorial, thanks.
You should also add how to undoing changes. On my case, I only needed an older php version to upgrade an old application that didn’t supported the latest official php version from Ubuntu. So, I upgraded, then afterwards, I didn’t need the old php version. I just went for the easy way:
1. Check if your application works with the installed version from Ubuntu, for this, remove the FilesMatch directive from apache, restart it and access your website.
You may also create a index2.php file as follows:
echo “” > /var/www/your_document_root/index.php
Then check that you are running the official Ubuntu version.
2. Then you can proceed to remove the ondrej/php repositories. There are several ways of doing this; however, I took the easy way, which was to use the “ppa-purge” tool:
sudo apt-get install ppa-purge
sudo ppa-purge ppa:ondrej/php
3. Look for the repository key:
sudo apt-key list
search: ondrej/php
4. Optional: you may delete that key by running:
sudo apt-key del “long_40_char_hex_here”
5. Check if the key was removed:
apt-key list | grep ondrej
6. Restart apache and check that your site is using the php version from Ubuntu by showing: index2.php in the browser
7. Delete index2.php
That’s all I did and it worked.
Thanks again for the tutorial
Best regards
Josef
I don’t know why, but some of my code was removed. And I also realized that something was wrong:
echo “… php phpinfo(); … ” > /var/www/your_document_root/index2.php
Replace it by the code from this post. By the way, My mistake on the previous command: I was overriding index.php, but that wasn’t what I wanted; it may break the php application, so, a better way is to create a second file: index2.php
THanks for the tutorial, it works on me (Ubuntu 20.04).
but when i type php –version in terminal , it show that php 7.4 is active, did you know how to switch this to 5.4 ? thanks.
Thanks
but
How do I solve mysql and mysqli problems?
Thank you very much from Chile.
For Ubuntu 18.04 users, first part of PHP installation should be :
sudo apt install software-properties-common
sudo add-apt-repository ppa:ondrej/php
rather than :
sudo apt install python-software-properties
sudo add-apt-repository ppa:ondrej/php
Thanks Mathieu, I have updated tutorial accordingly.
Nice, How i can use this tutorial to install with mysql + phpmyadmin without errors?
Cannot get it work. It shows plain text content of index.php:
<?php
phpinfo();
Can you help please?
Hi Yv,
Make sure the socket path in Apache “/var/run/php/php7.2-fpm.sock” is set to the correct version you have installed.
There is an mistake in virtualhost file in line below:
SetHandler “proxy:unix:/var/run/php/php5.6-fpm.sock|fcgi://localhost/”
Should be with no slash after localhost:
SetHandler “proxy:unix:/var/run/php/php5.6-fpm.sock|fcgi://localhost”
Otherwise $_SERVER[‘SCRIPT_FILENAME’] will be set with leading two slashes.
Hi Sebastian,
Thanks for valuable information. I have corrected our tutorials accordingly.
I love you! haha
Brilliant – been wondering how to do this for years
Easy solution
Thanks very much
Thanks man, been struggling with a nice automated setup for my dev environment, now having php version in conf is so clean! I tried a few different methods, but this one worked first time. Thanks again, Dave.
Good job man, thank you a lot 🙂
I’ve follow those steps but i’m getting a “503 Service Unavailable” error. Why es that?
I’ve followed these instructions before on one server and it worked but now I’m trying on a different server and the php for version 7.2 is being rendered in the browser. Any idea why that would be happening?
This worked perfectly on my Ubuntu 16.04 server. If you want to control your PHP version on a per-directory basis instead of using VirtualHosts you can add this to an .htaccess file in a directory you want to specify a non-default PHP version:
# Apache 2.4.10+ can proxy to unix socket
SetHandler “proxy:unix:/var/run/php/php5.6-fpm.sock|fcgi://localhost/”
I needed php5.6 in my example but you need to change the version number to what you installed.
I was looking for this and finally found it here! Thanks a lot, saved my day (night to be exact 😉 ). I did it just the same way with v7.1 and v7.3, works fine
For Hersdyanata: I missed the line with “sudo a2enmod actions fcgid alias proxy_fcgi” and had just white pages (module proxy_fcgi was not activated).
Thanks a lot..
Muito obrigado!
From Brazil
Thank you. This worked great for me. I had done the version where you install tasksel and then lamp-server and it came with Apache 2.0 handlers which I did not want, plus I wanted 2 versions. I removed all the PHP packages (using Webmin) and then was able to follow this guide and it worked great on 18.04!
Thanks!!! u are great
Very clear manual. Thanks a lot!
Much appreciated!
It worked on Debian 9.6 with phpbrew for PHP 7.1, 7.2 y 7.3
Sir you miss just 1 step.
sudo nano /etc/hosts/
then hosts file is open on Command line just add
127.0.0.1 php72.example.com
127.0.0.1 php56.example.com
I did same steps that you mention above But it not working.
Can any developer help me. already i spend 8 hours.
Thanks for the tuto, but I still have issue. I received Server not Found error when I run it.
And when running this line : “sudo a2enmod actions fastcgi alias proxy_fcgi”, fastcgi didn’t work.
Hello!
I have the same issue with “sudo a2enmod actions fastcgi alias proxy_fcgi” in Ubuntu 18.04.
I got this error: ERROR: Module fastcgi does not exist!
Hi Jose & Sebas,
There is little update with Ubuntu 18.04. This article is also updated accordingly.
Install Package:
$ sudo apt install libapache2-mod-fcgid
Enable Module:
$ sudo a2enmod fcgid
Simple and great post! Thank you for it!
One note, the `libapache2-mod-fastcgi` package you have listed is named `libapache2-mod-fcgid` in more recent repos.
Thanks again!
There is no package libapache2-mod-fastcgi in 18.04
Thanks for this tutorial
How does it work for a
I try and it does not work
It does not take into account the chosen php
Thank you
can we set what php using on .htaccess like cPanel did?
maybe if branch or function?
SetHandler “proxy:unix:/var/run/php/php{ReadFormHandler}-fpm.sock|fcgi://localhost/”
Sir. Just… Thank you. You save a lot of my time to upgrade my code into newer php version
Man , Fantastic. Thanks.
What this line used for?
SetHandler “proxy:unix:/var/run/php/php5.6-fpm.sock|fcgi://localhost/”
Normally I noticed apache vs mod_php and nginx vs php fpm packages
It redirects all php-script to the php interpreter binary using a local socket.
Quickly ran into this error:
Package libapache2-mod-fastcgi is not available, but is referred to by another package.
This may mean that the package is missing, has been obsoleted, or
is only available from another source
E: Package ‘libapache2-mod-fastcgi’ has no installation candidate
I’ve tried several online solutions for getting the lib after adding a lot of repo’s, but error remains.
Any ideas?
try searching:
$ apt-cache search fastcgi | grep apache2
apache2-utils – Apache HTTP Server (utility programs for web servers)
libapache2-mod-fcgid – FastCGI interface module for Apache 2
…
so, apt-get install libapache2-mod-fcgid
Thank you so much. It helps me.
Thank you so much for this instruction! 🙂
Great Work
hey, i follows your instructions. but mine cannot render the php script. where did i miss?
Thanks, it saved additional server cost…