MySQL is a relational database management system. This tutorial will help you to install MySQL 5.7 on Fedora Linux systems.
You can also follow these instructions to install MySQL 8 or phpMyAdmin on your Fedora system.
Step 1 – prerequisites
Login to your Fedora system and open a terminal. Now upgrade the current packages to the latest version by running the following command.
sudo dnf update
Step 2 – Configure Yum Repository
The MySQL team provides a Yum repository for the installation of the MySQL community server on Fedora systems. First, download the GnuPG key to your local system.
cd /etc/pki/rpm-gpg
sudo wget https://repo.mysql.com/RPM-GPG-KEY-mysql
After that create a repository file as:
vim /etc/yum.repos.d/mysql-community.repo
[mysql57-community]
name=MySQL 5.7 Community Server
baseurl=http://repo.mysql.com/yum/mysql-5.7-community/fc/$releasever/$basearch/
enabled=1
gpgcheck=1
gpgkey=file:///etc/pki/rpm-gpg/RPM-GPG-KEY-mysql
Save file and close.
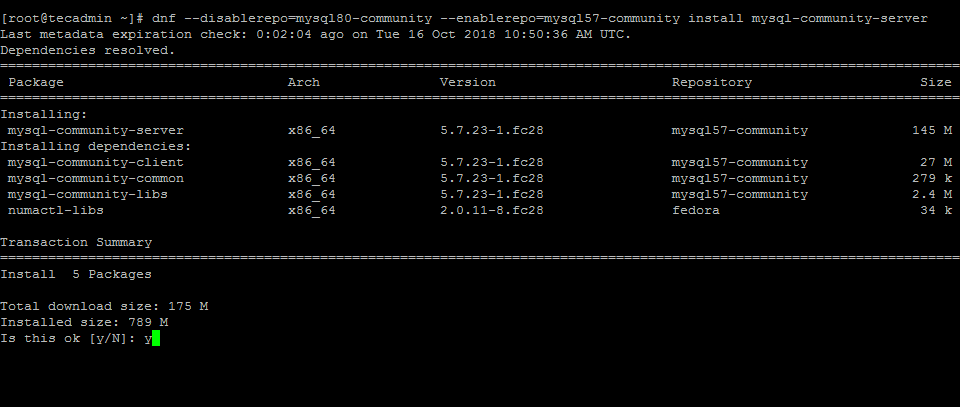
Step 3 – Install MySQL Server
After that run the following command to install the mysql-community-server package on your systems. This will also install all other required dependencies.
sudo dnf install mysql-community-server
After the installation of MySQL server on Fedora system. Enable the MySQL service to start on system boot. Also, start service using the below commands:
sudo systemctl enable mysqld.service
sudo systemctl start mysqld.service
Okay, now follow the post-installation instructions.
Step 4 – MySQL Post Installation Setup
The MySQL community server has been installed on your system. The installer will also generate a random password and set it for the root user. You can find the root user password in log files.
grep 'A temporary password is generated' /var/log/mysqld.log | tail -1

2018-10-16T11:49:31.216147Z 1 [Note] A temporary password is generated for root@localhost: ,yJrusM58kW7
Now run the following command to apply security on the MySQL server. Simply execute the below command and follow the security wizard.
sudo mysql_secure_installation
Follow the onscreen instructions. Change your root account password and Press Y for all other operations to apply improved security.
- Change the password for root? – Press y and change root password
- Remove anonymous users? Press y
- Disallow root login remotely? Press y
- Remove test database and access to it? (Press y
- Reload privilege tables now? Press y
Step 5 – Connect MySQL Terminal
All done. You can now connect to the MySQL server using the command line. The following command will connect MySQL running on localhost as the root user. This will prompt for root account password. You can also install LAMP stack on Fedora and configure PHPMyAdmin on fedora to access databases graphically.
mysql -u root -p

Conclusion
This tutorial helped you to install MySQL 5.7 on Fedora 31/30 and earlier version. To install MySQL on Fedora 34/33/32, the official repository provides MySQL 8.0 for installation. Visit another tutorial to install MySQL on Fedora 33/32 etc.

5 Comments
baseurl returns not found please help
First download the mysql gpg key:
cd /etc/pki/rpm-gpg
sudo wget https://repo.mysql.com/RPM-GPG-KEY-mysql
sudo dnf repolist
Thanks Erick, I have updated the article accordingly.
warning: /var/cache/dnf/mysql80-community-4fbb8be86665a18d/packages/mysql-community-server-8.0.16-2.fc28.x86_64.rpm: Header V3 DSA/SHA1 Signature, key ID 5072e1f5: NOKEY
Curl error (37): Couldn’t read a file:// file for file:///etc/pki/rpm-gpg/RPM-GPG-KEY-mysql [Couldn’t open file /etc/pki/rpm-gpg/RPM-GPG-KEY-mysql]
The downloaded packages were saved in cache until the next successful transaction.
You can remove cached packages by executing ‘dnf clean packages’.
How to resolve this?
Hmm, where do you get the RPM-GPG-KEY-mysql file that you referenced?