
MySQL is the most popular relational database management system. As an assumption MySQL is used by every third website running on www. MySQL installation on a Linux is very straightforward. You can simply install MySQL on a Debian system from its base repositories. But The Debian team replaced MySQL with MariaDB as the default database from Debian 9 Stretch. This tutorial will help you to install MySQL on Debian 9 systems with the latest MySQL version.
Step 1 – Prerequisites
Login to your Debian 9 system using shell access. For remote systems connect with SSH. Windows users can use Putty or other alternatives applications for SSH connection.
ssh root@debian9
Run below commands to upgrade the current packages to the latest version.
sudo apt update
sudo apt upgrade
Step 2 – Configure MySQL PPA
MySQL team provides official MySQL PPA for Debian Linux. You can download and install the package on your Debian system, which will add PPA file to your system. Run below command to enable PPA.
wget http://repo.mysql.com/mysql-apt-config_0.8.13-1_all.deb
sudo dpkg -i mysql-apt-config_0.8.13-1_all.deb
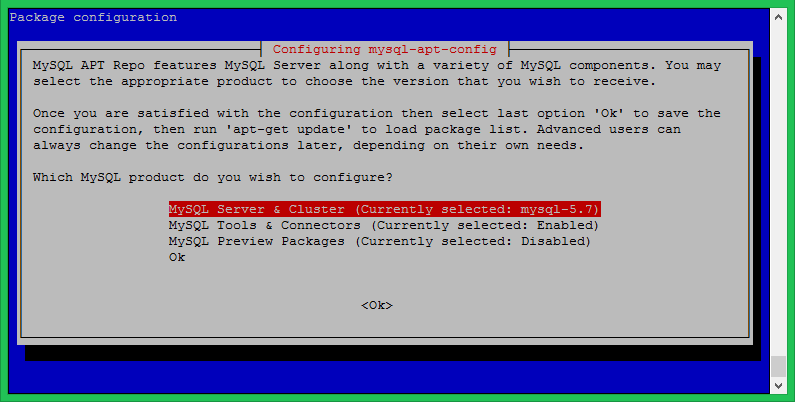
During the installation of MySQL apt config package, It will prompt to select MySQL version to install. Select the MySQL 5.7 or 5.6 option to install on your system.
Step 3 – Install MySQL on Debian 9
Your system is ready for the MySQL installation. Run the following commands to install MySQL on a Debian machine.
sudo apt update
sudo apt install mysql-server
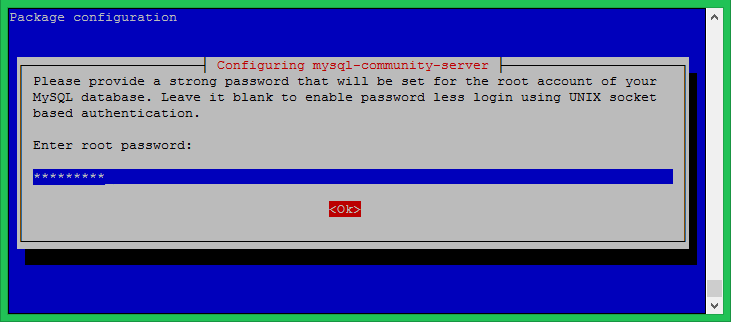
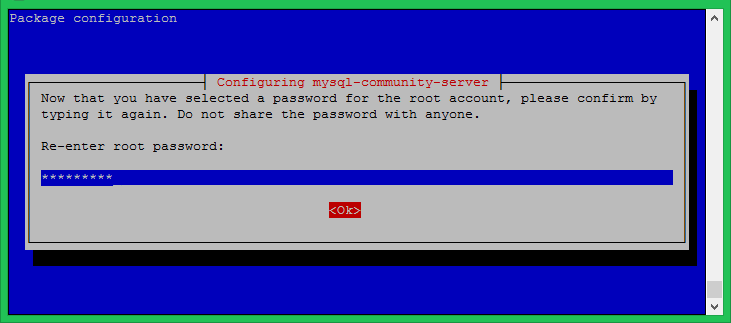
The installation process will prompt for the root password to set as default. Input a secure password and same to confirm password window. This will be MySQL root user password required to log in to MySQL server.
Step 4 – Secure MySQL Installation
Execute the below command on your system to make security changes on your Database server. This will prompt some questions. The do the high security provide all answers to yes.
First start the MysQL service if not started:
sudo systemctl restart mysql
Then run below command:
sudo mysql_secure_installation
Step 5 – Connect MySQL
The MySQL server has been installed on your system. Now connect to the MySQL database using the command line.
mysql -u root -p

Enter password:
Welcome to the MySQL monitor.  Commands end with ; or \g.
Your MySQL connection id is 5
Server version: 5.7.21 MySQL Community Server (GPL)

Copyright (c) 2000, 2018, Oracle and/or its affiliates. All rights reserved.

Oracle is a registered trademark of Oracle Corporation and/or its
affiliates. Other names may be trademarks of their respective
owners.

Type 'help;' or '\h' for help. Type '\c' to clear the current input statement.

mysql>
25 Comments
A very valuable support !
Another great article, thank you
Perfect!! It helped me a lot.
Thanks bro, worked perfectly for Debian 4.19
it worked. thank you very much
Thank you. Install in Debian 9.9 . ,10.1.41 MariaDB
Thanks dude!
Thanks man!
Hi Rahul, My name is Luis.
I have install mysql 8 on debian 10 for project the university,
I have tried everything but I have not achieved it, do you think you can guide me?
Regards
Great tutorial, but you need to change the version of the script, otherwise it will just install mariadb again.
It should be: mysql-apt-config_0.8.13-1_all.deb
Thanks Voja, Tutorial has been updated.
This is BS and will damage your computer.
To get mysql log in as root with su and password.
Then type “apt-get install mysql-server”
And it will load automatically!
I just tried your suggestion, you know… for shits and giggles…
Package ‘mysql-server’ has no installation candidate
Not working – it install Maria !!!
Found the problem, maybe they PPA provided here is not signed and debian is ignoring him, this is the most recent PPA:
https://dev.mysql.com/get/mysql-apt-config_0.8.13-1_all.deb
just wget and dpkg and you will success.
It not working! It installs MariaDB on Debian 9.6! How to install Mysql 8, not MariaDB?
ahoj 🙂
How do I install a particular version. I need to install the version 5.7 (not the latest version 8).
Thanks a lot, Rahul! A quick question. Installed on my VirtualBox, but the prompt says MariaDB. Why is it so?
Hello Raul.. Can you update this.. adding mysql workbench,. is giving trouble to install it..
Thanks
mysql_secure_installation
Securing the MySQL server deployment.
Enter password for user root:
Error: Can’t connect to local MySQL server through socket ‘/var/run/mysqld/mysqld.sock’ (2)
Awesome guide for a newbie like me ! One specification : For step 2, if the currently selected product is already the correct on e(mysql 5.7) then you should just navigate down to “ok” rather than pressing Enter (otherwise you’ll get in a loop..)
Thank you.
Cool….. I love this blog
This was great Rahul, thank you. Good detailing, and straight forward.