Nagios is an open-source monitoring tool that is used to monitor hosts, services, and network devices. It provides real-time monitoring, alerting, and reporting capabilities to help you proactively identify and resolve issues in your IT environment. In this article, we will show you how to install Nagios Server on Ubuntu & Debian, including the prerequisites, installation process, and configuration steps.
Nagios Server is the central component of the Nagios monitoring system. It collects data from remote hosts, services, and network devices, and displays the information in a web interface. Nagios Server can be installed on a variety of operating systems, including Ubuntu & Debian. In this article, we will focus on installing Nagios Server on Ubuntu & Debian systems.
How to Monitor remote Linux host using Nagios
How to Monitor remote Windows host using Nagios
Prerequisites
Before installing Nagios Server, you should have the following prerequisites:
- A fresh installed Ubuntu or Debian system.
- Shell access with sudo privileged user.
- Internet connection to download the required packages.
Step 1: Update the System
Before installing any new packages, it is always recommended to update the system with the latest security patches and bug fixes. Run the following command to update the system:
sudo apt update && sudo apt upgrade
Step 2: Install Required Packages
Before installing Nagios, you need to install some required packages including Apache, PHP, and GCC. Run the following command to install them:
sudo apt install -y build-essential unzip openssl libssl-dev php apache2 apache2-utils
Step 3: Create a Nagios User and Group
First of all, create a nagios user using the following command:
sudo adduser nagios
Then create a group for Nagios setup “nagcmd” and add nagios user to this group. Also, add nagios user in the Apache group.
sudo groupadd nagcmdsudo usermod -a -G nagcmd nagiossudo usermod -a -G nagcmd www-data
Step 4: Download Nagios Core
You can download Nagios Core from the official website using the wget command. Run the following command to download the latest version of Nagios Core:
wget https://assets.nagios.com/downloads/nagioscore/releases/nagios-4.5.2.tar.gz
After downloading the package, extract it using the tar command. Run the following command to extract the package:
tar xzf nagios-4.5.2.tar.gz
Step 5: Compile and Install Nagios Core
Go to the extracted directory and run the following commands to compile and install Nagios Core:
cd nagios-4.5.2sudo ./configure --with-command-group=nagcmd --with-httpd-conf=/etc/apache2/sites-enabledsudo make allsudo make installsudo make install-initsudo make install-configsudo make install-commandmode
Now create an Apache configuration file for your Nagios server as below:
sudo make install-webconf
Now copy event handlers scripts under libexec directory. These binaries provides multiple events triggers for your Nagios web interface.
sudo cp -R contrib/eventhandlers/ /usr/local/nagios/libexec/sudo chown -R nagios:nagios /usr/local/nagios/libexec/eventhandlers
Step 6: Configure Apache Web Server
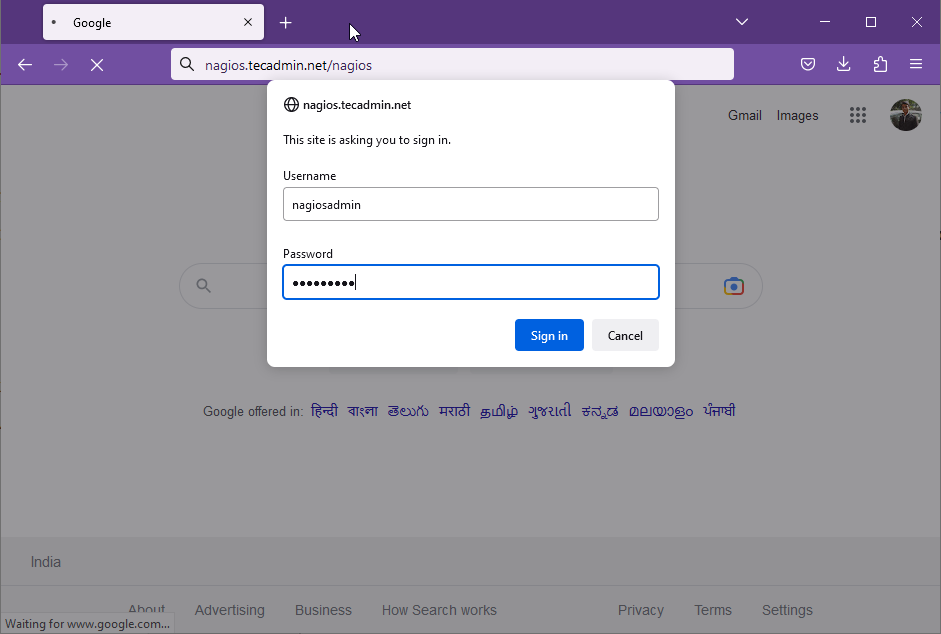
We need to setup apache authentication for user nagiosadmin. Until more specific reason use this username as “nagiosadmin” else you would require more changes in configuration.
sudo htpasswd -c /usr/local/nagios/etc/htpasswd.users nagiosadmin
Now enable Apache configuration and restart Apache service to make the new settings take effect.
sudo a2enmod cgi rewritesudo systemctl restart apache2
Step 7: Install Nagios Plugins
After installing and configuring Nagios core service, Download latest nagios-plugins source and install using the following commands.
wget http://www.nagios-plugins.org/download/nagios-plugins-2.4.9.tar.gztar xzf nagios-plugins-2.4.9.tar.gzcd nagios-plugins-2.4.9
Now compile and install Nagios plugins
sudo ./configure --with-nagios-user=nagios --with-nagios-group=nagcmd --with-opensslsudo makesudo make install
Step 8: Start Nagios Service
Use the Nagios commands to verify the Nagios installation and configuration file.
sudo /usr/local/nagios/bin/nagios -v /usr/local/nagios/etc/nagios.cfg
After successfully verify start the Nagios core service and enable auto-start on system boot..
sudo systemctl start nagiossudo systemctl enable nagios
Step 9: Access Nagios Web Interface
You can access the Nagios web interface by opening a web browser and entering the following URL:
You will be prompted to enter a username and password. Use the credentials you created in step 6 (nagiosadmin/password) to log in.
Once you are logged in, you will see the Nagios dashboard that displays the status of all the hosts and services being monitored.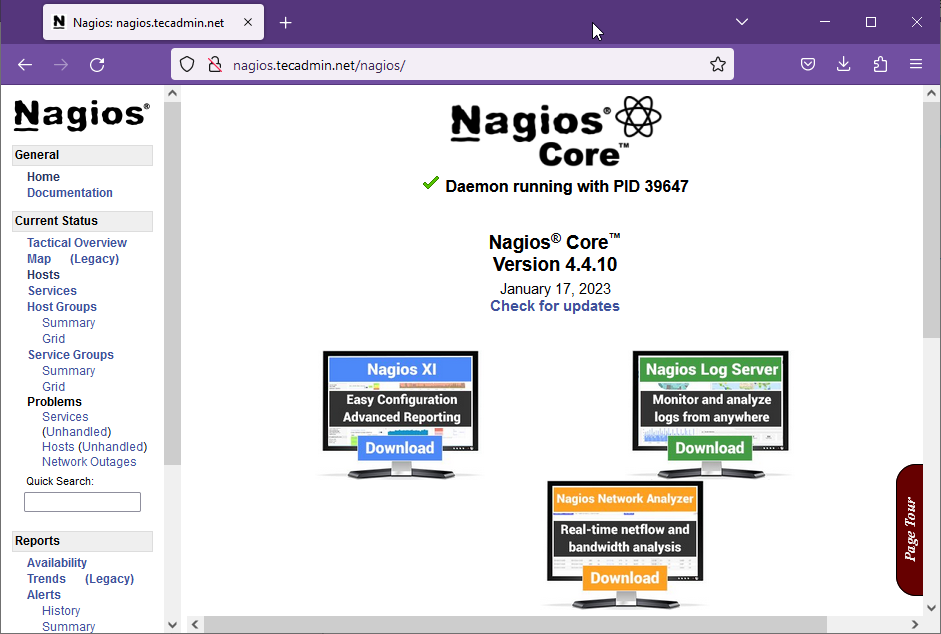
Finally, You have successfully installed and configured Nagios Monitoring Server core service in your system. Now visit net article to monitor Linux host and Windows host using Nagios server.
Conclusion
In this article, we have introduced Nagios Server, its importance, and the installation process for Ubuntu & Debian systems. Installing Nagios Server will allow you to monitor your IT environment and ensure that critical systems and services are functioning correctly. By following the steps outlined in this article, you can get started with Nagios Server and take the first step towards proactively managing your IT environment.
26 Comments
bro, let me know why you don’t just keep it simple ?
apt update && apt install nagios3
on ubuntu 1604 works fine
Thank you for your clear instructions for installing Nagios on Ubuntu. Can you also provide instructions on upgrading Nagios. Thank you.
Please I can’t install, I’ve error while using command $ sudo make install
That’s what my prompt show me:
root@mubarak-Latitude-E6420:/opt/nagios-4.4.3# make install
cd ./base && make install
make[1] : on entre dans le répertoire « /opt/nagios-4.4.3/base »
make install-basic
make[2] : on entre dans le répertoire « /opt/nagios-4.4.3/base »
/usr/bin/install -c -m 775 -o nagios -g nagios -d /usr/local/nagios/bin
/usr/bin/install: utilisateur «nagios» incorrect
Makefile:183: recipe for target ‘install-basic’ failed
make[2]: *** [install-basic] Error 1
make[2] : on quitte le répertoire « /opt/nagios-4.4.3/base »
Makefile:176: recipe for target ‘install’ failed
make[1]: *** [install] Error 2
make[1] : on quitte le répertoire « /opt/nagios-4.4.3/base »
Makefile:276: recipe for target ‘install’ failed
make: *** [install] Error 2
root@mubarak-Latitude-E6420:/opt/nagios-4.4.3#
How could I fix it?
Same problem… There isn’t nagios folder in usr. Did you fix this?
bonjour ,fait la mise ajours et relance ,je pense cela pouvait passe
dont we need nrpe too? I cannot find check_nrpe in the server
Great work – a clear and accurate guide that got Nagios up and working on my server within 20 minutes. Thank you!
Bless up good man
You are a guru. I install cacti and Nagios on the same server . Things are functionning well as for now .
Dear Rahul.
Need some experts opinion regarding my problem i.e. my nagios statumap is mess up , i have number of switches to monitor, but problem is that they are so much congested that , cant even read there name properly. What i want is that my statusmap should be scattered around the rrot Host.
thanks
when I finish all configurations and then get start web server, after autehtification
I get this massage
“Unable to get process status” I’m using nagios 4.3.4 in ubuntu 18.04
Need help
Nagios is running on cli but when I am hitting in browser it is not loading say took too long to respond
Give Nagios default port number 80 to your server then retry.
Hi,
Have installed it and working but getting error when adding devices. Can you please tell me where to added on this template and a basic format. Want to add one device for ping.
Thanks..
Pipa
For ping check, nothing required to install on remote devices. You can try with NagiosQL, which provides an easy to configure interface for Nagios
https://tecadmin.net/install-nagiosql-with-nagios-core-on-centos-rhel/
Thanks for the walkthrough tutorial, I was able to install the following:
nagios-4.4.2.tar.gz
nagios-plugins-2.2.1.tar.gz
Thanks Smuv, Article has been updated with the latest stable release version.
Everything worked until I went to select Hosts, Service or anything like that. It prompts me what to do with the .cgi file.
The frustrating thing of upgrading from an older version of Nagios is EVERYONE DOES THE INSTALL DIFFERENTLY!! Yes, I am meaning to yell. You get used to placing checks in certain places and then and upgrade breaks that.
How do I fix the .cgi issue??
A great walk-through. I’ve been through a couple over the last week and this one was the most concise. the only issue was not having NAGIOS service so I couldn’t complete steps 6B & C. I was able to resolve this by (I used VIM text editor and then did ESC : wq).
Create the nagios.service file
# vi /etc/systemd/system/nagios.service
[Unit]
Description=Nagios
BindTo=network.target
[Install]
WantedBy=multi-user.target
[Service]
User=nagios
Group=nagios
Type=simple
ExecStart=/usr/local/nagios/bin/nagios /usr/local/nagios/etc/nagios.cfg
# systemctl enable /etc/systemd/system/nagios.service
# systemctl start nagios
# systemctl status nagios
After that you need to restart the Nagios Service.
# /etc/init.d/nagios restart
That’s it you should now be able to access Nagios WEBUI.
It didn’t work initially, but a reboot resolved it.
This worked pretty well for me. There were two kinks I had to work out and then it worked awesome.
First: the makefile needs “unzip” and that was not installed on my system (Ubuntu 16.04). May I suggest adding that to the list of prerequisites.
Second: “make install-init” did not install the service for systemd. I had to do that by hand. That’s obviously not a criticism of this tutorial, but a warning to others that install from source.
Nice job, Rahul.
When i try to login to Nagios in my web browser and after having repeatedly enter my login and password on my Nagios page , i get this :
Authorization Required
This server could not verify that you are authorized to access the document requested. Either you supplied the wrong credentials (e.g., bad password), or your browser doesn’t understand how to supply the credentials required. Apache/2.2.15 (Red Hat) Server at 127.0.0.1 Port 80
I had followed your instruction and completed the installation but i am unable to login in to nagios web interface because of apache2 authentication is not accepting username and password. what is the default username here ?
Thanks Rahul, best instructions I have seen so far and worked for me.
I am running ubuntu 14.04 in VMware Fusion (mac install)
Though I had a small make install error but cleared after I run,
apt-get install unzip.
Couldnt do it !
Failed @ $ htpasswd -c /usr/local/nagios/etc/htpasswd.users nagiosadmin
Also could not restart apache2 server -[fail]
Hi Sean
What error are you getting with htpasswd command ?
@ackbote:
i have created a script for auto-installation, for “nagios-core 4.0.8 with plugins 2.0.3” and auto-configuration on ubuntu machin, within 10 mins, just have to add password to default user: nagiosadmin, try this git:
$ sudo git clone https://github.com/slktechlabs/nagios /tmp/nagios && cd /tmp/nagios && sh nagios.sh