Install Nginx MySQL PHP (LEMP Stack) on Ubuntu 16.04 LTS. LEMP is the popular web hosting environment for websites developed in php programming language and MySQL database. Linux is the operating system, Nginx is the popular web server and MySQL is relational database management system used for storing data.
This tutorial will help you to setup LEMP Stack on Ubuntu 16.04 LTS Systems.
Step 1 – Install PHP
PHP 7 is the default available packages in Ubuntu 16.04 repositories. Simply use the following commands to update apt cache and install PHP packages on your system.
$ sudo apt update
$ sudo apt install php php-fpm
Verify installed PHP version using following command.
rahul@tecadmin:~$ php -v

PHP 7.0.4-7ubuntu2 (cli) ( NTS )
Copyright (c) 1997-2016 The PHP Group
Zend Engine v3.0.0, Copyright (c) 1998-2016 Zend Technologies
    with Zend OPcache v7.0.6-dev, Copyright (c) 1999-2016, by Zend Technologies
Step 2 – Install NGINX
First we will install Nginx web server on our system. Use the following commands to install Nginx web server on your Ubuntu 16.04 LTS server.
$ sudo apt install nginx
Step 3 – Install MySQL
Finally install mysql-server packages for MySQL database. Also install php-mysql package to use MySQL support using php. Use following command to install it.
$ sudo apt install mysql-server php-mysql
Installer will prompt for root password, This password will work for your MySQL root user. After installing MySQL execute following command for initial settings of MySQL server. You will she that script will prompt about more settings than earlier mysql versions like password validation policy etc.
$ sudo mysql_secure_installation
Step 4 — Configure PHP-FPM
PHP-FPM (FastCGI Process Manager) is an alternative PHP FastCGI implementation with some additional features.
$ sudo nano /etc/php/7.0/fpm/php.ini
un-comment cgi.fix_pathinfo=1 line and set value to 0.
cgi.fix_pathinfo=0
Now set the listen parameter in /etc/php/7.0/fpm/pool.d/www.conf configuration file. Here you can use php5-fpm socket to work or start php5-fpm server on any port as service. We are going to use it as service.
$ sudo nano /etc/php/7.0/fpm/pool.d/www.conf
Now make changes in configuration file as below. Commend listen with socket file and enable it as service
; listen = /run/php/php7.0-fpm.sock
listen = 127.0.0.1:9000
Step 5 — Configure Nginx VirtualHost
Finally do the configuration of Nginx virtualhost. For this example we are editing default configuration file.
$ sudo nano /etc/nginx/sites-enabled/default.conf
and make changes as below.
server {
        listen   80;

        root /var/www;
        index index.php index.html index.htm;
        server_name  example.com www.example.com;

        location / {
                try_files $uri $uri/ /index.html;
        }

        error_page 404 /404.html;
        error_page 500 502 503 504 /50x.html;
        location = /50x.html {
              root /usr/share/nginx/www;
        }

        location ~ .php$ {
                try_files $uri =404;
                fastcgi_pass 127.0.0.1:9000;
                fastcgi_index index.php;
                fastcgi_param SCRIPT_FILENAME $document_root$fastcgi_script_name;
                include fastcgi_params;
        }
}
You have to do the same changes in all VirtualHosts configured.
Step 6 – Restart Services
After installing all services on your system, start all required services.
$ sudo systemctl restart nginx.service
$ sudo systemctl restart php7.0-fpm.service
Step 7 – Open Access in Firewall
If you are using iptables, Use following commands to open port 80 for public access of webserver.
Iptables Users:
$ sudo iptables -A INPUT -m state --state NEW -p tcp --dport 80 -j ACCEPT
UFW Users:
$ sudo ufw allow 80/tcp
Step 8 – Test Setup
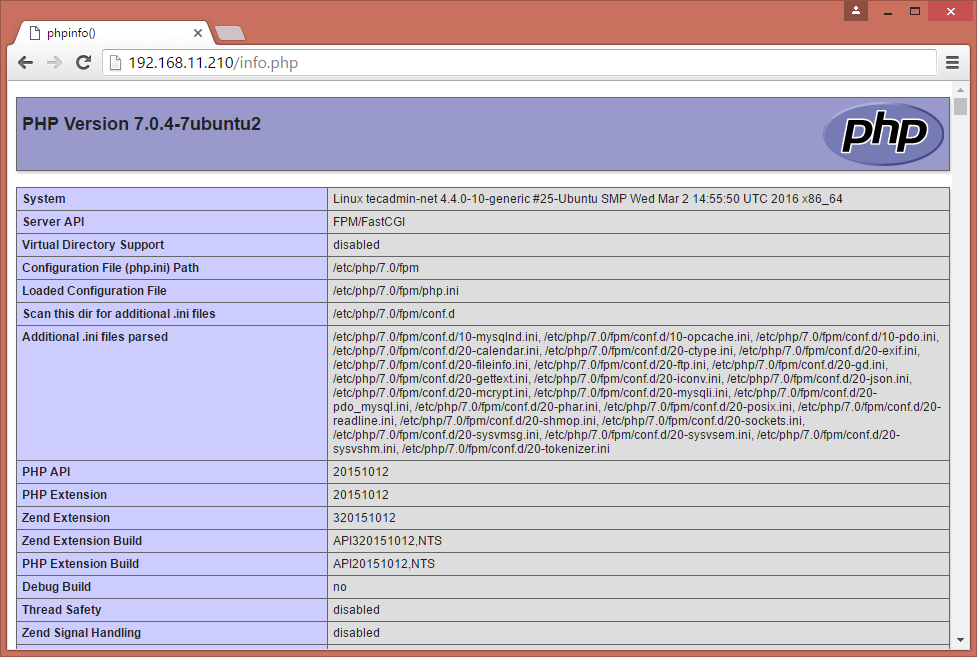
After completing all setup. Let’s create a info.php file website document root with following content.
<?php
 phpinfo();
?>
Now access this file in web browser. You will see the screen like below with all details of PHP on server.
1 Comment
Hi, Thanks for the tutorial. But I have some problem here when I try to restart php-fpm service.
“Job for php7.0-fpm.service failed because the control process exited with error code. See “systemctl status php7.0-fpm.service” and “journalctl -xe” for details.”
How to fix it ?