Node Version Manager (NVM) is popular among developers for installing and managing multiple versions of Node.js on a single machine. This allows developers to work on multiple projects that require different versions of Node.js. NVM installs Node.js under the user’s home directory, ensuring that Node.js versions do not conflict between users on shared systems. On macOS, there are several methods available to install NVM, but one of the most popular and efficient ways is using Homebrew, the renowned package manager for macOS.
This tutorial will provide you with step-by-step instructions for installing NVM on macOS using Homebrew, enabling you to set up a flexible Node.js development environment with ease.
Step 1: Install Homebrew
If you don’t have Homebrew installed on your macOS, you can install it by pasting the following command in the terminal:
/bin/bash -c "$(curl -fsSL https://raw.githubusercontent.com/Homebrew/install/HEAD/install.sh)"
For more instruction visit Homebrew installation tutorial.
Step 2: Install NVM on macOS
- Before installing any packages, it’s always a good idea to update Homebrew to the latest version and update the formulae.
brew update - After that, you can easily install NVM using the following command:
brew install nvm - Now, configure the required environment variables. Edit the following configuration file in your home directory
vim ~/.zprofile - Add the below lines to ~/.zprofile ( or ~/.bashrc for older macOS versions)
export NVM_DIR="$HOME/.nvm"
  [ -s "/opt/homebrew/opt/nvm/nvm.sh" ] && \. "/opt/homebrew/opt/nvm/nvm.sh"  # This loads nvm
  [ -s "/opt/homebrew/opt/nvm/etc/bash_completion.d/nvm" ] && \. "/opt/homebrew/opt/nvm/etc/bash_completion.d/nvm"
Press ESC + :wq to save and close your file.
- Next, load the environment variables to the current shell environment. From the next login, it will automatically loaded.
source ~/.zprofile
That’s it. The NVM has been installed on your macOS system. Go to next step to install Node.js versions with the help of nvm.
Step 3: Using NVM
First of all, see what Node versions are available to install. To see available versions, type:
nvm ls-remote
Now, you can install any version listed in above output. You can also use aliases names like node for latest version, lts for latest LTS version, etc.
nvm install node## Installing Latest version nvm install 20## Installing Node.js 20.X version
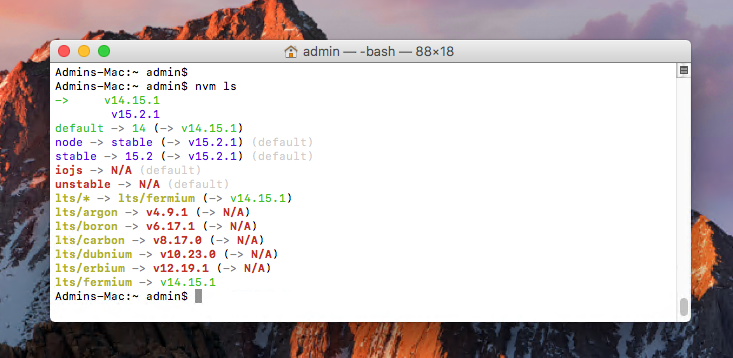
After installing you can verify what is installed with:
nvm ls
If you have installed multiple versions on your system, you can set any version as the default version any time. To set the node 20 as default version, simply use:
nvm alias default 20
Similarly, you can install other versions like Node 12, 16, 18, and 21 versions and switch between easily.
Conclusion
That’s it. You have successfully installed and configured NVM on your macOS system. This tutorial also guides you through the basic uses of NVM, including installing Node.js versions, switching between different Node.js versions, and setting a specific version as the default. Once installed, developers can easily switch between versions as per their project requirements.

48 Comments
It really helped me, thanks a lot!
I had the command not found error event though I installed the nvm, but after editing the .zprofile it worked.
command not found: nvm
after doing the following:
brew reinstall nvm
I added:
export NVM_DIR=”$HOME/.nvm”
[ -s “/opt/homebrew/opt/nvm/nvm.sh” ] && \. “/opt/homebrew/opt/nvm/nvm.sh”
[ -s “/opt/homebrew/opt/nvm/etc/bash_completion.d/nvm” ] && \. “/opt/homebrew/opt/nvm/etc/bash_completion.d/nvm”
[[ -s $HOME/.nvm/nvm.sh ]] && . $HOME/.nvm/nvm.sh
to the .zshrc file located in home.
Then nvm was found!
System: MacOS M3 Sonoma 14
I followed @vanshika answer, but it still wasn’t working for me. I had to run this command after those steps:
source $(brew –prefix nvm)/nvm.sh
I like the tutorial Thank a lot
thanks guys
I just want to say you saved my life!
This is so amazing. thank you for this wonderful exact step by step guide
God bless you
Amazing work!
so cool 😎
thanks Rahul
Thankyou, your article was very helpful.
thanks this is very helpful and great
Why do you “export NVM_DIR=~/.nvm” right before the “source $(brew –prefix nvm)/nvm.sh”
if inside the “$(brew –prefix nvm)/nvm.sh” there is already this export ?
I have used only:
source $(brew –prefix nvm)/nvm.sh
and it works.
Thanks for your post!
Thank you so much for the detailed article
Thank you so much! Your article was very helpful!
Thanks!!
This is one of the few tutorials that actually worked. Thanks for making such a well-written post!
Thanks! This helped a lot!
it was usefull, thanks for clear explanation.
thanks, is a very useful article!
Hello,
i am working on macOS BigSur v11.5.2. I wanted to install nvm in order to work with the 10.x version of sage/root (a wordpress theme builder).
:: source ~/.bash_profile
is not working for me.
i used
:: source ~/.nvm/nvm.sh
instead.
Thank you for the tut 😉
Tengo exactamente la misma version, y me funciono muy bien
Thank you for this tutorial.
Nice Tutorial
Thanks Rahul! Still very helpful!
Homebrew installation is not supported according to nvm docs:
https://github.com/nvm-sh/nvm#installing-and-updating
This article was a bit of a waste of time to be honest.
I ended up with command not found: nvm
This is because there was an empty .nvm folder in my user location.
To fix this I installed nvm manually using:
curl -o- https://raw.githubusercontent.com/nvm-sh/nvm/v0.39.1/install.sh | bash
So you can skip over the homebrew stuff and just do that instead!
For me it worked using homebrew.
Thanks.
Hello,
Thanks for the clean explanation..
I see a file named .zshenv. Is it possible to use this instead of zshrc?
Regards.
Aykut.
thank you so much. its ok for me
Thank you!
for beginners like me:
last part of point 2 should be : source ~/.zshrc
for any recent OS (Catalina, Big Sur, Monterey) It’s kind of mentioned at the step before that but it took me a minute 🙂
Awesome. It saves my time. Great resource!!
Thank you. !
Thanks a lot Rahul!
Very nice, thanks a lot!
nvm documentation explicitly states that homebrew installation is not supported. I tried it but had problems invoking minor versions of node.
Very Good Article Rahul
Totally agree and easy to understand and read.
When zshrc is installed, you have to add
“`export NVM_DIR=~/.nvm
source $(brew –prefix nvm)/nvm.sh“`
to `~/.zshrc` file.
Thanks George
Thanks for sharing these details!
Easy to understand and working perfectly. Thanks you!
amazing work dude
Definitely bookmarking this. Thanks
Thanks a lot, this article helped me to install nvm and node!
Thank you very much ??
Good one, really helpful.
Thank you so much.
Thx for this tutorial. It was clear and very useful.
Keep it going.
command not found: nvm
Great resource!!
Thanks so much Rahul!! This was extremely helpful.