
ownCloud provides data access using web interface. It also provides options to sync and share across devices—all under your control. Using ownCloud we can easily implement restrictions on file (ACLs) per user. ownCloud provides its desktop clients (Windows, MAC, Linux) as well as mobile apps (Android and iPhone) to keep our data sync on your device.
This tutorial will help you to install ownCloud 10 on Ubuntu 19.10, 18.04 LTS & 16.04 LTS systems.
Step 1 – Install LAMP Server
To start setup with ownCloud, we first need to set up a running LAMP server. If you have already running LAMP stack skip this step else use followings commands to set up the LAMP on the Ubuntu system.
Install PHP
Install PHP 5.6 or higher version on your Debian system
sudo apt-get install python-software-properties
sudo add-apt-repository ppa:ondrej/php
sudo apt-get update
sudo apt-get install -y php php-gd php-curl php-zip php-dom php-xml php-simplexml php-mbstring
Install Apache2
sudo apt-get install -y apache2 libapache2-mod-php
Install MySQL
sudo apt-get install -y mysql-server php-mysql
Step 2 – Download ownCloud Source
After successfully configuring lamp server on your system, Let’s download latest ownCloud from its official website.
cd /tmp
wget https://download.owncloud.org/community/owncloud-10.4.0.tar.bz2
Now extract downloaded archive under website document root and setup appropriate permissions on files and directories.
cd /var/www/html
sudo tar xjf /tmp/owncloud-10.4.0.tar.bz2
sudo chown -R www-data:www-data owncloud
sudo chmod -R 755 owncloud
Now, remove the archive file.
sudo rm -f /tmp/owncloud-10.4.0.tar.bz2
Step 3 – Create MySQL Database and User
After extracting code, let’s create a MySQL database and user account for configuring ownCloud. Use following set of command to login to MySQL server and create database and user.
$ mysql -u root -p
Enter password:

mysql> CREATE DATABASE owncloud;
mysql> GRANT ALL ON owncloud.* to 'owncloud'@'localhost' IDENTIFIED BY '_password_';
mysql> FLUSH PRIVILEGES;
mysql> quit
Step 4 – Install ownCloud with Web Installer
Now access the ownCloud directory on a web browser as below. Change localhost to your server IP address or domain name.
http://localhost/owncloud/
Enter new admin credentials to create an admin account and provide the location of the data folder.
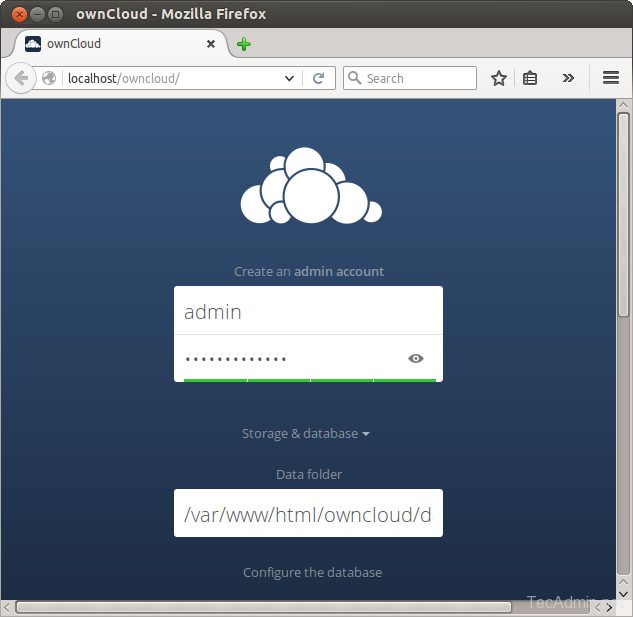

Now slide your page down and input the database credentials and click on Finish Setup.

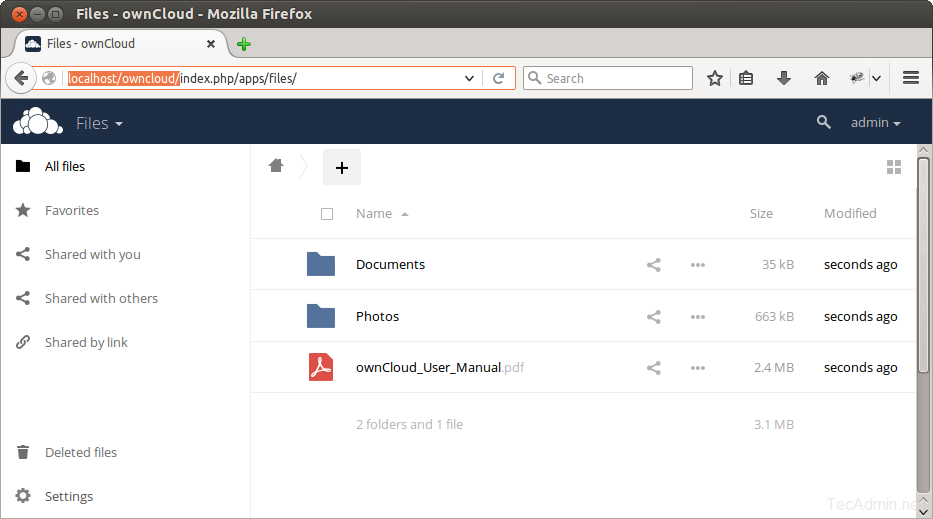
After completing the setup you will get the admin dashboard. Where you can create users, groups and assigned them permissions, etc.

17 Comments
Hi Rahul,
How to take backup of Own Cloud,
Can we have a detailed Page for that, would e of great help.
TIA.
while opening owncloud server using http://localhost/owncloud, I am getting this message-
“Can’t write into config directory!
This can usually be fixed by giving the webserver write access to the config directory.”
(OS- Linux Mint)
Please Help. Thank You
run in Browser http://192.168.0.32/owncloud
and it shows the script:
<?php
/**
* @author Jörn Friedrich Dreyer
* @author Lukas Reschke
* @author Morris Jobke
* @author Philipp Schaffrath
* @author RealRancor
* @author Robin Appelman
* @author Sergio BertolÃn
* @author Thomas Müller
* @author Vincent Petry
*
enter http://192.168.0.32 in a browser and it shows the apache2 default page
It looks you don’t have installed libapache2-mod-php package properly. Please check
I have a problem after installing owncloud, when open http://localhost/owncloud/index.php,
“No database drivers (sqlite, mysql, or postgresql) installed.” PHP modules have been installed, but they are still listed as missing? Please ask your server administrator to restart the web server.”
Hi Dodi,
Add an info.php file on document root with following content and access in browser
<?php
phpinfo();
?>
Now access this file in the browser and check MySQL is enabled there.
You have to restart PHP (or your server).
Fail on Linux Mint 18.1 when:
———————————————————————————–
$ sudo add-apt-repository ppa:ondrej/php5
‘This PPA does not support xenial’
Cannot add PPA: ”This PPA does not support xenial”.
———————————————————————————–
Attempt with php7, etc all fail.
Hi Keith,
We have updated tutorial, Please check with PHP5.6
Cool but it really needs updating as it’s now php7. php5 has no release candidate.
user@ubuntu-server:~$ sudo apt-get install -y php5 php5-gd php5-curl php5-zip php5-dom php5-xml php5-simplexml
Reading package lists… Done
Building dependency tree
Reading state information… Done
Package php5 is not available, but is referred to by another package.
This may mean that the package is missing, has been obsoleted, or
is only available from another source
Package php5-gd is not available, but is referred to by another package.
This may mean that the package is missing, has been obsoleted, or
is only available from another source
E: Package ‘php5’ has no installation candidate
E: Package ‘php5-gd’ has no installation candidate
E: Unable to locate package php5-curl
E: Unable to locate package php5-zip
E: Unable to locate package php5-dom
E: Unable to locate package php5-xml
E: Unable to locate package php5-simplexml
user@ubuntu-server:~$
Hi, Melvin,
PHP5 is replaced by PHP-7.0. I’ve found a good work-through here, which I was able to set up very quickly. After starting from scratch several times (I mean, fresh install of OS, just to make sure everything was clean), this worked. I’m moving on to the step of actually installing OwnCloud, but I’ve got the SSL working and phpmyadmin set up (haven’t tried accessing https from outside my home network – which gave me a hang-up on previous attempts! Anyway, you can see the tutorial here:
https://www.howtoforge.com/tutorial/install-apache-with-php-and-mysql-on-ubuntu-16-04-lamp/
Forgot to say:
1) On the step with the heading, “Installing MariaDB as MySQL replacement,” DO NOT follow the instructions to press Enter when you see the prompt, “Enter current password for root (enter for none):,” and the instructions are given, “<– press enter." Rather, enter whatever password you want to be root. It will tell you this is unnecessary, but do it anyway; it didn't work without doing this, and other sites I found specifically pointed out this error.
2) On the step with the heading, "Install phpMyAdmin," on the bit about "MariaDB enables a plugin called 'unix_socket'": If you're on the machine with the LAMP server, do NOT enter the command beginning "echo." My phpMyAdmin install is working well without this step, and on a previous attempt, this seemed to be the step that killed the functionality.
“This tutorial will help you to install ownCloud 8 on Ubuntu, Debian and LinuxMint systems.”
Thanks Sputnik for pointing typo. Its corrected now.
I’ve been having a problem installing owncloud on Mint 17.3. I followed the steps without a problem up until
$ sudo chown -R apache.apache owncloud —> I get invalid user
I skipped the step as it wasn’t working for me. I continued on and when I try to start my cloud server I get the message
“Can’t write into config directory!
This can usually be fixed by giving the webserver write access to the config directory.”
Any help would be appreciated. If you can dumb it down, that’d be great. I’m still in the linux learning phase.
Really enjoy following this site via RSS, and thank you for all the well laid out tutorials!