
A few days back PHP version 7.2 has been released. Which has a number of changes and improvements over PHP version 7.X. This article will help you to install PHP 7, NGINX and MySQL 5.6 on CentOS / RHEL 7.4 & 6.9 operating systems. This tutorial has been tested with CentOS 7.4, so all the services command are used with systemctl, For CentOS 6 users change all systemctl command correspondence service command.

Step 1 – Setup Yum Repository
In the first step install all the required yum repositories in your system used in the remaining tutorial for various installations. You are adding REMI, EPEL, Webtatic & MySQL community server repositories in your system.
CentOS / RHEL 7
yum install epel-release
rpm -Uvh http://rpms.famillecollet.com/enterprise/remi-release-7.rpm
rpm -Uvh http://repo.mysql.com/mysql-community-release-el7-5.noarch.rpm
CentOS / RHEL 6
yum install epel-release
rpm -Uvh http://rpms.famillecollet.com/enterprise/remi-release-6.rpm
rpm -Uvh http://repo.mysql.com/mysql-community-release-el6-5.noarch.rpm
Step 2 – Install PHP 7
Now install PHP 7 packages from remi-php72 rpm repository using the following command.
yum --enablerepo=remi-php72 install php
Now install required php modules. Use following command to list available modules in yum repositories.
yum --enablerepo=remi-php72 search php
Now check all listed modules in above command and install required modules like below.
yum --enablerepo=remi-php72 install php-mysql php-xml \
php-soap php-xmlrpc php-mbstring php-json php-gd php-mcrypt
Step 3 – Install NGINX
NGINX is the popular web server used on Linux systems. Let’s install the Nginx web server using the following command on your system.
yum install nginx
Now start nginx service and enable to start on boot using below commands.
systemctl enable nginx.service
systemctl start nginx.service
Step 4 – Install MySQL 5.6
In step 1 we already have installed required yum repository in your system. Lets use following command to install MySQL server on your system.
yum install mysql-server
You need to execute mysql_secure_installation once after installation of MySQL server using following command. First it will prompt to set a password for root account, after that ask few questions, I suggest to say yes ( y ) for all.
systemctl start mysqld.service
mysql_secure_installation
Now restart MySQL service and enable to start on system boot.
systemctl restart mysqld.service
systemctl enable mysqld.service
Step 5 – Setup PHP-FPM
Now use following command to install php7 fpm package using following command.
yum --enablerepo=remi-php72 install php-fpm
Step 6 – Create Nginx VirtualHost
Finally do the configuration of Nginx VirtualHost. For this example we are editing default configuration file.
sudo vi /etc/nginx/conf.d/example.conf
and make changes as below.
server {
        listen   80;

        root /var/www;
        index index.php index.html index.htm;
        server_name  example.com www.example.com;

        location / {
                try_files $uri $uri/ /index.html;
        }

        error_page 404 /404.html;
        error_page 500 502 503 504 /50x.html;
        location = /50x.html {
              root /usr/share/nginx/www;
        }

        location ~ .php$ {
                try_files $uri =404;
                fastcgi_pass 127.0.0.1:9000;
                fastcgi_index index.php;
                fastcgi_param SCRIPT_FILENAME $document_root$fastcgi_script_name;
                include fastcgi_params;
        }
}
You have to do the same changes in all Virtual Hosts configured.
Step 7 – Restart Services
After installing all services on your system, start all required services.
systemctl restart nginx.service
systemctl restart php-fpm.service
Step 8. Open Port in Firewall
Finally open firewall ports for HTTP (80) and https (443) services using the following command.
firewall-cmd --permanent --zone=public --add-service=http
firewall-cmd --permanent --zone=public --add-service=https
firewall-cmd --reload
Step 9. Verify Setup
Let’s check the installed versions of packages on system using following commands one by one.
# php -v

PHP 7.2.0 (cli) (built: Nov 28 2017 20:22:21) ( NTS )
Copyright (c) 1997-2017 The PHP Group
Zend Engine v3.2.0, Copyright (c) 1998-2017 Zend Technologies
# nginx -v

nginx version: nginx/1.12.2
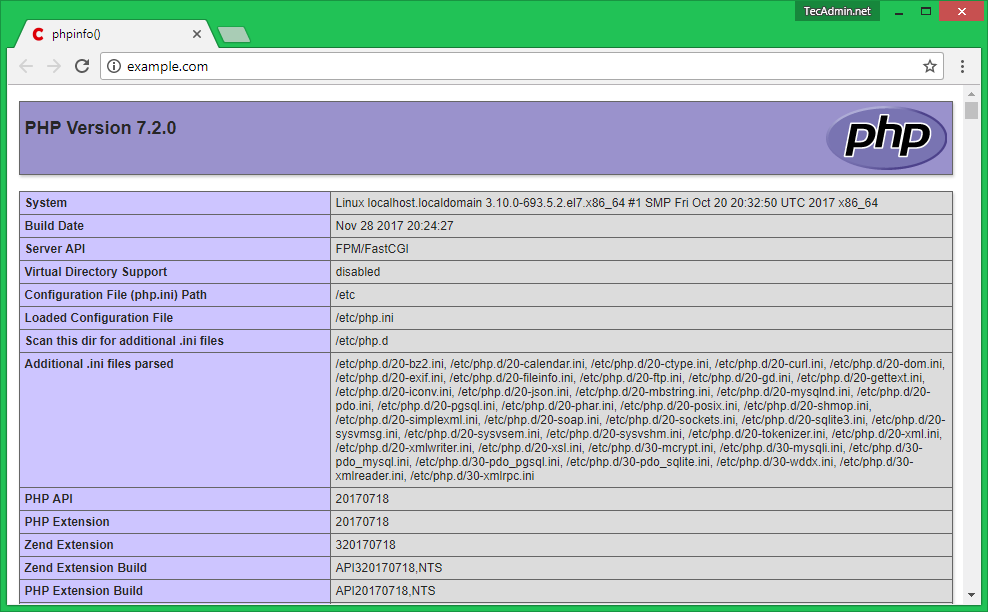
Finally, verify the installation of PHP 7 with NGINX. Let’s create a file index.php on website document root using the following content.
1 2 3 | <?php phpinfo(); ?> |
Now browse this file in a web browser. It will so all the details about versions and installation.
You have successfully configured LEMP Stack setup on your CentOS / RHEL 7.4 & 6.9 system.
6 Comments
Hi, could you tell me why php files are trying to download instead of running?
Hi Rahul, can we use without example.com? i changed example.com become my local ip address, but it’s not working, please advise. Thank you
Your tutorial works perfectly (y)
thanks alot ^_^
If you’ve a problem with the console given by your host provider, i suggest you to download an application called PUTTY, it allows you to do a copy paste instead of spending your time looking for some keyboard symboles ( : { } …).
No need to modify settings for php-fpm?
the php files just download following this tutorial step by step
Me the same. php installed successfully. The php files just download when visit the site.