
phpMyAdmin is the graphical web-based database management tool for MySQL. phpMyAdmin is easy to use and provides most of the options to work and manage your MySQL server. It also provides an easy way to set up database replication between multiple MySQL hosts with easy step wizard.
This article will help you to install phpMyAdmin in Ubuntu systems using the apt package manager. To install phpMyAdmin on CentOS, Redhat and Fedora refer below link.
Step 1 – Install LAMP Stack
We assume you already have installed LAMP on your system. If you do not have installed, Use the following command to install it. The below command will install Apache2, PHP5 and MySQL server in your Ubuntu, Debian and LinuxMint systems.
sudo apt-get update
sudo apt-get install apache2 php mysql-server
Step 2 – Install phpMyAdmin
After installing LAMP stack on your system, let’s install phpMyAdmin using the command in your Ubuntu system.
sudo apt-get install phpmyadmin
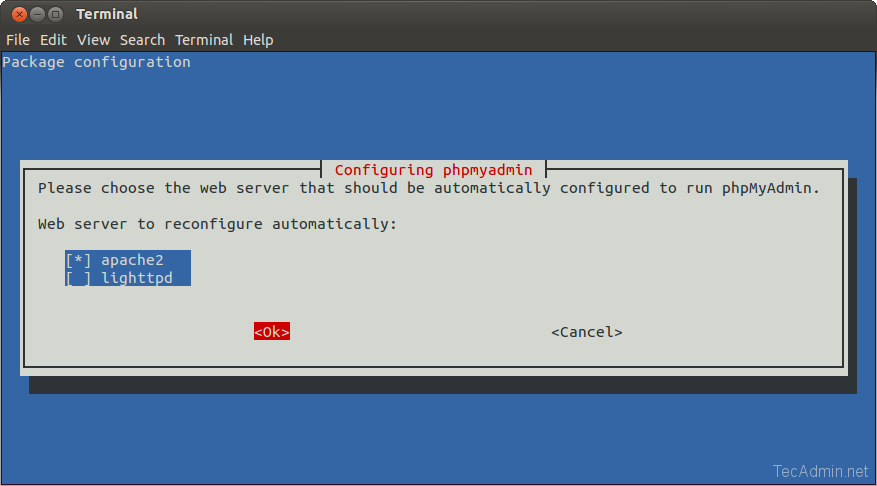
During installation it will prompt for selecting web server, you have installed on your system. Select the appropriate web server you used.

Step 3 – Configure Apache2 for phpMyAdmin
The installer creates and an Apache configuration file /etc/phpmyadmin/apache.conf for phpMyAdmin. Also, create a soft link to be used by Apache. Make sure a soft link is created at /etc/apache2/conf-available/phpmyadmin.conf. In case a soft link is not created and enable phpMyAdmin.
sudo ln -s /etc/phpmyadmin/apache.conf /etc/apache2/conf-available/phpmyadmin.conf
sudo a2enconf phpmyadmin
After updating the above entry, restart Apache2 service using the following command
sudo service apache2 restart
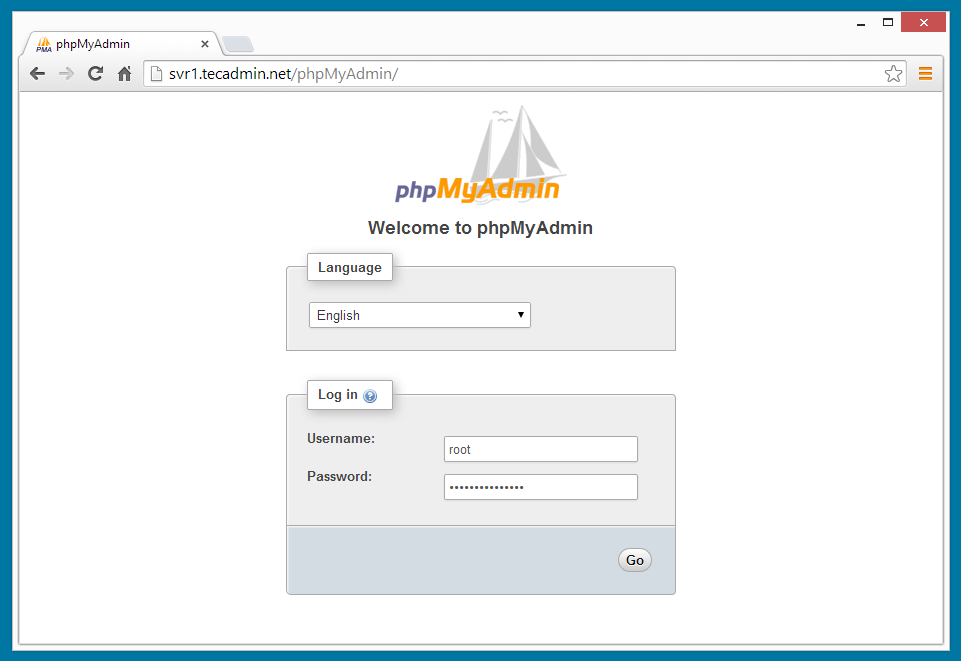
Step 4 – Access phpMyAdmin
You phpMyAdmin installation has been completed successfully. Open you favourite web browser and access following url to open phpMyAdmin, change the localhost with servers hostname or ip address.
http://localhost/phpmyadmin/
Using single phpMyAdmin we can manage multiple MySQL servers by adding multiple remote MySQL server. Use this article to add multiple MySQL hosts in phpMyAdmin.
14 Comments
Than you bro.
I had two problems in the installation. I am using ubuntu mate 16.04
When I tried sudo apt-get install apache2 php5 mysql-server there is not php5
I tried php alone and it worked.
All others are ok. I did the configuration and when I look for localhost it works! but if I ask for localhost/phpmyadmin there is a problem:
A page with a lot of text starting with:
addJSON( ‘list’, PMA_RecentFavoriteTable::getInstance(‘recent’)->getHtmlList() ); exit;
How can I get it work?
Blank screen shows 🙁
Step 3 should be:
Include /etc/phpmyadmin/apache.conf
(there should be no 2 in that)
Rahul…FIX!
Thanks a lot.
We have updated article accordingly.
Thanks Tony
That made it work for me 🙂
* Restarting web server apache2 [fail]
* The apache2 configtest failed.
Output of config test was:
apache2: Syntax error on line 223 of /etc/apache2/apache2.conf: Could not open configuration file /etc/phpmyadmin/apache2.conf: No such file or directory
Action ‘configtest’ failed.
The Apache error log may have more information.
use include /etc/phpmyadmin/apache.conf instead of include /bla/blabla/apache2.conf…
tnk i has try, good and work, but i has try many more tutorial but this tutorial instal web server on ubuntu work
Thanks just what i needed
Thanks a lot for this tutorial! It’s help me , thanks again. Good work.
Instead of the three-package apt-get command given above, I used the alternative monolithic LAMP package command:
sudo apt-get install lamp-server^ (The trailing carat is required.)
In that case, the Include directive to be added to the end of /etc/apache2/apache2.conf for phpMyAdmin’s benefit is:
Include /etc/phpmyadmin/apache.conf
This way that Halfnium is much easier than the one explained in the article !
Thank you Halfnium 🙂
I went through the whole MyPhpadmin and it will not work for me. Says server can’t be found. Any help appreciated