PostgreSQL is an open-source database management system (DBMS) that is widely used for its reliability, performance, and scalability. It is also known as a third-generation DBMS because it retains data in secondary storage rather than memory, making it less prone to performance degradation and other issues associated with dynamic memory allocation. In this article, we’ll show you how to install PostgreSQL on macOS.
In this blog post, you will learn how to install PostgreSQL on macOS with Homebrew by following the steps below. Once you complete the installation process, you’ll be able to create databases, tables, and other objects inside those tables. You can even write queries against those tables so that they return the data that you are looking for.
Installing Homebrew
The first step is to install Homebrew, which is a package manager for macOS. Package managers are useful when installing open source software (OSS) because you don’t have to manually download the source code, build the software from scratch, and then install it. You can instead, just use the package manager to pull in the OSS that you want and then install it with a simple command. You can follow the steps below to install Homebrew on macOS.
First, open a new Terminal window by clicking on Finder and then clicking on Applications. From there, click on Utilities. This will open a new Terminal window. In the Terminal window, type:
/bin/bash -c "$(curl -fsSL https://raw.githubusercontent.com/Homebrew/install/HEAD/install.sh)"
You’ll see a bunch of text fly by. Once the text stops, you are then prompted to add the path for Terminal to your PATH environment variable. You can do that by typing “export PATH=/usr/local/bin:/usr/local/sbin:$PATH” and then press the enter key.
Installing PostgreSQL
Once you’ve installed Homebrew on your macOS, first of all search available versions of PostgreSQL server for installation:
brew search postgresql
All the available versions or formulae will be listed.

Choose one of the listed PostgreSQL versions to install on your macOS. For example, to install PostgreSQL 14, execute the following command:
brew install postgresql@14
If you need to upgrade an existing PostgreSQL installation, use the following command:
brew upgrade postgresql@14
Remember that the above command will upgrade the minor version only.
Then, start the PostgreSQL service with the following command:
brew services start postgresql@14
If you want to stop or restart the service, use the following commands:
brew services stop postgresql@14brew services restart postgresql@14
That’s it. You have successfully installed the PostgreSQL server on your macOS.
Login to PostgreSQL
After installing a fresh database server, you need to configure it before using it. The “psql” is the command line utility for managing the Postgres database server. The default PostgreSQL comes with a database named “postgres”, that we can use to log in to the server. Execute the following command to get login into the Postgres terminal:
psql postgres

Once you get the Postgres terminal, you can check the available databases with the following command:
\l
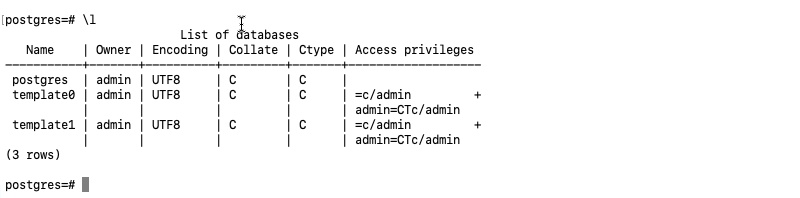
The default installation creates a user named “admin” with superuser privileges. That is the owner of the default “postgres” database. You can list all the available users with the following command.
\du

Creating User
As you see above that the default PostgreSQL creates a super admin named “admin” and database “postgres”. You can either use the “CREATE ROLE” to add a new ROLE (User) in your system or use “createuse” command line utility to create it. Personally, I love to use “createuser” utility with an interactive mode that helped for adding new roles quickly
Let’s create the first ROLE from your macOS terminal, type:
createuser --interactive --pwprompt
This will prompt for the following details:
- Name for the new ROLE (User).
- Inter a password for new role
- Re-enter the password for new role (Same as above)
- Press ‘n’, do not provide super administrator privileges.
- Press ‘y’ to provide create database privileges
- Press ‘n’ to not allow to make new roles

You can successfully added a new user to the Postgres database server. Use the following command to log in as a new user.
psql postgres -U tecadmin -W
Change “tecadmin” with your user name. Currently the user user doesn’t have any database with name, So the above command will connect to the “postgres” database. Press Enter button and provide the password of the user:

Creating Database
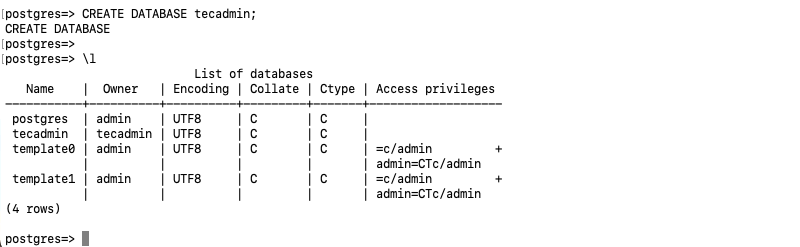
Now, create a new database with the following command.
CREATE DATABASE tecadmin;
After creating a database, list all the databases in the postgres server.
\du
Conclusion
In this article, we’ve shown you how to install PostgreSQL on macOS. Once you complete the installation process, you’ll be able to create databases, tables, and other objects inside those tables. You can even write queries against those tables so that they return the data that you are looking for. When you’re finished, be sure to log out of the “postgres” user or stop the PostgreSQL service by using the “brew services stop postgresql” command before continuing to use your Mac.

