
Symfony is a web application framework written in PHP. Its provides a set of reusable PHP components. Symfony 3 is the latest version available of this releases. Currently it is providing 30 stand-alone components for your applications.
This tutorial will help you to install Symfony 3 php framework on Ubuntu, Debian and LinuxMint operating systems.
Step 1 – Install Apache & PHP
First start with the installation of LAMP server on your system. If you have already running LAMP stack skip this step else use followings commands to set up lamp on Ubuntu system.
Install PHP 5.6
$ sudo apt-get install python-software-properties
$ sudo add-apt-repository ppa:ondrej/php
$ sudo apt-get update
$ sudo apt-get install -y php5.6 php5.6-intl
Install Apache2
$ apt-get install apache2 libapache2-mod-php5
Step 2 – Setup Symfony Installer
Symfony provides its own installer for creating new projects. Below commands will help you to setup Symfony installer on your system.
$ sudo curl -LsS https://symfony.com/installer -o /usr/local/bin/symfony
$ sudo chmod a+x /usr/local/bin/symfony
Step 3 – Create New Symfony 3 Application
After successful setup of Symfony installer on your system. Let’s start with your new Symfony application. Navigate to your web document root and create a new Symfony application.
$ cd /var/www
$ symfony new myproj
Now change to newly created directory and check if all requirements are properly installed on your system. If everything is fine you will get following results.
$ cd myproj
$ php bin/symfony_requirements


 [OK]
 Your system is ready to run Symfony3 projects
Step 4 – Start Application in Development Mode
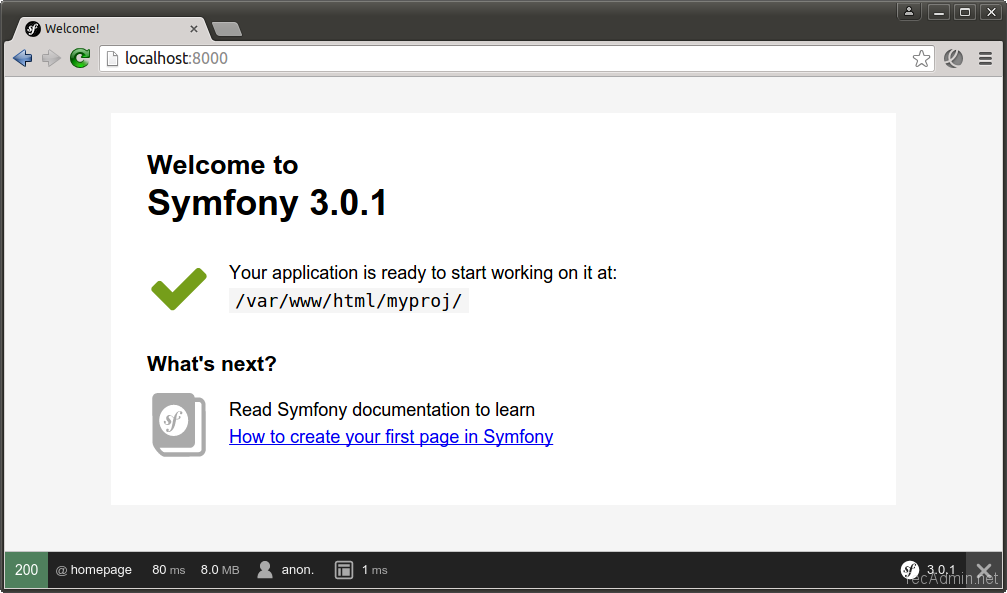
Now start development with Symfony php framework and built great application’s. To view changes in browser you can start Symfony developer web server using following command. By default web server will start on port 8000.
$ php bin/console server:run


 [OK] Server running on http://127.0.0.1:8000
 // Quit the server with CONTROL-C.
Now access http://localhost:8000 in web browser.

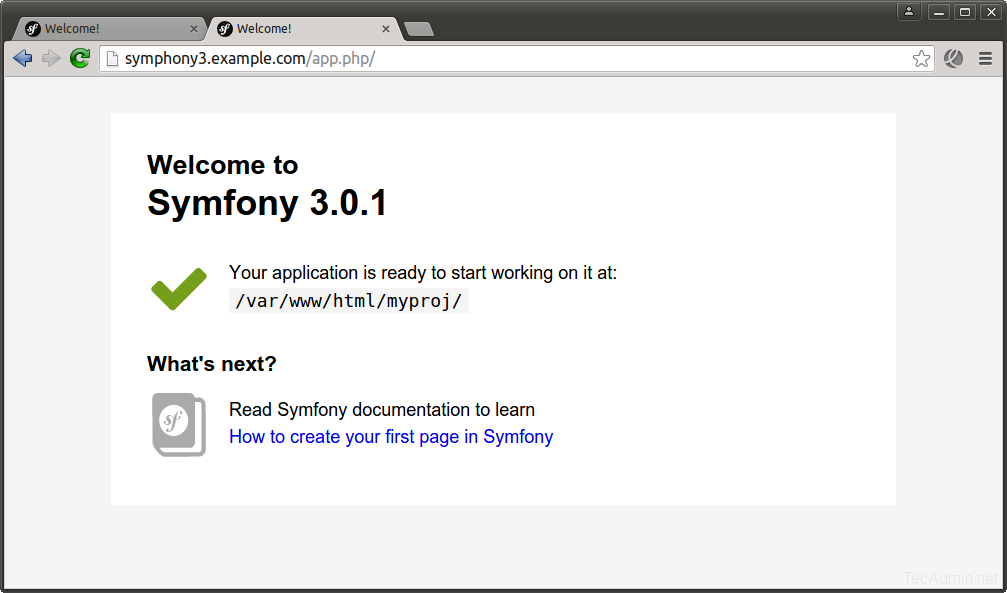
Step 5 – Create Apache VirtualHost
Now If you need to configure Symfony with sub domain. Create a new Apache configuration file under directory /etc/apache2/sites-available/ and add Virtual Host for your Symfony 3 application.
$ vim /etc/apache2/sites-available/symphony3.example.com.conf
directory and add below content.
<VirtualHost *:80>
    ServerName symphony3.example.com
    DocumentRoot /var/www/myproj/web

    <Directory /var/www/myproj/web>
        AllowOverride All
        Order Allow,Deny
        Allow from All
        <IfModule mod_rewrite.c>
            Options -MultiViews
            RewriteEngine On
            RewriteCond %{REQUEST_FILENAME} !-f
            RewriteRule ^(.*)$ app.php [QSA,L]
        </IfModule>
    </Directory>

    ErrorLog /var/log/apache2/myproj_error.log
    CustomLog /var/log/apache2/myproj_access.log combined
</VirtualHost>
Finally enable website and reload Apache service using below command.
$ sudo a2ensite symphony3.example.com
$ sudo service apache2 reload
Click here to read more about Symfony framework.
3 Comments
Hi, you have to declare symphony3.example.com in /etc/hosts like this :
127.0.0.1 symphony3.example.com
Regards
You also have to install a Database (e.g. mysql) :
$ sudo apt-get install mysql-server php-mysql
Ubuntu is great, but I was wondering if there is a tutorial for Debian as well, but couldn’t find one on your website. I found another tutorial on another website, but that tutorial uses a specific platform called Cloudways. Here is the link to it: https://www.cloudways.com/blog/install-symfony-3-on-cloud/