Apache Tomcat 8.5 is the latest version available for the installation of the Tomcat 8 series. Tomcat is an open-source web server for the Java-based applications developed by the Apache Foundation. We use Tomcat for deploying Java Servlet and JSP applications. To know more about the Apache Tomcat visit apache official site http://tomcat.apache.org/.
Prerequisites
- shell access
- sudo priviledged account access
Step 1 – Install Java
Java is the primary requirement for running Tomcat 8.5 on CentOS 8 Linux system. Make sure you have Java 8 or higher version installed in your system. If you don’t’ have Java installed, use the following command to install java (OpenJDK) on your system.
sudo dnf install openjdk
Then check the installed Java version
java -version

openjdk version "11.0.4" 2019-07-16 LTS
OpenJDK Runtime Environment 18.9 (build 11.0.4+11-LTS)
OpenJDK 64-Bit Server VM 18.9 (build 11.0.4+11-LTS, mixed mode, sharing)
Step 2 – Create Tomcat User
Many of the system administrators are run the Tomcat server with root user. Which is not the correct way for security purposes. So, I always prefer to create a separate user account to run the Tomcat server on the Linux system.
sudo useradd -m -d /opt/tomcat -U -s /bin/false tomcat
The above command will create user “tomcat” with the group “tomcat”.
Step 3 – Download Tomcat 8
Download Apache Tomcat archive file from Apache tomcat official download page. You can use below wget command to download it.
wget https://dlcdn.apache.org/tomcat/tomcat-8/v8.5.75/bin/apache-tomcat-8.5.75.tar.gz
Then extract the archive file and copy all the files under tomcat home directory
tar xzf apache-tomcat-8.5.75.tar.gz
sudo mv apache-tomcat-8.5.75/* /opt/tomcat/
Also, set the proper ownership of all files.
sudo chown -R tomcat:tomcat /opt/tomcat/
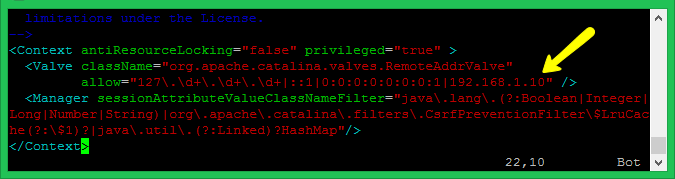
Step 4 – Enable Host/Manager for Remote IP
The latest Tomcat versions do not allow manager and host-manager interface for remote users. You can access them from the localhost only. To enable access to these pages for the remote system, allow IP or IP range in the application-specific context.xml file. The files are as following:
- Manager – /opt/tomcat/webapps/manager/META-INF/context.xml
- Host Manager – /opt/tomcat/webapps/host-manager/META-INF/context.xml
Edit the above files one byte one and add your IP address like 192.168.1.10 in the below screenshot.
Step 5 – Setup User Accounts
Finally we need to create user accounts to secure and access admin/manager pages. Edit conf/tomcat-users.xml file in your editor and paste inside <tomcat-users> </tomcat-users> tags.
<!-- user manager can access only manager section --> <role rolename="manager-gui " /> <user username="manager " password="_SECRET_PASSWORD_ " roles="manager-gui " /><!-- user admin can access manager and admin section both --> <role rolename="admin-gui " /> <user username="admin " password="_SECRET_PASSWORD_ " roles="manager-gui,admin-gui " />
Step 6 – Create Tomcat Start Script
Tomcat provides bash scripts for start or stop service. But you can also create a startup script to manage Tomcat via systemctl command. Create a tomcat.service file with the following content:
sudo vim /etc/systemd/system/tomcat.service
[Unit]
Description=Tomcat 8.5
After=network.target

[Service]
Type=forking

User=tomcat
Group=tomcat

Environment="JAVA_HOME=/usr/lib/jvm/jre"
Environment="JAVA_OPTS=-Djava.security.egd=file:///dev/urandom"
Environment="CATALINA_BASE=/opt/tomcat"
Environment="CATALINA_HOME=/opt/tomcat"
Environment="CATALINA_PID=/opt/tomcat/temp/tomcat.pid"
Environment="CATALINA_OPTS=-Xms512M -Xmx1024M -server -XX:+UseParallelGC"

ExecStart=/opt/tomcat/bin/startup.sh
ExecStop=/opt/tomcat/bin/shutdown.sh

[Install]
WantedBy=multi-user.target
Reload the systemd daemon service to apply changes
sudo systemctl daemon-reload
Then, enable and start Tomcat service on your system
sudo systemctl enable tomcat.service
sudo systemctl start tomcat.service
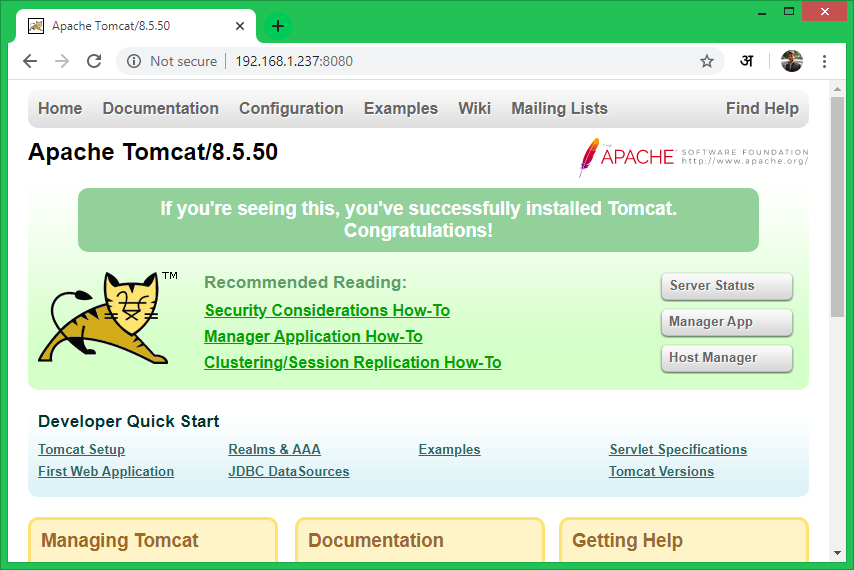
Step 7 – Access Tomcat in Browser
Tomcat server works on port 8080 default. To access Tomcat on the web browser by connecting your server on port 8080.
If you are connecting from the local machine then use the localhost. To connect from remote machine use IP address of the system with port:
http://localhost:8080
Conclusion
You have a running Tomcat 8.5 server on your CentOS 8 system. You may also need to create a Virtual host or configure a SSL certificate in Tomcat.