Apache Tomcat is an open-source web hosting server for the Java-based web application. Tomcat is licensed under Apache License version 2. Apache has released a stable version of Tomcat 8 on June 25, 2014. Which is available for download on its official site. Apache Tomcat 8 has upgraded some features. Below are a few details about Tomcat 8.
- Tomcat 8 requires JAVA 7 or Higher to work.
- Tomcat 8 supports Java Servlet 3.1
- Tomcat 8 supports JavaServer Pages 2.3
- Tomcat 8 supports Java Unified Expression Language 3.0
- Tomcat 8 supports Java WebSocket 1.0
This article will help you to Install Tomcat 8 on your CentOS/RHEL and Ubuntu systems. Tomcat 8 stable release is available for download. To install other version of tomcat visit Install Tomcat 7 on CentOS/RHEL or Install Tomcat 7 on Ubuntu as per your operating system used.
Step 1 – Verify JAVA
JAVA is the first requirement of Tomcat installation. Use the following command to check if you have java installed already on your system.
#java -version openjdk version "1.8.0_282" OpenJDK Runtime Environment (build 1.8.0_282-8u282-b08-0ubuntu1~16.04-b08) OpenJDK 64-Bit Server VM (build 25.282-b08, mixed mode)
Tomcat 8 is designed to run on Java SE 7 and later. So make sure you have installed the correct version on your system. If you don’t have Java installed on your system or installed lower version, use one of the following links to install Java first.
Step 2 – Downloading Tomcat Archive
Download Apache Tomcat 8 archive file using following commands or you can visit Tomcat 8 official download page for download most recent available version. After downloading extract archive file in /opt directory. You may change this location as per your setup.
wget http://www-us.apache.org/dist/tomcat/tomcat-8/v8.5.51/bin/apache-tomcat-8.5.64.tar.gz
tar xzf apache-tomcat-8.5.64.tar.gz
mv apache-tomcat-8.5.64 /usr/local/tomcat8
Step 3 – Configure Environment Variables
Before starting Tomcat, configure CATALINA_HOME environment variable in your system using following commands.
echo "export CATALINA_HOME="/usr/local/tomcat8"" >> ~/.bashrc
source ~/.bashrc
Step 4 – Start Tomcat Server
Tomcat is very easy to use, There is no need to compile its source. You simply extract the archive and start the tomcat server. Tomcat by default start on port 8080, So make sure no other application using the same port.
cd /usr/local/tomcat8
./bin/startup.sh
[Sample Output]
Using CATALINA_BASE:   /usr/local/tomcat8
Using CATALINA_HOME:   /usr/local/tomcat8
Using CATALINA_TMPDIR: /usr/local/tomcat8/temp
Using JRE_HOME:        /opt/jdk1.8.0_121
Using CLASSPATH:       /usr/local/tomcat8/bin/bootstrap.jar:/usr/local/tomcat8/bin/tomcat-juli.jar
Tomcat started.
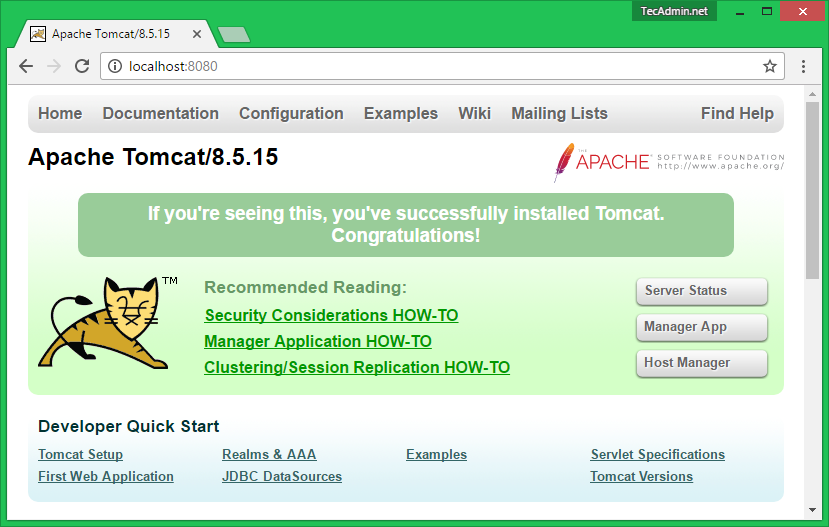
Step 5 – Access Tomcat in Browser
Tomcat server works on port 8080 default. Access tomcat on a web browser by connecting your server on port 8080.
http://localhost:8080
Step 6 – Setup User Accounts
Finally we need to create user accounts to secure and access admin/manager pages. Edit conf/tomcat-users.xml file in your editor and paste inside <tomcat-users> </tomcat-users> tags.
<!-- user manager can access only manager section --> <role rolename="manager-gui " /> <user username="manager " password="_SECRET_PASSWORD_ " roles="manager-gui " /><!-- user admin can access manager and admin section both --> <role rolename="admin-gui " /> <user username="admin " password="_SECRET_PASSWORD_ " roles="manager-gui,admin-gui " />


6 Comments
your sever is not open…………….
how to add tomcat server to eclipse after this step?
Tomcat not starting on booting the system. I have used the above mentioned script, still it doesn’t start up. Kindly help..
Thank you. To everyone, dont forget type your path to “export CATALINA_HOME=/your/path/here”…
Create tomcat8 file in /etc/init.d/ like this:
# sudo vim /etc/init.d/tomcat8
and paste following code:
#!/bin/bash
export CATALINA_HOME=/your/path/here
PATH=/sbin:/bin:/usr/sbin:/usr/bin
start() {
sh $CATALINA_HOME/bin/startup.sh
}
stop() {
sh $CATALINA_HOME/bin/shutdown.sh
}
case $1 in
start|stop) $1;;
restart) stop; start;;
*) echo “Run as $0 “; exit 1;;
esac
And later modify /etc/init.d/tomcat8 file permissions:
# sudo chmod 755 /etc/init.d/tomcat8
That is all.
Thank you very much.
Very clean and easy to understand. You could also end how to start tomcat at the system startup.