
Apache Tomcat is another product released by the Apache Software Foundation. It is an open-source implementation of the Java Servlet and JavaServer Pages (JSP) technologies. Tomcat is a web server used for hosting the Java-based web application. Apache Tomcat team has announced its latest Tomcat 9 release.
This article helps you to install Tomcat 9 on Ubuntu 19.10, 18.04 LTS & 16.04 LTS systems.
Step 1 – Java Installation
You must have Java installed on the system before installing Apache Tomcat on a Linux VPS. Tomcat 9 required Java 8 or later versions to work. You can check and verify that Java is installed with the right version.
java -version

java version "11.0.2" 2019-01-15 LTS
Java(TM) SE Runtime Environment 18.9 (build 11.0.2+9-LTS)
Java HotSpot(TM) 64-Bit Server VM 18.9 (build 11.0.2+9-LTS, mixed mode)
If you don’t have Java installed on your system or installed a lower version, run the below commands to satisfy requirements.
sudo apt-get update
sudo apt-get install default-jdk
Step 2 – Download & Install Tomcat 9
You need to download the Tomcat archive from its official download website or mirrors. Download and Install the Tomcat 9 archive file using the following commands. You can also visit official download page to download latest available version.
wget https://dlcdn.apache.org/tomcat/tomcat-9/v9.0.58/bin/apache-tomcat-9.0.58.tar.gz
tar xzf apache-tomcat-9.0.58.tar.gz
sudo mv apache-tomcat-9.0.58 /usr/local/tomcat9
Step 3 – Configure Environment Variables
Now configure the required environment variables for the Tomcat. Set CATALINA_HOME to the extracted tomcat directory. Also, set Java environment variables as per Java installed on your system.
echo "export CATALINA_HOME="/usr/local/tomcat9"" >> ~/.bashrc
echo "export JAVA_HOME="/usr/lib/jvm/java-11-oracle"" >> ~/.bashrc
echo "export JRE_HOME="/usr/lib/jvm/java-11-oracle"" >> ~/.bashrc
source ~/.bashrc
Step 4 – Setup Tomcat User Accounts
Finally we need to create user accounts to secure and access admin/manager pages. Edit conf/tomcat-users.xml file in your editor and paste inside <tomcat-users> </tomcat-users> tags.
<!-- user manager can access only manager section -->
<role rolename="manager-gui" />
<user username="manager" password="_SECRET_PASSWORD_" roles="manager-gui" />

<!-- user admin can access manager and admin section both -->
<role rolename="admin-gui" />
<user username="admin" password="_SECRET_PASSWORD_" roles="manager-gui,admin-gui" />
Step 5 – Enable Host/Manager for Remote IP
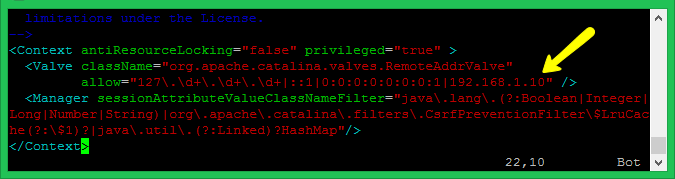
The default manager and host-manager web pages are enabled to access from localhost only. To access these pages from the remote system, you have to allow your IP or IP range in the application-specific context.xml file.
Manager File: ./webapps/manager/META-INF/context.xml
Host Manager File: ./webapps/host-manager/META-INF/context.xml
Edit the above files and add your IP address like the screenshot. After making changes restart Tomcat service.
Step 6 – Starting Tomcat Service
Tomcat is very easy to use, There is no need to compile its source. You simply extract the archive and start the tomcat server. Tomcat by default start on port 8080, So make sure no other application using the same port.
cd /usr/local/apache-tomcat9
chmod +x ./bin/startup.sh
./bin/startup.sh
[Sample Output]
Using CATALINA_BASE:   /usr/local/tomcat9
Using CATALINA_HOME:   /usr/local/tomcat9
Using CATALINA_TMPDIR: /usr/local/tomcat9/temp
Using JRE_HOME:        /usr/lib/jvm/java-11-oracle
Using CLASSPATH:       /usr/local/tomcat9/bin/bootstrap.jar:/usr/local/tomcat9/bin/tomcat-juli.jar
Tomcat started.
Step 7 – Access Tomcat in Browser
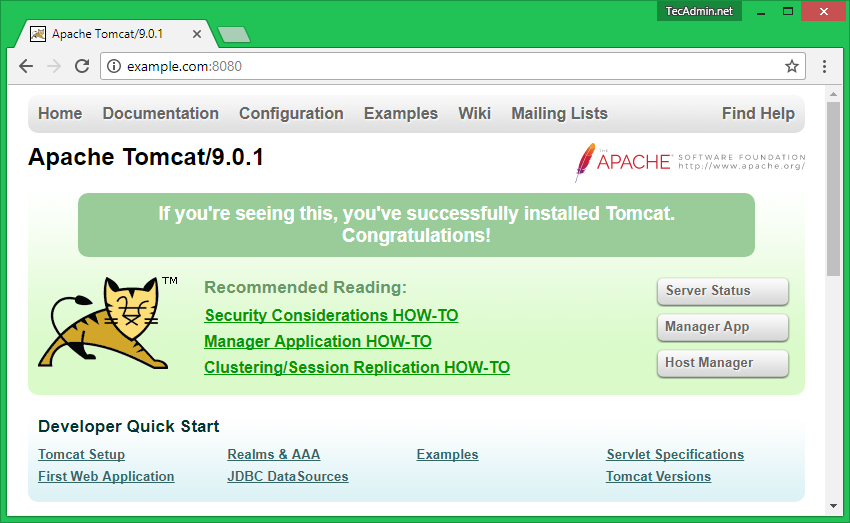
Tomcat server default works on port 8080. Access tomcat in the web browser by connecting your server on port 8080.
Access Tomcat Home- This is default home screen of tomcat 9. There are no authentication required to access this page..
http://localhost:8080
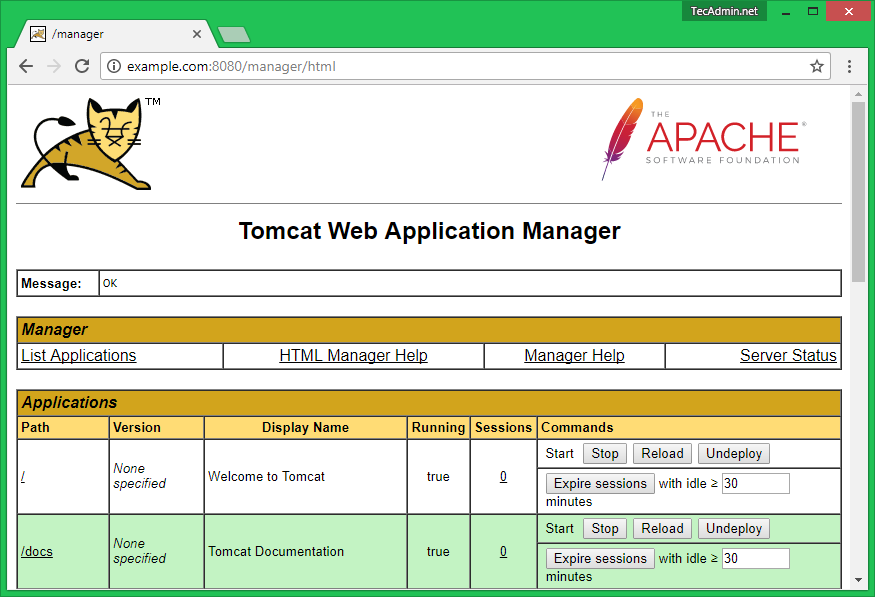
Access Manager App- Click on Manager App link displayed on home page.This page is allowed for Admin and Manager access both.
http://localhost:8080/manager/html
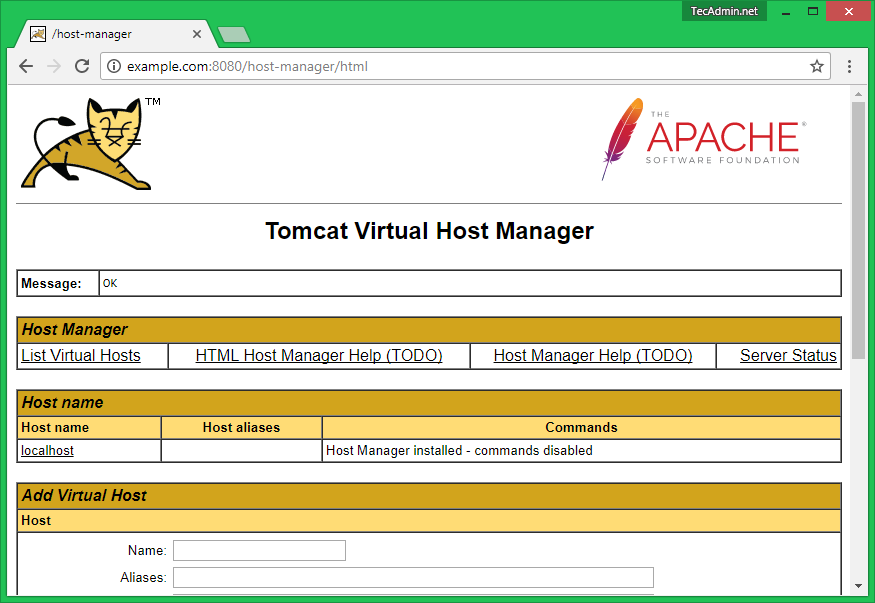
Access Host Manager Page:- Click on the Host Manager link on your Tomcat home.This page is allowed for Admin access only.
http://localhost:8080/host-manager/html


31 Comments
My java envirnments:
**************************************************************************************************************
pi@Home:~ $ java -version openjdk version “11.0.9.1” 2020-11-04 OpenJDK Runtime Environment (build 11.0.9.1+1-post-Raspbian-1deb10u2) OpenJDK Server VM (build 11.0.9.1+1-post-Raspbian-1deb10u2, mixed mode)
LAMP server install and running on port 80
The system has no built-in firewall and the Router firewall is configured to TCP/UDP (TX, RX) port 80 and 8080
**************************************************************************************************************
download and install tomcat from the following link:
wget https://downloads.apache.org/tomcat/tomcat-10/v10.0.2/bin/apache-tomcat-10.0.2.tar.gz
**************************************************************************************************************
Change the IP address to my local IP address in both following XML files:
Manager File: ./webapps/manager/META-INF/context.xml Host Manager File: ./webapps/host-manager/META-INF/context.xml
***************************************************************************************************
**************************************************************************************************
After installation complete, I manage to set the environment and start the server in the terminal with following command:
root@Home:/usr/local/tomcat10# ./bin/startup.sh
*************************************************************************************************
Output:
*************************************************************************************************
Using CATALINA_BASE: /usr/local/tomcat10 Using CATALINA_HOME: /usr/local/tomcat10 Using CATALINA_TMPDIR: /usr/local/tomcat10/temp> Using JRE_HOME: /usr/lib/jvm/java-11-oracle Using CLASSPATH: /usr/local/tomcat10/bin/bootstrap.jar:/usr/local/tomcat10/bin/tomcat->juli.jar Using CATALINA_OPTS:
Tomcat started.
**************************************************************************************************
but when I type localhost:8080 I get following error message in Chrome browser
**************************************************************************************************
This site can’t be reached localhost refused to connect.
Try:
Checking the connection
Checking the proxy and the firewall
ERR_CONNECTION_REFUSED
**************************************************************************************
I can’t understand the reason for this error any suggestion on what should I do to load tomcat index page in we browser
Thanks
Thank you for helping.
Hello Rahul,
I have installed tomcat 9 on ubuntu 18.04 but i keep getting a connection refused error what could this be?
where can i check to have this sorted
Thanks! You’ll need to update the download mirror though.
Hello! Thanks by the tutorial!
Please, i have installed tomcat 9 at LEMP Ubuntu 18.04.
And at the server block i putted:
location /tomcat/ {
include proxy_params;
proxy_pass http://tomcat/;
}
What is the correct configuration of this location to serve the pages correctly?
Thanks and Regards,
Thank you for this tutorial. It works for me.
Some commands did not pass I had to add “sudo”.
On the browser it did not work the url was not good : we must use this url: http://localhost: 8080
Finally very happy thank you very much 🙂
your writing worked for me in ubuntu 16.04 LTE.
setup as a service is not working. I delete the file from /etc folder
/etc/systemd/system/tomcat.service
thank you
Hi Rahul,
I am happy see your steps to install tomcat in linux but i am facing issue in date time formatting in tomcat catalina.out logs, i want indian format in logs loke 2018-07-30 2:16 PM like that, can you please help me out in this issue.
thank u …. its not running in browser ………. no error but its just loading nthing is showing ???
How can someone integrate Tomcat into Netbeans 8.2? I am getting an error as follows:
“(Catalina Home) Folder is invalid”. Is it due to the fact that Tomcat is not in its original directory? Thanks!
Connecting to www-us.apache.org (www-us.apache.org)|40.79.78.1|:80… connected.
HTTP request sent, awaiting response… 404 Not Found
2018-07-12 14:28:19 ERROR 404: Not Found.
Hi John, I have updated command with the latest URL.
Hello is there a way/means of making sure this is running each time on startup via systemd? Maybe a tomcat.service file? Thanks!
Hello great write-up will this be started by default by systemd upon each start-up? Thanks!
First it was a beautiful writing. Even if I follow all the steps, the selection made with the intelli j configuration is not tomcat home. The file path I chose is / usr / local / apache-tomcat9
Hello I stuck on step 6, When
./bin/startup.sh
I get
-bash: ./bin/startup.sh: Permission denied
How can I solve this?
Run this command to set execute permissions: (Also updated tutorial)
chmod +x ./bin/startup.sh
Tank you, it worked but I can’t access tomcat from the browser in step 7. I installed tommcat on a virtual server in my shool and I have access on it with openvpn. What can I do now?
What is showing on screen?
It’s showing : Tomcat started and on the browser : the computer 192.168.6.54 refused connection
Which ip I must put on step 5?
This is IP from where you need to access Host Manager dashboard. Generally, it will be your public IP, LAN IP or LAN network.
Thanks
Thank you. It is really good.
Thank you very much!
You are awesome man!! I wasted a whole damn day to install tomcat 9, but this helps me in the end.
Just one thing to add for new Ubuntu users: type this command in terminal to configure CATALINA_HOME environment variable;
$ sudo su –
thank you very much
Hi
thank you, thank you… thank you..very much : )
Thanks it works for me
Love the tutorial! Just curious how I would get Tomcat9 to startup on machine reboot though. Otherwise this tutorial worked wonders for me!
https://www.rosehosting.com/blog/install-tomcat-9-on-an-ubuntu-16-04-vps/
tells you how to set it up for machine reboot