Facebook Twitter Instagram
    TecAdmin
    • Home
    • Ubuntu 20.04
      • Upgrade Ubuntu
      • Install Java
      • Install Node.js
      • Install Docker
      • Install LAMP Stack
    • Tutorials
      • AWS
      • Shell Scripting
      • Docker
      • Git
      • MongoDB
    • FeedBack
    • Submit Article
    • About Us
    Facebook Twitter Instagram
    TecAdmin
    Home»Linux Distributions»Ubuntu»How to Install LightDM Display Manager on Ubuntu

    How to Install LightDM Display Manager on Ubuntu

    RahulBy RahulMay 3, 20222 Mins ReadUpdated:May 10, 2022

    LightDM is a free, opensource and lightweight X Display Manager for Linux Desktop systems. It is also used as a cross-desktop display manager. It supports various Desktop environments including various display technology, such as Wayland, Mir, and X windowing systems.

    This tutorial will help you to install the LightDM display manager on the Ubuntu Desktop system.

    Installing Lightdm on Ubuntu

    LightDM packages are available under default apt repositories. You can install lightdm on Ubuntu by running the following commands.

    sudo apt update 
    sudo apt install lightdm 
    

    Configure Lightdm as Default Display Manager

    Once the lightdm is installed on your system. You need to run the following command to set lightdm as the default display manager on your Ubuntu system.

    sudo dpkg-reconfigure lightdm 
    

    You will get a list of installed display managers below:
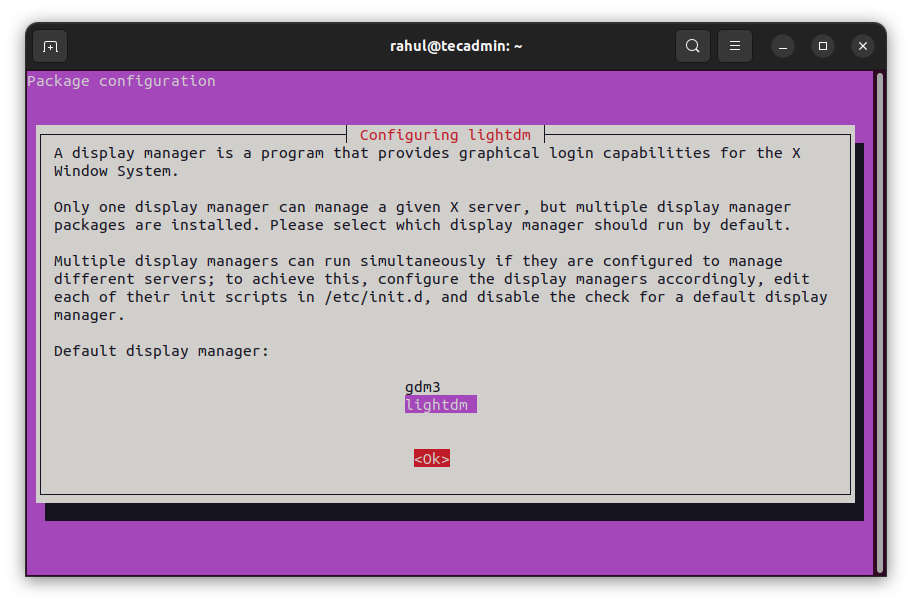
    How to Install Lightdm on Ubuntu
    Select lightdm as default display manager

    Use the keyboard UP+DOWN buttons to select lightdm and then press TAB to select the Ok button and hit Enter.

    Lightdm is now the default display manager on your Ubuntu desktop. Next time you will see the Lightdm login screen as shown below screenshot:
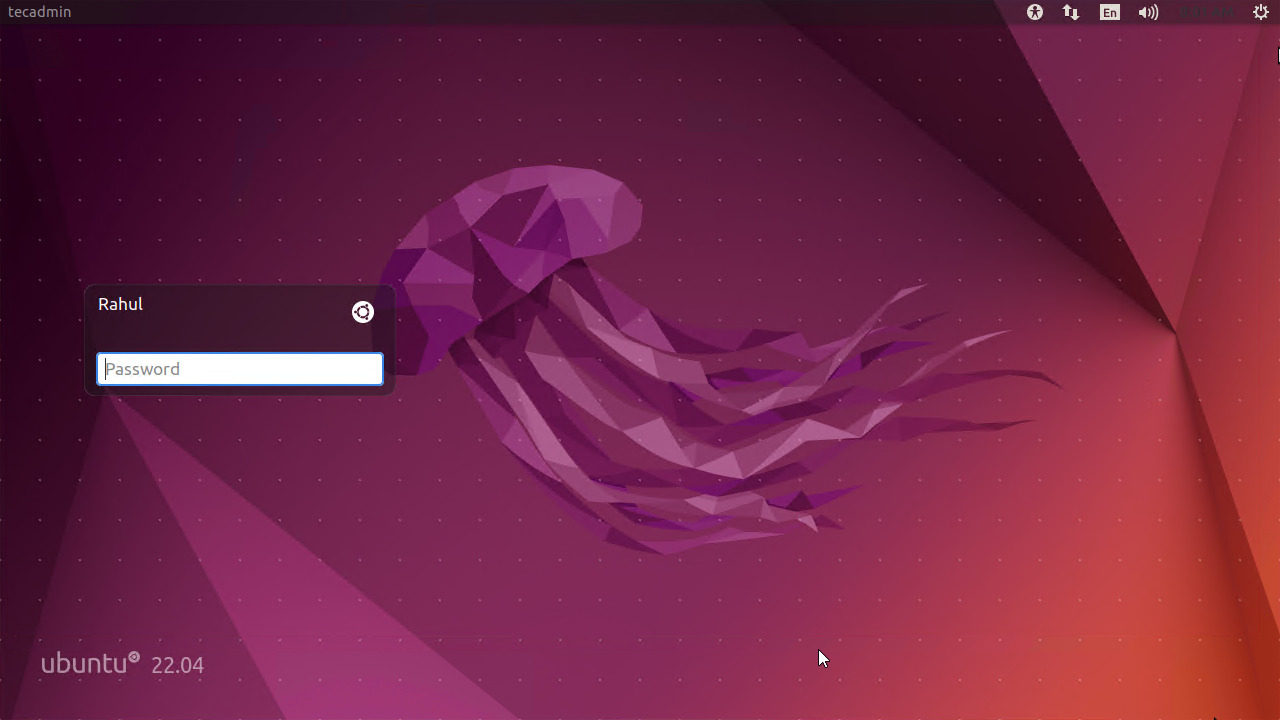
    How to Install Lightdm on Ubuntu
    Ubuntu login screen with lightdm

    In case, you still do not see the above screen reboot your system once.

    Uninstall Lightdm

    Before uninstalling the lightdm, switch back to gdm3 display manager

    sudo dpkg-reconfigure gdm3 
    

    Select the gdm3 and hit Ok button.

    Now, uninstall the lightdm package from the system.

    sudo apt remove lightdm  
    sudo apt autoremove
    

    Conclusion

    This how-to guide helps you with the installation of the Lightdm display manager on a Ubuntu desktop system. That loads the login screen faster than other display managers.

    display manager lightdm
    Share. Facebook Twitter Pinterest LinkedIn Tumblr Email WhatsApp
    Previous Article(Resolved) userauth_pubkey: key type ssh-rsa not in PubkeyAcceptedAlgorithms
    Next Article (Resolved) zookeeper is not a recognized option – Kafka

    Related Posts

    How to Install Composer on Ubuntu 22.04

    Updated:June 24, 20223 Mins Read

    How to Install Apache Kafka on Ubuntu 22.04

    Updated:June 5, 20225 Mins Read

    Setting Up Environment Variables on Ubuntu

    Updated:May 28, 20222 Mins Read

    How to Install Apache Solr 9.0 on Ubuntu 22.04

    Updated:May 26, 20223 Mins Read

    How to Install .NET Core (dotnet) on Ubuntu 22.04

    Updated:August 4, 20224 Mins Read

    Switching Display Manager in Ubuntu – GDM, LightDM & SDDM

    Updated:May 16, 20222 Mins Read

    Leave A Reply Cancel Reply

    Recent Posts
    • How to Import GPG Keys on Ubuntu & Debian (without apt-key)
    • How To Install Google Chrome On macOS
    • How to Install Minecraft on Ubuntu 22.04 & 20.04
    • Running a Cron job every Sunday (Weekly)
    • Running Multiple Commands At Once in Linux
    Facebook Twitter Instagram Pinterest
    © 2022 Tecadmin.net. All Rights Reserved | Terms  | Privacy Policy

    Type above and press Enter to search. Press Esc to cancel.