
An open-source, object-based relational database PostgreSQL, provides the user with the implementation of SQL and is commonly hosted on Linux. With PostgreSQL users can expand the system by defining self-data types, functions, and operators.
PostgreSQL is used by many large companies to save and store their data for various applications and it supports various programming interfaces as well as videos, texts, and images. In this article we’ll first go through the installation of PostgreSQL on ubuntu 20.04 then we’ll configure it to allow remote connection
Prerequsities
This article assumes that you already have running a PostgreSQL server on your system. If not, use one of the below links to install the PostgreSQL database server on your system.
Find Configuration File
In order to install PostgreSQL on our system we need to update our repository and for that execute the below command:
sudo -u postgres psql -c "SHOW config_file;"
Output:config_file ----------------------------------------- /etc/postgresql/13/main/postgresql.conf (1 row)
You need to change the listening address in the postgresql.conf configuration file showing in the command output. Also, you need to edit “pg_hba.conf” in the same directory to allow remote access.
Configure PostgreSQL to Allow Remote Connections
In order to allow all the IP addresses to connect to the PostgreSQL server, we need to configure the file and make some changes, for that you have located the configuration file in the previous step.
- Configuring
postgresql.conf:Now we need to open the file and make some changes in order to allow a remote connection. To open the file you’ve to use the keyword “nano” or you can run the command in the terminal that is provided below:
sudo nano /etc/postgresql/13/main/postgresql.confThis command will open this file and in it, you need to search “listen_addresses” and add the following line.
#listen_addresses = 'localhost'
listen_addresses = '*'
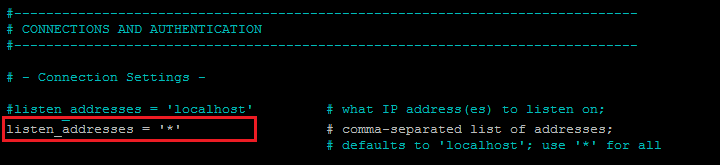
Change Listen Address in PostgreSQL All you’ve to do is change the listening address from localhost to “*” or add a new line as shown above. This will allow every IP address to be connected to the database server, or if you want to specify some particular ips you can type them with spaces between each IP address.
- Configuring
pg_hba.conf:In order to allow the users that we want to be connected to the database then we need to make changes in the “pg_hba.conf” file. This file will be available under the same directory as above.
Now open the file using the command provided below:
sudo nano /etc/postgresql/13/main/pg_hba.confIn the file you’ve to add the following lines in file:
# TYPE  DATABASE	USER	ADDRESS   	METHOD
host    all     	all     0.0.0.0/0       md5
host    all             all     :/0             md5
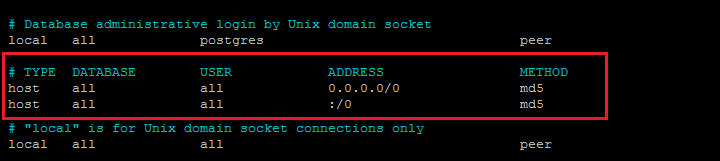
Allow Remote Hosts in PostgreSQL Save the configuration file and close it.
- Restart Service :
Now, restart the database service to apply changes by executing the below-mentioned command:
sudo systemctl restart postgresqlNow simply open the port “5432” in the firewall and you’re all set to see all the databases and you can bond from whichever ip address to the server of PostgreSQL:
sudo ufw allow 5432
That’s it. Your PostgreSQL database server is accessible from remote hosts.
Conclusion
PostgreSQL database is default set to bond with localhost which restricts the other IP address and host to connect or have the access to the PostgreSQL server. In this article, we guided you through the configuration of PostgreSQL to allow remote connection so that other IPs can bond to the server. In this way, other hosts can easily see the list of databases and connect to the PostgreSQL server remotely.
3 Comments
Hello,
I confirm that this causes an impossibility to connect to the server. The correct syntax for ‘all’ ipv6 is ::0/0
As Faheem Ahmed mentioned in your article an error for the ipv6 address. The better version that uses scram-sha-256 instead of md5 :
# IPv4 local connections:
host all all 0.0.0.0/0 scram-sha-256
# IPv6 local connections:
host all all ::/0 scram-sha-256
I think the following line might cause issues
host all all :/0 md5
The configuration to allow on IPv6 should be like:
host all all ::0/0 md5