
In this tutorial, you will learn how to create a simple graphical user interface (GUI) using Python and Tkinter. We’ll guide you through the process of crafting your first Tkinter application step-by-step, from installing the necessary dependencies to building and running the app.
Table of Contents
- Introduction to Python GUIs and Tkinter
- Setting up Your Environment
- Creating a Basic Tkinter Window
- Adding Widgets to Your Tkinter Application
- Layout Management
- Event Handling and Callback Functions
- Running and Testing Your Application
- Conclusion
1. Introduction to Python GUIs and Tkinter
Python offers several libraries for creating graphical user interfaces, including PyQt, Kivy, and Tkinter. Tkinter is the standard GUI library for Python and comes pre-installed with most Python installations. It provides an easy way to create windows, dialogs, buttons, and other GUI elements for desktop applications.
2. Setting up Your Environment
To get started with Tkinter, make sure you have Python 3.x installed on your computer. You can check the Python version by running the following command:
python --version
If you have Python installed, you should see the version number. If you don’t, please visit the official Python website to download and install the appropriate version for your operating system.
3. Creating a Basic Tkinter Window
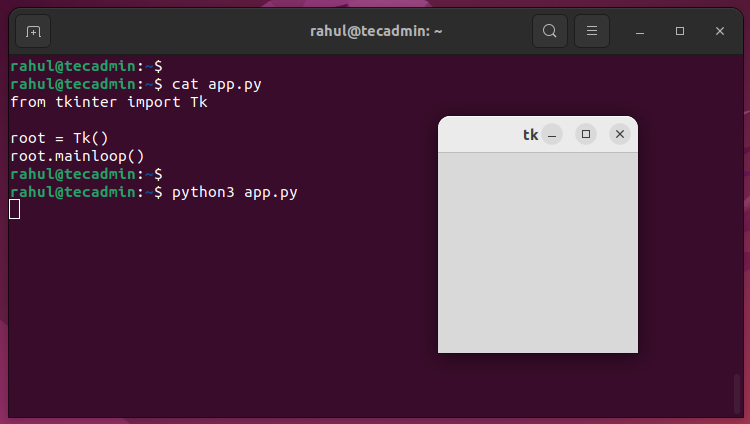
To create a basic Tkinter window, first, import the Tk class from the tkinter module:
1 | from tkinter import Tk |
Next, create a new instance of the Tk class and call the mainloop method to start the event loop:
1 2 | root = Tk() root.mainloop() |
This simple script creates an empty window. Save the script as app.py and run it using the following command:
python app.py

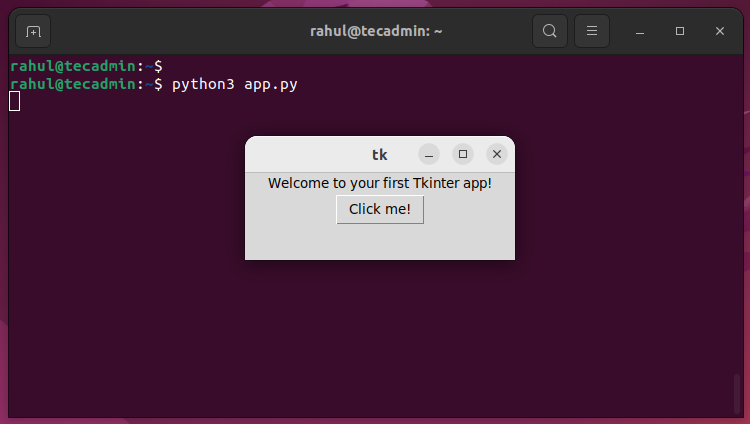
4. Adding Widgets to Your Tkinter Application
Widgets are the building blocks of any Tkinter application. They represent elements such as buttons, labels, and text boxes. To add widgets to your application, you need to import them from the tkinter module.
Let’s add a label and a button to our application:
1 2 3 4 5 6 7 8 9 10 11 | from tkinter import Tk, Label, Button root = Tk() label = Label(root, text="Welcome to your first Tkinter app!") label.pack() button = Button(root, text="Click me!") button.pack() root.mainloop() |
The pack method is used to position the widgets within the window.
5. Layout Management
Tkinter provides three geometry managers for organizing widgets: pack, grid, and place. We’ve already seen the pack method in action. Now, let’s use the grid manager to create a more complex layout:
1 2 3 4 5 6 7 8 9 10 11 12 13 | from tkinter import Tk, Label, Button, Entry root = Tk() Label(root, text="Username:").grid(row=0, column=0) Entry(root).grid(row=0, column=1) Label(root, text="Password:").grid(row=1, column=0) Entry(root, show="*").grid(row=1, column=1) Button(root, text="Login").grid(row=2, column=1, sticky="E") root.mainloop() |
The grid method positions widgets in a table-like structure. The row and column parameters define the widget’s position.


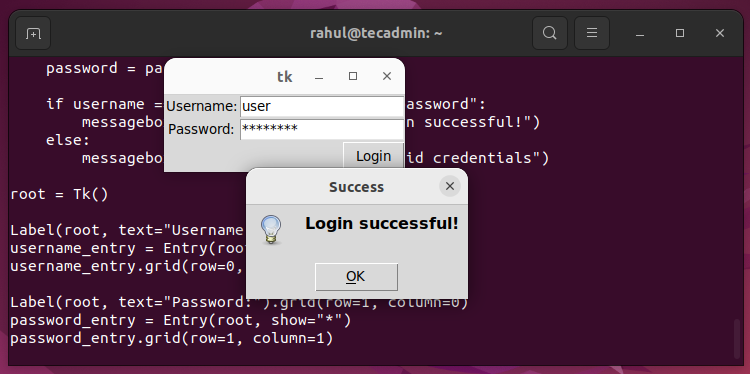
6. Event Handling and Callback Functions
To make your application interactive, you need to handle events, such as button clicks. To do this, you can define callback functions and bind them to the corresponding widgets. Let’s add a simple login functionality to our app:
1 2 3 4 5 6 7 8 9 10 11 12 13 14 15 16 17 18 19 20 21 22 23 24 | from tkinter import Tk, Label, Button, Entry, messagebox def on_login_click(): username = username_entry.get() password = password_entry.get() if username == "user" and password == "password": messagebox.showinfo("Success", "Login successful!") else: messagebox.showerror("Error", "Invalid credentials") root = Tk() Label(root, text="Username:").grid(row=0, column=0) username_entry = Entry(root) username_entry.grid(row=0, column=1) Label(root, text="Password:").grid(row=1, column=0) password_entry = Entry(root, show="*") password_entry.grid(row=1, column=1) Button(root, text="Login", command=on_login_click).grid(row=2, column=1, sticky="E") root.mainloop() |
In this example, we’ve created a function `on_login_click` that is called when the login button is clicked. The function checks whether the entered credentials are correct and displays an appropriate message using the messagebox module.

7. Running and Testing Your Application
Now that we have created a simple Tkinter application, it’s time to run and test it. Save your script as app.py and run it using the following command:
python app.py
A window containing the login form should appear. Try entering various combinations of usernames and passwords to see how the application responds.
Conclusion
In this tutorial, you learned how to create a simple Tkinter application step-by-step, from setting up your environment to building and running the app. You also learned how to add widgets, manage layouts, and handle events.
Now that you’ve mastered the basics of Tkinter, you can explore more advanced topics, such as creating custom widgets, implementing drag-and-drop functionality, or using themes to style your application. As you continue to develop your skills, you’ll be able to create even more sophisticated and powerful Python GUI applications.