React is a cross-platform JavaScript library maintained by Facebook. It’s used for creating user interfaces. Using the React Native, you can easily build the mobile apps. React Native provide Hot reloading of your application. So you can build your app faster. Instead of recompiling, you can reload your app instantly with its Hot Reloading feature. Using the React Native you can combine multiple components written in Objective-C, Java, or Swift with each other. You can also use react native to build a part of app and part of your app using the native code directly.
Use this quick start guide to start developing your mobile application with React Native.
Step 1 – Install Node.js
React native required Node.js to be installed on your system. To start development with a new app, we recommend using latest Node.js version. If you don’t have Node.js installed, Use one of below link to install latest node.js on your system.
- Install Node.js/NPM on Ubuntu, LinuxMint
- Install Node.js/NPM on Fedora, CentOS
- Install Node.js/NPM on Debian
Step 2 – Create React Native App
I’m using create-react-native-app NPM module for the creating the new react native app for the quickstart development. Let’s install create-react-native-app NPM package first using the below command.
npm install -g create-react-native-app
Then run the following commands to create a new React Native project called “myApp”:
cd /opt
create-react-native-app myApp
The above commands will create a directory myApp and generate required files for the starting development. Let’s go to below step to start development server with the new app.
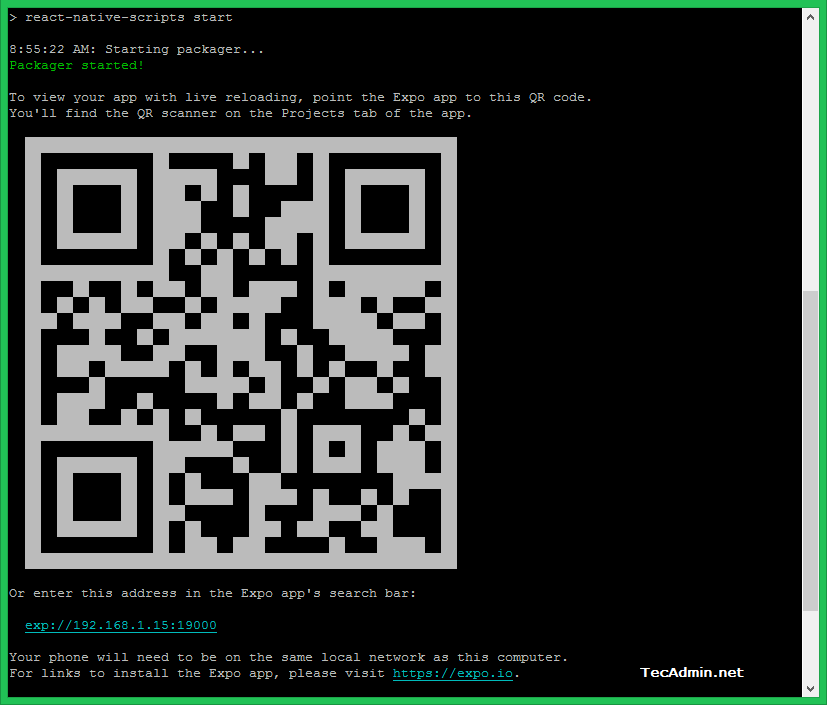
Step 3 – Start React Native App
The following commands will start a development server for you and print a QR code in your terminal. Use this qb code with your Expo app to access this app directory. Make sure the application system and mobile device are on same network.
cd myApp
npm start
Step 4 – Open App on Mobile Device
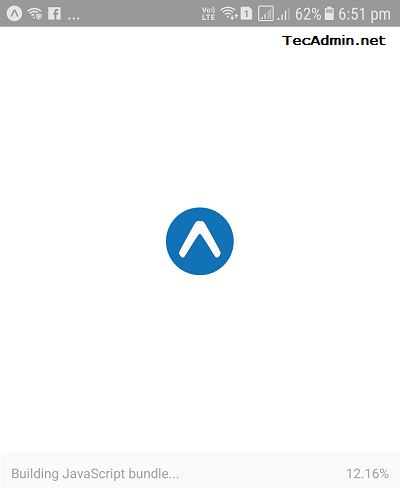
To access react application during development, I use Expo Android app on my Android device, You can install this application on Google Play.
After installation, start Expo app and scan the above showing barcode in your terminal window. As soon as you scan the barcode, you will see the build JavaScript message appear on your terminal. The same message will appear on the bottom of your Expo app on your mobile device.
After build finished, the default page will show on your mobile screen. It shows as following on my device.
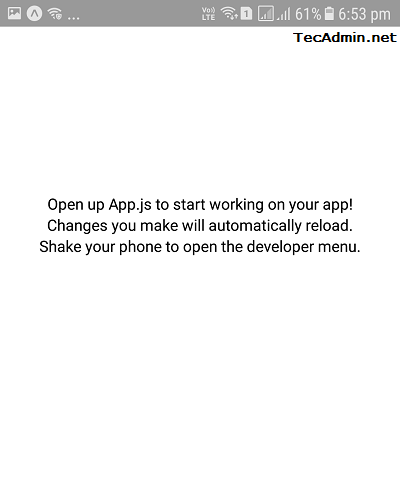
For the testing purpose, I opened a new terminal and navigate to the myApp directory. Now followed the instruction shown on default page and edited App.js. Change the Text with my own sample text.
1 2 3 4 5 6 7 8 9 10 | export default class App extends React.Component { render() { return ( <View style={styles.container}> <Text>Hello React!</Text> <Text>TecAdmin.net</Text> </View> ); } } |
As I save the file, React automatically build the page and updates shows on my mobile device. This is also the best feature of React to build application automatically on changes detected. My updated screen shows like below.