CloudFront is an popular caching and content delivery network service provided by the Amazon Web Services. It delivers data to users though its global data centers. CloudFront also make a local cache of content on its servers, which is further uses to quickie fulfill users requests.
The Invalidation allows us to remove object(s) from the Cloudfront cache before it expires. It allows you to remove a specific object from cache as well use supported wildcard character to remove multiple objects. You can also remove all the objects from cache by using “/*” parameters to invalidation requests.
In this tutorial, you will learn how to remove cloudfront cache using AWS CLI or management console. Use one of the blelow methods to create CloudFront invalidations and remove object from cache.
Create CloudFront Invalidation using AWS CLI
Assuming you already have installed AWS CLI on your system. If not, use this tutorial to install and configure aws cli on your system.
Now use the following example commands to create CloudFront invalidations and clear files from cache.
- Remove specific files from cache. You can define multiple files with full path to remove from cache.
aws cloudfront create-invalidation \ --distribution-id EXSE2W0DCDBPB \ --paths "/path/to/example-file.css" "/path/to/example-file-2.jpg" - Remove all content from a specific directory
aws cloudfront create-invalidation \ --distribution-id EXSE2W0DCDBPB \ --paths "/static/content/*" - Remove all objects stored in cache
aws cloudfront create-invalidation \ --distribution-id EXSE2W0DCDBPB \ --paths "/*" - Head to CloudFront in AWS Management Console
- Click on CloudFront ID from list to open its configuration
- Open “Invalidations” tab
- Click on “Create Invalidation” button
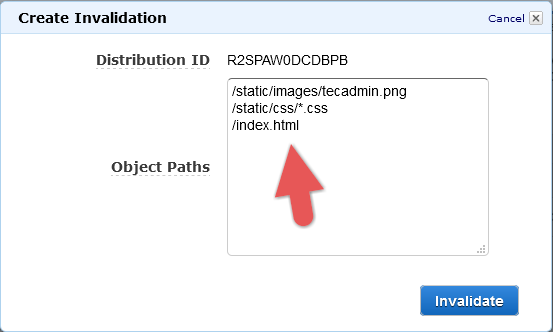
- Enter file names with full paths to remove from cache. You can also use “*” as wildcard names.
- To clear all cache use “
/*“. Then click Invalidate button. - Wait for the invalidation process completed
- All done
Create CloudFront Invalidation using AWS Console
You can also create invalidation request from AWS Management Console. Follow the below instructions to create Cloudfront invalidation:
Conclusion
This tutorial explained you to how to clear cache in CloudFront by creating the invalidation request via AWS CLI or Management Console.
You can also refer the following Python script to clear CloudFront cache and automate it.


