In the fast-paced world of cloud computing, the ability to dynamically adjust resources to meet the evolving needs of applications is crucial. “Expanding Your Horizons: How to Resize the Root Partition on AWS Linux Instances” serves as an indispensable guide for AWS users seeking to harness the power of flexibility and scalability. This comprehensive tutorial delves into the innovative capabilities of AWS Elastic Volumes, a game-changing feature that allows for the modification of volume attributes in real time, without impacting application performance.
Designed for developers, system administrators, and IT professionals, this guide illuminates the path towards seamless storage management. Whether you’re looking to expand the root partition to accommodate growing data needs or optimize performance by adjusting volume types, this article offers step-by-step instructions to achieve your goals without downtime. From understanding the basics of volume resizing to executing changes with minimal disruption, “Expanding Your Horizons” equips you with the knowledge to make informed decisions and efficiently manage your AWS storage infrastructure. Prepare to embark on a journey that will elevate your AWS skills and ensure your applications continue to thrive in the ever-changing landscape of cloud computing.
Resize EBS Volumes in EC2 Linux Instances
The AWS elastic volumes allow online resizing of the volumes without any downtime of your applications. This is very useful for production applications. Here is the step-by-step tutorial to resize the EBS volume on the EC2 instance and grow the partition size.
- I have a running ec2 instance with Ubuntu Linux. Login to the EC2 dashboard in the AWS account and identify your instance.

Running Ec2 Instance - That was initially launched with 12 GB of EBS volume attached to the EC2 instance. As the application data size grows now, we need to increase the disk space.

Current EBS Volume Size - Check the size of the EBS volume partition attached to the root file system.
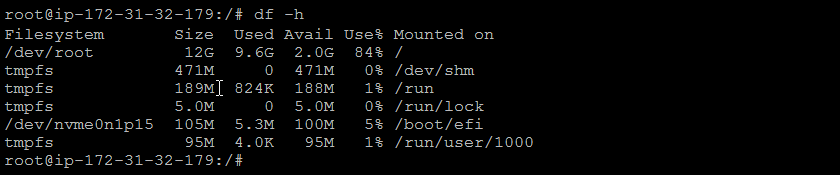
Check disk size attached to root filesystem. - Go to the EC2 dashboard and right-click on the EBS volume attached to your instance. Click Modify Volume:

Modify EBS Volume - A dialog box will appear in the browser.Set a new size for your EBS volume and click Modify
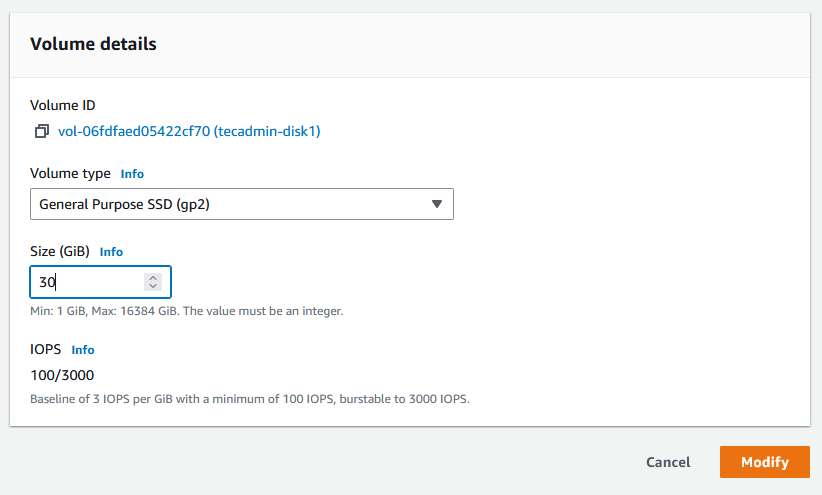
Set the new size for EBS volume - The volume will now begin the resize and optimization process, which you can see on the console. This will take a couple of minutes to complete ebs resize process. You will see a message in the volume state column:

Modifying EBS Volume - Wait until the volume state column change to “in-use” with green color.

EBS volume after resizing - Login to your instance and type “lsblk” command to view attached volumes and disk partitions. You may find that the volume size is increased but the partition mounted on the root (/) file system is still the same.
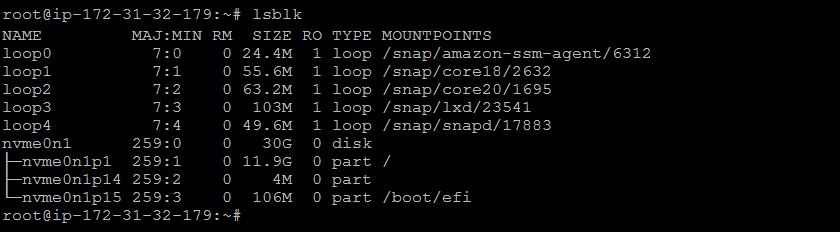
Check increased volume size - Use the “growpart” command to resize the root partition up to the free available volume. This command takes two parameters, first if the volume name, and second is the partition number.
Resize root partition
Now you can see the partition size is also increased with the “lsblk” command. -
Now, you need to resize the partition manually from the command line. Before this, identify the type of filesystem on that partition with the following command:

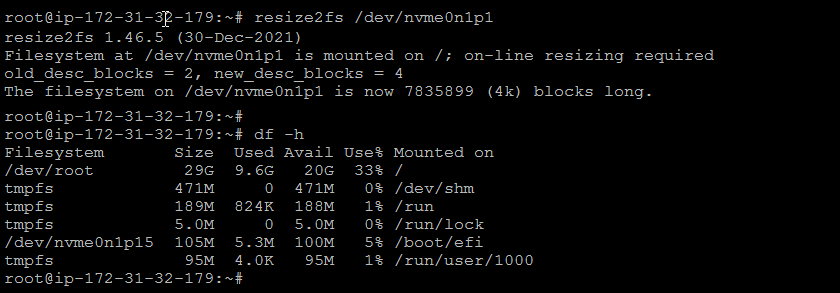
Check filesystem type - Finally, resize the partition based on the filesystem. In my case, the partition was formatted with Ext4. So I used the “resize2fs” command to resize it.
Resize root partition
If the partition is formatted with the XFS file system, then use “xfs_growfs -d /” command to perform this operation. - All done!
Wrap Up
The new AWS elastic volumes allow online resizing, which is very helpful for production environments. You can quickly increase the disk size of your instances without any downtime. In this tutorial, you have learned about resizing ebs volume on ec2 Linux instances.
In this guide, we have provides you steps to quickly resize the volume on an EC2 Linux instance.
")
9 Comments
after doing this could we save data?
Never save after making the changes in the disk partition. Just Quit without saving and perform a reboot. After that, log in and you can see the root volume size has increased.
Excellent! thank you very much for this step by step guide!
After delete the partition I can’t boot anymore…grub shows up
After delete the partition I can’t boot enaymore…grub shows up
wow and gud job plz update in future this type of cmd
This is great info, much easier than detaching, reattaching to a different instance to resize it, etc, etc.
It’s just what is needed for resizing a CentOS instance that was launched with a bigger-than-default size boot volume. Thank you so much for posting this!
This is really helpful. Thank you very much.
Thanks man,
You saved my lot of time.
It will be great if you explain how you achieved this.