OpenSSH is a widely used software suite for secure remote access to systems and servers over the internet. It provides an encrypted communication channel between two systems, preventing unauthorized access and eavesdropping. However, relying solely on a password for authentication can leave your system vulnerable to brute-force attacks and password guessing. Two-factor authentication (2FA) provides an extra layer of security to OpenSSH by requiring users to provide an additional piece of information, usually a one-time code generated by a mobile app, in addition to their password.
In this article, we will explore how to set up OpenSSH with two-factor authentication on a Linux server, adding an extra layer of security to your remote access.
Step 1: Installing Google Authenticator
The first step is to install the Google Authenticator application on the server. Google Authenticator is a widely used mobile app that generates one-time codes for 2FA. It is available for both Android and iOS devices.
To install Google Authenticator on a Linux server, use the following command:
sudo apt-get install libpam-google-authenticator
One RHEL-based systems use:
sudo yum install google-authenticator
This will install the Google Authenticator module for Pluggable Authentication Modules (PAM) on your server.
Step 2: Configuring Google Authenticator
Once you have installed Google Authenticator, you need to configure it for your user account. To do this, run the following command:
google-authenticator
This will prompt you with a series of questions to configure Google Authenticator for your user account. The questions include:
- Do you want authentication tokens to be time-based (y/n)?
- If you lose your phone, you can recover your tokens from backup codes. Do you want to enable this feature (y/n)?
- Do you want to require a confirmation code each time you log in (y/n)?
Answer the questions according to your preference. Once you have completed the setup, Google Authenticator will generate a QR code that you can scan using the Google Authenticator app on your mobile device.
https://www.google.com/chart?chs=200x200&chld=M|0&cht=qr&chl=otpauth://totp/[email protected]%3Fsecret%3DWUGQECLUOFLAEAAZ
Your new secret key is: WUGQECLUOFLAEAAZ
Your verification code is 002879
Your emergency scratch codes are:
  52979690
  49230818
  19888375
  80196807
  17714397

Do you want me to update your "~/.google_authenticator" file (y/n) y

Do you want to disallow multiple uses of the same authentication
token? This restricts you to one login about every 30s, but it increases
your chances to notice or even prevent man-in-the-middle attacks (y/n) y

By default, tokens are good for 30 seconds and in order to compensate for
possible time-skew between the client and the server, we allow an extra
token before and after the current time. If you experience problems with poor
time synchronization, you can increase the window from its default
size of 1:30min to about 4min. Do you want to do so (y/n) y

If the computer that you are logging into isn't hardened against brute-force
login attempts, you can enable rate-limiting for the authentication module.
By default, this limits attackers to no more than 3 login attempts every 30s.
Do you want to enable rate-limiting (y/n) y
Google Authenticator will show you with a secret key and many “emergency scratch codes.” Emergency codes can only be used one time in case of you secret key lost, so write down them to a safe place.
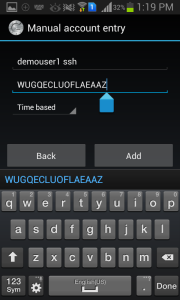
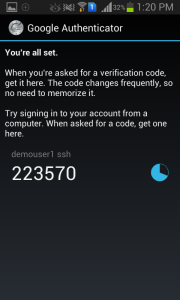
Use Google Authenticator Application in your Android, iPhone or Blackberry phones to generate verification code by entering secret key. You can also scan the bar code provided in url to do it.
You may also used Java based applications to generate verification codes. Use below link to get details.
http://blog.jcuff.net/2011/02/cli-java-based-google-authenticator.html
Step 3: Configuring OpenSSH
Now that you have configured Google Authenticator for your user account, you need to configure OpenSSH to use it.
- To do this, edit the “/etc/pam.d/sshd” file using your favorite text editor:
sudo nano /etc/pam.d/sshdAdd the following line at the top of the file:
1auth required pam_google_authenticator.soSave and close the file.
- Next, edit the “/etc/ssh/sshd_config” file:
sudo nano /etc/ssh/sshd_configFind the line that starts with “ChallengeResponseAuthentication” and change its value to yes:
1ChallengeResponseAuthentication yesSave and close the file.
- Finally, restart the SSH service for the changes to take effect:
sudo service ssh restart
Step 4: Testing
Now that you have configured OpenSSH with two-factor authentication, you can test it by attempting to log in to your server from a remote machine. When you are prompted for your password, you will also be prompted for a verification code from the Google Authenticator app on your mobile device.
If you have configured everything correctly, you should be able to successfully log in to your server using both your password and the verification code.
Conclusion
Using OpenSSH with two-factor authentication is a simple but effective way to add an extra layer of security to your remote access. By requiring users to provide an additional piece of information, such as a one-time code generated by a mobile app, you can significantly reduce the risk of unauthorized access to your system.
By following the steps outlined in this article, you can easily set up OpenSSH with two-factor authentication on your Linux server. Remember to always keep your server and Google Authenticator app updated to ensure the best possible security.
It is worth noting that while 2FA can greatly improve security, it is not foolproof. Attackers can still use social engineering or other methods to trick users into revealing their passwords or verification codes. Therefore, it is important to also implement other security measures, such as regular password changes, strong password policies, and intrusion detection systems, to further protect your system.
In conclusion, using OpenSSH with two-factor authentication can significantly enhance the security of your remote access. By following the steps outlined in this article, you can easily set up 2FA for your OpenSSH on your Linux server. Always keep your system and Google Authenticator app updated to ensure the best possible security.


3 Comments
Looks like ChallengeResponseAuthentication has changed to KbdInteractiveAuthentication in Ubuntu 22.04 (and Mint 21.1 in my case):
https://discourse.ubuntu.com/t/configure-ssh-to-use-two-factor-authentication/13956
You say install EPEL repo, but give commands for repmforge
Thanks Bruno to pointing… We have updated the article.