Transport Layer Security (TLS) is a cryptographic protocol designed to secure communications over a computer network. TLS 1.2, released in 2008, has become the de facto standard for secure data transmission. As a .NET developer, it’s essential to understand how to implement and configure TLS 1.2 within your applications.
In this tutorial, we will walk you through a step-by-step guide to securing your .NET applications with TLS 1.2.
Prerequisites
Before we begin, ensure you have the following:
- A basic understanding of .NET programming.
- Visual Studio installed on your computer.
- A .NET application in which you want to implement TLS 1.2.
Step 1: Update Your .NET Framework
To ensure compatibility with TLS 1.2, it’s recommended to use .NET Framework 4.6 or later. You can update your application’s target framework within Visual Studio by following these steps:
- Open your .NET project in Visual Studio.
- Right-click on your project in the Solution Explorer, and select “Properties”.
- In the “Application” tab, find the “Target Framework” dropdown and select the appropriate version (4.6 or later).
- Save and close the project properties.
Step 2: Enabling TLS 1.2 in Your Application
To enable TLS 1.2 for outgoing connections in your .NET application, add the following line of code:
System.Net.ServicePointManager.SecurityProtocol |= SecurityProtocolType.Tls12;
Place this line in the application startup code, such as the Main method or the Global.asax file for web applications.
For incoming connections, ensure your application is running on an updated web server, such as IIS 10.0, which supports TLS 1.2 by default.
Step 3: Configuring Cipher Suites
Cipher suites determine the combination of cryptographic algorithms used for encryption, key exchange, and data integrity. To configure cipher suites for your .NET application, follow these steps:
- Open the Windows Registry Editor by pressing Win + R and typing regedit.
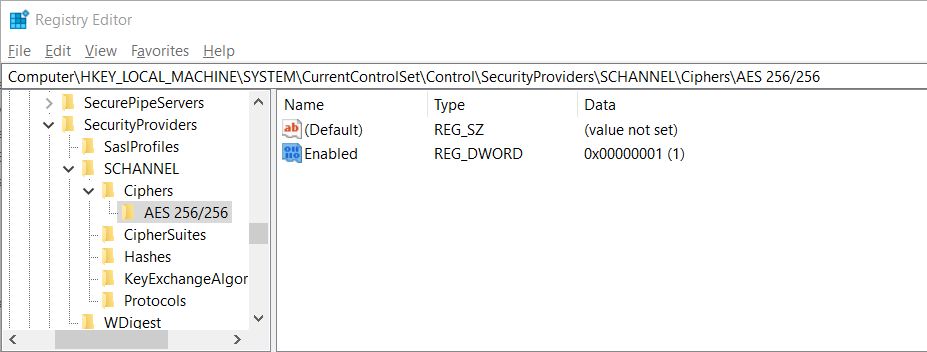
- Navigate to HKEY_LOCAL_MACHINE\SYSTEM\CurrentControlSet\Control\SecurityProviders\SCHANNEL\Ciphers.
- Create new keys for each cipher suite you want to enable or disable. For example, to enable AES 256, create a new key named AES 256/256.
- Inside each key, create a new “DWORD (32-bit)” value called Enabled, and set its value to 1 for enabling or 0 for disabling the cipher suite.

Step 4: Validating Your Implementation
To ensure your implementation of TLS 1.2 is working correctly, use a third-party tool like SSL Labs’ SSL Server Test. Enter your application’s URL and run the test to verify your server’s security settings.
Step 5: Troubleshooting
If you encounter issues when implementing TLS 1.2, consider the following:
- Verify that your .NET Framework version is up-to-date and compatible with TLS 1.2.
- Check your web server’s settings and ensure that TLS 1.2 is enabled.
- Review your application code to ensure the TLS 1.2 security protocol is properly set.
- Double-check your cipher suite configurations in the Windows Registry.
Conclusion
Implementing TLS 1.2 in your .NET applications is critical for ensuring secure data transmission and meeting industry standards. By following this step-by-step tutorial, you will be well on your way to securing your applications and protecting your users sensitive data.
