
Ensuring the security of a website is crucial in today’s digital age. One effective way to enhance web security is by implementing the ‘Upgrade-Insecure-Requests’ directive in Apache. This guide will walk you through the process step by step, making it accessible even for beginners.
What is ‘Upgrade-Insecure-Requests’?
‘Upgrade-Insecure-Requests’ is a directive that can be set in your website’s HTTP header via the Apache server configuration. It instructs browsers to upgrade all insecure HTTP requests to secure HTTPS. This is particularly useful for protecting your site and its users from man-in-the-middle attacks.
Prerequisites
- Basic understanding of Apache server and its configuration files.
- Access to your server’s command line.
- Sudo or root privileges on the server.
Step 1: Enable Apache Headers Module
Apache needs its headers module to modify HTTP headers, including setting up the ‘Upgrade-Insecure-Requests’ directive.
- Open your terminal.
- Enable the module by running:
sudo a2enmod headers - Restart Apache to apply the change:
sudo systemctl restart apache2
Step 2: Edit Apache VirtualHost Configuration
- Locate your Apache VirtualHost configuration file. It’s typically found in `/etc/apache2/sites-available/` or `/etc/httpd/conf.d/`.
- Open the file with a text editor. For example:
sudo nano /etc/apache2/sites-available/your-site.confReplace `your-site.conf` with your actual configuration file name.
Step 3: Add the ‘Upgrade-Insecure-Requests’ Directive
- Inside the <VirtualHost> block of your configuration file, add the following line:
Header always set Content-Security-Policy "upgrade-insecure-requests" - Here’s an example of what your configuration might look like:
<VirtualHost *:80>
    ServerName www.example.com
    # ... other configurations ...
    Header always set Content-Security-Policy "upgrade-insecure-requests"
</VirtualHost>
Step 4: Restart Apache Server
After saving your changes, restart Apache to apply the new configuration:
sudo systemctl restart apache2
Step 5: Testing
To ensure everything is set up correctly:
- Visit your website.
- Right-click on the page, and select “Inspect” or “Inspect Element” to open the Developer Tools.
- Go to the “Network” tab and reload the page.
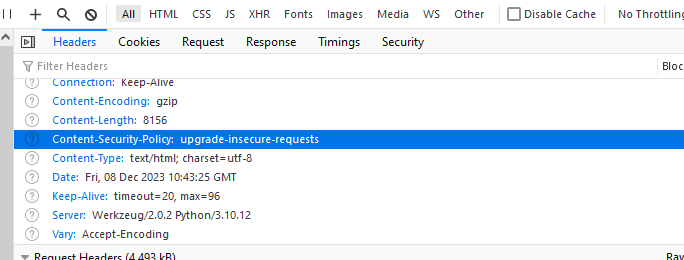
- Click on any request and look for the ‘Content-Security-Policy’ header in the response headers section. It should include `upgrade-insecure-requests`.

Conclusion
Congratulations! You have successfully set up the ‘Upgrade-Insecure-Requests’ directive in your Apache server. This setup helps enhance the security of your website by ensuring that all requests are made over HTTPS, providing an additional layer of security for your users.
Remember, web security is a continuous process. Keep your server and software updated, and stay informed about best practices in web security.