PHP FPM (FastCGI Process Manager) is an alternative implementation of PHP FastCGI. It provides some additional features like Adaptive process spawning which is useful for sites. This tutorial will help you to install Apache with PHP-FPM/FastCGI on Ubuntu 20.04 system. In this tutorial, we are using PHP 7.4 and configure with Apache using PHP-FPM and FastCGI.
You can also visit the previous tutorial to configure Apache with multiple PHP versions using PHP-FPM/FastCGI on Ubuntu systems.
Step 1 – Installing Apache
Apache web server debian packages are available under the default repositories. Login to your Ubuntu system with sudo privileges account. Open a terminal and execute the following commands:
sudo apt update
sudo apt install apache2 libapache2-mod-fcgid
The above commands will install Apache and FastCGI module to your server.
Step 2 – Install PHP with FPM
Next, install PHP and PHP-FPM on your Ubuntu system. For this tutorial, we choose PHP 7.4 to install using
For the PHP installation we recommend to use ppa:ondrej/php PPA. Execute below couple of commands to add the PPA to your system.
sudo apt install software-properties-common
sudo add-apt-repository ppa:ondrej/php
Then install PHP 7.4 (or required version) the latest version available on the day of writing this tutorial. Simply execute follows commands for the installation of PHP and PHP-FPM packages.
sudo apt update
sudo apt install php7.4 php7.4-fpm
After installing the packages php7.4-fpm service will automatically be started. To make sure, type:
sudo systemctl status php7.4-fpm

● php7.4-fpm.service - The PHP 7.4 FastCGI Process Manager
     Loaded: loaded (/lib/systemd/system/php7.4-fpm.service; enabled; vendor preset: enabled)
     Active: active (running) since Sat 2020-05-09 04:41:44 UTC; 19s ago
       Docs: man:php-fpm7.4(8)
    Process: 375077 ExecStartPost=/usr/lib/php/php-fpm-socket-helper install /run/php/php-fpm.sock /etc/php/7.4/fpm/pool.d/www.conf 74 (code=exited>
   Main PID: 375073 (php-fpm7.4)
     Status: "Processes active: 0, idle: 2, Requests: 0, slow: 0, Traffic: 0req/sec"
      Tasks: 3 (limit: 2283)
     Memory: 9.3M
     CGroup: /system.slice/php7.4-fpm.service
             ├─375073 php-fpm: master process (/etc/php/7.4/fpm/php-fpm.conf)
             ├─375075 php-fpm: pool www
             └─375076 php-fpm: pool www

May 09 04:41:43 tecadmin systemd[1]: Starting The PHP 7.4 FastCGI Process Manager...
May 09 04:41:44 tecadmin systemd[1]: Started The PHP 7.4 FastCGI Process Manager.
Step 3 – Apache Configuration
Now, You need to enable some of the Apache modules required for the FastCGI confiugration. You can enable the requird module by running command:
sudo a2enmod actions fcgid alias proxy_fcgi
Then configure Apache Virtual Host to run with FPM/FastCGI. For this tutorial, we use default VirtualHost. Edit VirtualHost host configuration file in a text editor. You can also create a new configuration as per your choice.
sudo vim /etc/apache2/sites-available/000-default.conf
Update the configuration as followings.
1 2 3 4 5 6 7 8 9 10 11 12 13 14 15 16 17 18 19 | <VirtualHost *:80> ServerName example.com ServerAlias www.example.com DocumentRoot /var/www/html <Directory /var/www/html> Options -Indexes +FollowSymLinks +MultiViews AllowOverride All Require all granted </Directory> <FilesMatch \.php$> # 2.4.10+ can proxy to unix socket SetHandler "proxy:unix:/var/run/php/php7.4-fpm.sock|fcgi://localhost" </FilesMatch> ErrorLog ${APACHE_LOG_DIR}/error.log CustomLog ${APACHE_LOG_DIR}/access.log combined </VirtualHost> |
Save your changes to the configuration file and restart Apache to reload the changes.
sudo systemctl restart apache2
Step 4 – Verify Setup
Apache with PHP-FPM configuration has been done. Now all the PHP files will be run with the FPM.
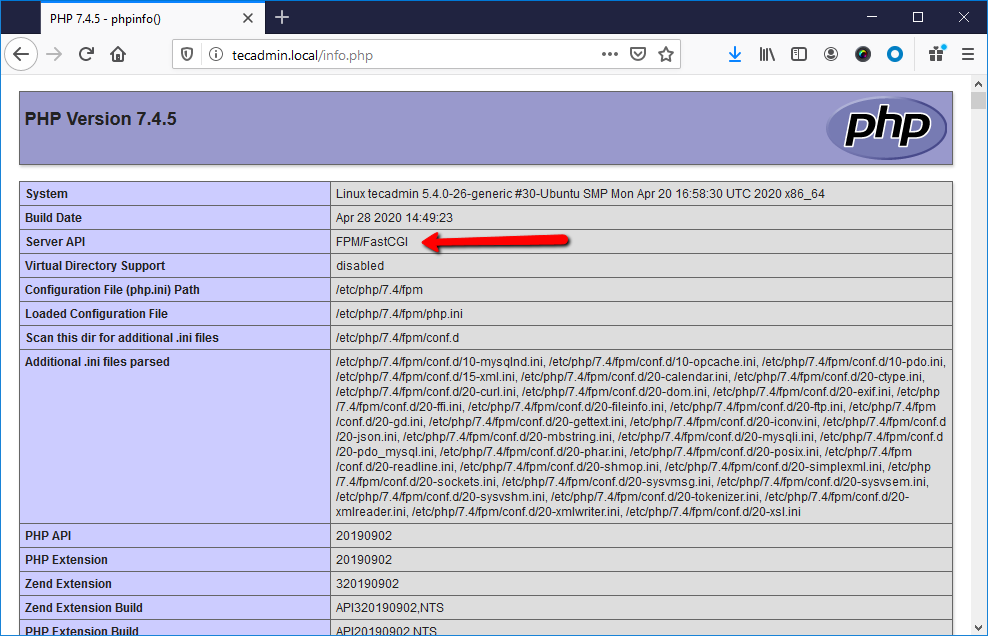
To verify these settigns, create a PHP script with phpinfo() function and place it to your server document root. Use below command to create file:
echo "<?php phpinfo(); ?>" > /var/www/html/info.php
Then access the info.php using server IP address (for default VirtualHost) or your configured domain in Apache VirtualHost.
Conclusion
This tutorial helps you to install Apache with PHP-FPM on Ubuntu system.


5 Comments
Why not use:
apt install php7.4-cgi php7.4-fpm
a2enconf php7.4-cgi
apachectl reload apache2
and eliminate steps:
sudo apt install software-properties-common
sudo add-apt-repository ppa:ondrej/php
sudo a2enmod actions fcgid alias proxy_fcgi
sudo vim /etc/apache2/sites-available/000-default.conf
Thank you sir for adding days to my life!
Hi,
small typo: sudo systemctl status php7.3-fpm <– 7.4?
thanks rahul, its really helpful. few questions though.
Can you please share, best way to turn off php fpm and revert back to normal php 7.4 ..
huge thanks,
Comment below section from virtual host:
  <FilesMatch \.php$>
        # 2.4.10+ can proxy to unix socket
        SetHandler "proxy:unix:/var/run/php/php7.4-fpm.sock|fcgi://localhost"
   </FilesMatch>