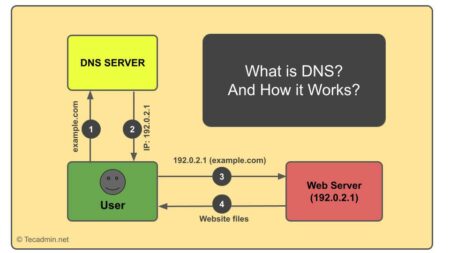
Definition at Wikipedia:
Caching name servers, also called DNS caches, store DNS query results for a period of time determined in the configuration (time-to-live) of each domain-name record. DNS caches improve the efficiency of the DNS by reducing DNS traffic across the Internet, and by reducing load on authoritative name-servers, particularly root name-servers. Because they can answer questions more quickly, they also increase the performance of end-user applications that use the DNS. Read more
This article will help you to setup caching nameserver on your CentOS/RHEL 6 system.
Step 1: Install BIND Packages
Install bind packages using below command. In CentOS/RHEL 6 chaching-nameserver package has been included with bind package.
# yum install bind bind-chroot
Step 2: Create Configuration File
Copy bind configuration file from bind sample files using below command. Change the path of files as per version you have installed.
# cd /var/named/chroot/etc
# cp /usr/share/doc/bind-9.9.2/sample/etc/named.conf  .
# cp /usr/share/doc/bind-9.9.2/sample/etc/named.rfc1912.zones  .
Step 3: Update Configuration File
Edit bind configuration file in your favorite editor and make necessary changes as per below settings or use below configuration.
# /var/named/chroot/etc/named.conf
// /var/named/chroot/etc/named.conf
options {
        listen-on port 53 { 127.0.0.1; any; };
        listen-on-v6 port 53 { ::1; };
        directory       "/var/named";
        dump-file       "/var/named/data/cache_dump.db";
        statistics-file "/var/named/data/named_stats.txt";
        memstatistics-file "/var/named/data/named_mem_stats.txt";
        allow-query     { localhost; any; };
        allow-query-cache    { localhost; any; };
        recursion yes;

        dnssec-enable yes;
        dnssec-validation yes;
        dnssec-lookaside auto;

        /* Path to ISC DLV key */
        bindkeys-file "/etc/named.iscdlv.key";

        managed-keys-directory "/var/named/dynamic";
};

logging {
        channel default_debug {
                file "data/named.run";
                severity dynamic;
        };
};

include "/etc/named.rfc1912.zones";
Now update required permissions on configuration files using below command.
# chown root:named named.conf named.rfc1912.zones
Step 4: Check Configuration File
We recommend to check DNS configuration file before restarting service.
# named-checkconf named.conf
Step 5: Restart Bind Service
Now installation of bind service has been completed. Lets start bind (named) service using following command.
# service named restart
Enable auto start bind service on system boot.
# chkconfig named on
Step 6: Finally Test Caching Only DNS
Send query to your dns server directly using below command.
Syntax: nslookup <domainname> <caching dns server name/ip>
# nslookup yahoo.com 192.168.1.90
[Sample Output:]
Server:         192.168.1.91
Address:        192.168.1.91#53

Non-authoritative answer:
Name:   yahoo.com
Address: 98.138.253.109
Name:   yahoo.com
Address: 98.139.183.24
Name:   yahoo.com
Address: 206.190.36.45
Congratulation’s! You have successfully configured caching nameserver on your linux system. Read out next articles Configure DNS Server on CentOS/RHE 6 and Setup Master Slave DNS Server on CentOS/RHEL 6.

7 Comments
Hello again
from the /var/log/messages
I can read the following line: Oct 29 03:06:36 ns named[960]: loading configuration from ‘/etc/named.conf’
Which means, the /var/named/chroot/etc/named.conf has no relationship with /etc/named.conf
When I compare both files, I see some differences.
[root@ns etc]# diff -y /etc/named.conf /var/named/chroot/etc/named.conf
// <
// named.conf <
// <
// Provided by Red Hat bind package to configure the ISC BIND <
// server as a caching only nameserver (as a localhost DNS re <
// <
// See /usr/share/doc/bind*/sample/ for example named configu <
// <
dnssec-lookaside auto;
/* Path to ISC DLV key */ | /* Path to ISC DLV key */
bindkeys-file “/etc/named.iscdlv.key”; | bindkeys-file “/etc/named.iscdlv.key”;
managed-keys-directory “/var/named/dynamic”; | managed-keys-directory “/var/named/dynamic”;
}; };
logging { logging {
channel default_debug { channel default_debug {
file “data/named.run”; file “data/named.run”;
severity dynamic; severity dynamic;
}; };
}; };
zone “.” IN { <
type hint; <
file "named.ca"; <
}; <
<
include "/etc/named.rfc1912.zones"; include "/etc/named.rfc1912.zones";
include "/etc/named.root.key"; <
[root@ns etc]#
And…
from http://www.howtoforge.com/perfect-server-centos-5.6-x86_64-ispconfig-3-p5
Can you explain why did this guy do the following ?
chmod 755 /var/named/
chmod 775 /var/named/chroot/
chmod 775 /var/named/chroot/var/
chmod 775 /var/named/chroot/var/named/
chmod 775 /var/named/chroot/var/run/
chmod 777 /var/named/chroot/var/run/named/
cd /var/named/chroot/var/named/
ln -s ../../ chroot
touch /var/named/chroot/var/named/named.local
cp /usr/share/doc/bind-9.3.6/sample/var/named/named.root /var/named/chroot/var/named/named.root
touch /var/named/chroot/etc/named.conf.local
vi /var/named/chroot/etc/named.conf
//
// named.conf
//
// Provided by Red Hat bind package to configure the ISC BIND named(8) DNS
// server as a caching only nameserver (as a localhost DNS resolver only).
//
// See /usr/share/doc/bind*/sample/ for example named configuration files.
//
options {
listen-on port 53 { any; };
listen-on-v6 port 53 { any; };
directory "/var/named/chroot/var/named";
dump-file "/var/named/chroot/var/named/data/cache_dump.db";
statistics-file "/var/named/chroot/var/named/data/named_stats.txt";
memstatistics-file "/var/named/chroot/var/named/data/named_mem_stats.txt";
allow-query { any; };
recursion no;
allow-recursion { none; };
};
logging {
channel default_debug {
file "data/named.run";
severity dynamic;
};
};
zone "." IN {
type hint;
file "named.root";
};
include "/var/named/chroot/var/named/named.local";
You need to add: yum install bind-utils
for those that are following your instructions right after a clean install from CentOS minimal.
Thanks
Isn’t there any other option or package to use for a dns cache?
For me and many, BIND is specifically a very poor piece of software and wish to avoid.
Debian has several variants, I don’t understand why Redhat Enterprise would not have a good robust alternative.
I do not see the step to setup resolv.conf, you need to point resolv.conf to the caching name server
Hi,
Using yum install and update named I have bind.x86_64 version 30:9.3.6-20.P1.el5_8.6 installed on Centos 5.5 64bit.
It is working and running. However, I suspect that it does not do caching.
So I tried to use some lines from your configuration.
When I run, named displayed following errors:
unknown option ‘allow-query’
unknown option ‘allow-query-cache’
unknown option ‘recursion’
unknown option ‘dnssec-enable’
unknown option ‘dnssec-validation’
unknown option ‘dnssec-lookaside’
What could be the reason, is centos 5 too old?
Hello! first of all thanks for taking the time to read my query …
Know where cahe record is saved?
is to find the sites visited by my office terminals and generate blocking rules for certain domains.
thank you very much!
Adrian!
pd: sorry for my bad English
I followed the steps correctly and it all worked out. Thanks a lot for sharing your knowledge with us
Thanks