Kubernetes, often called K8s, is a powerful system for managing containerized applications across a cluster of machines. If you’re new to this, don’t worry. Setting up a Kubernetes cluster on Ubuntu is straightforward and this guide will walk you through it step-by-step. By the end, you’ll have a working K8s cluster where you can deploy and manage your applications easily.
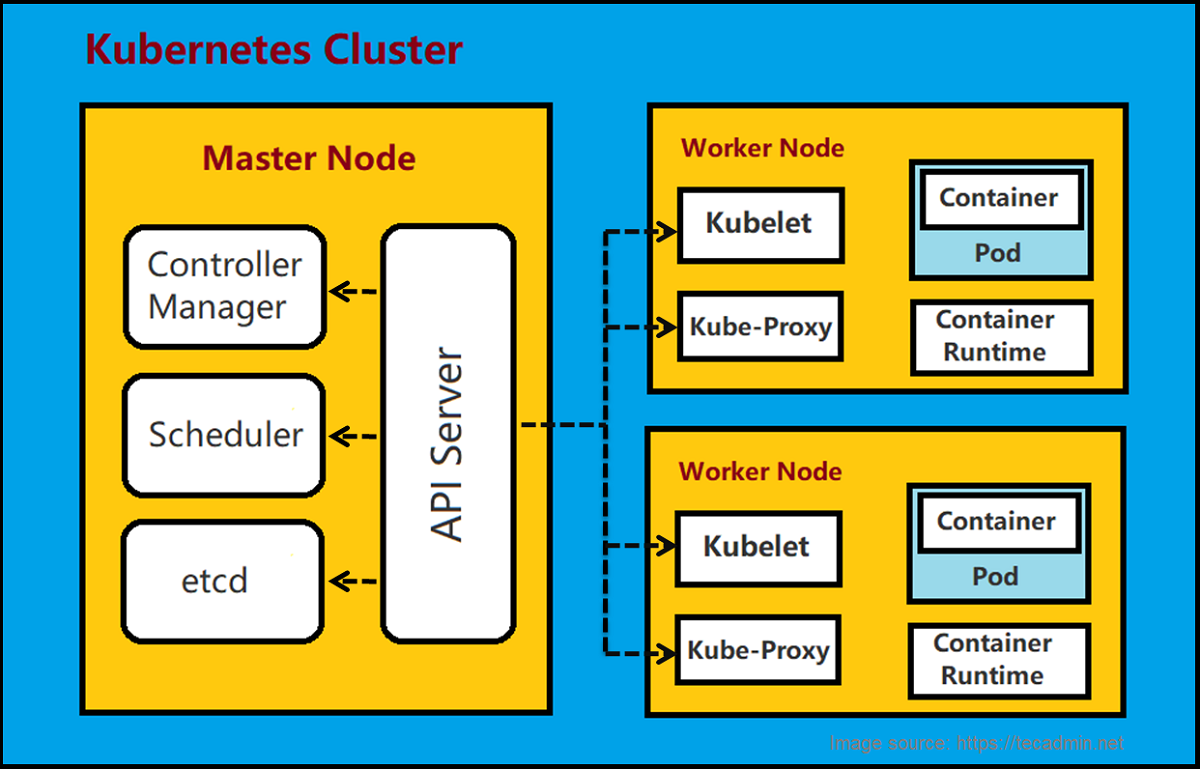
In simple terms, a Kubernetes cluster consists of one master node that controls and manages several worker nodes. These nodes run your applications in containers. Ubuntu, a popular Linux distribution, is an excellent choice for setting up a K8s cluster due to its user-friendly nature and robust performance.
Let’s get started with the basics and move step by step to set up your very own Kubernetes cluster on Ubuntu!
Prerequisites
Before you start, make sure you have:
- Ubuntu Servers: At least two machines (one master and at least one worker) running Ubuntu 20.04 or later. Each should have at least 2 CPUs and 2GB of RAM (more for production).
- SSH Access: SSH access to all nodes.
- Internet Connectivity: Reliable internet connection for downloading packages.
- Docker: Installed on all nodes as Kubernetes uses Docker for containers.
- User with sudo privileges: A user with sudo access on all nodes.
Step 1: Preparing Ubuntu Systems
First, prepare your Ubuntu systems to join a Kubernetes cluster. This includes installing Docker and configuring it.
1.1. Update Your System
Update your system packages to the latest versions:
sudo apt-get updatesudo apt-get upgrade -y
1.2. Install Docker on All Nodes
Install Docker on all nodes:
sudo apt-get install docker.io -ysudo systemctl enable dockersudo systemctl start docker
1.3. Configure the Docker Daemon
Kubernetes needs a specific Docker setup. Create or edit the Docker config file:
sudo mkdir -p /etc/dockerecho '{"exec-opts": ["native.cgroupdriver=systemd"]}' | sudo tee /etc/docker/daemon.jsonsudo systemctl restart docker
Step 2: Installing Kubernetes Components
Install tools like kubeadm, kubelet, and kubectl. First, set up your package manager to access Kubernetes packages, then install the components.
2.1. Add Kubernetes Repository
Add the Kubernetes signing key and repository on all nodes:
curl -s https://packages.cloud.google.com/apt/doc/apt-key.gpg | sudo apt-key add -echo "deb http://apt.kubernetes.io/ kubernetes-xenial main" | sudo tee /etc/apt/sources.list.d/kubernetes.list
2.2. Install Kubernetes
Install Kubernetes components:
sudo apt-get updatesudo apt-get install kubelet kubeadm kubectl -ysudo apt-mark hold kubelet kubeadm kubectl
Step 3: Initializing the Kubernetes Cluster
On the master node, initialize the cluster with kubeadm:
sudo kubeadm init --pod-network-cidr=192.168.0.0/16
Follow the instructions to start using your cluster. This usually involves running commands to use kubectl as a non-root user and applying a CNI (Container Network Interface) plugin.
Step 4: Joining Worker Nodes to the Cluster
On each worker node, use the kubeadm join command provided by the master node:
sudo kubeadm join :6443 --token --discovery-token-ca-cert-hash sha256:
Step 5: Deploying a Pod Network
To enable communication between pods, deploy a pod network like Calico. Run this command:
kubectl apply -f https://docs.projectcalico.org/manifests/calico.yaml
This sets up the network so your pods can communicate effectively.
Step 6: Testing Your Setup
Check if your cluster is working correctly by following these steps:
6.1. Verifying Nodes Status
Check the status of all nodes:
kubectl get nodes
This command should show all nodes with a status of “Ready.”
6.2. Deploying a Test Application
Deploy a simple Nginx app to test your cluster:
- Create a Deployment:
kubectl create deployment nginx --image=nginx - Expose the Deployment:
kubectl expose deployment nginx --port=80 --type=NodePort - Check the Deployment and Service:
kubectl get deploymentskubectl get podskubectl get svc
6.3. Accessing the Test Application
To access the Nginx homepage, open a web browser and navigate to http://<NODE_IP>:<NODE_PORT>, replacing <NODE_IP> with the IP address of any node and <NODE_PORT> with the port number shown for the Nginx service.6.4. Verifying Cluster and Pod Communication
Check if pods can communicate with each other and the outside world by creating a temporary pod to run a curl command:
kubectl run curl --image=radial/busyboxplus:curl -i --tty --rm -- sh
Inside the pod, run:
curl http://nginx
You should see the HTML content of the Nginx welcome page.
6.5. Cleaning Up
Clean up the resources:
- Delete the Deployment:
kubectl delete deployment nginx - Delete the Service:
kubectl delete svc nginx
Conclusion
Setting up a Kubernetes (K8s) cluster on Ubuntu might seem like a complex task, but with the right steps, it's entirely manageable, even for beginners. In this guide, we’ve covered the fundamental steps to get your K8s cluster up and running.
Starting from installing the necessary tools, configuring your master and worker nodes, to finally deploying your first application, you now have a basic understanding of how Kubernetes works on Ubuntu. With this foundation, you can explore more advanced features of Kubernetes, such as scaling applications, managing storage, and ensuring high availability.
Remember, practice makes perfect. The more you work with Kubernetes, the more comfortable you'll become.