
In the rapidly evolving world of software development, DevOps professionals are constantly seeking efficient ways to manage and deploy applications. Kubernetes, an open-source platform for automating containerized applications’ deployment, scaling, and operations, has emerged as a solution to these challenges. This guide provides a comprehensive walkthrough for setting up a Kubernetes cluster on Ubuntu, tailored for DevOps professionals aiming to streamline their workflows and enhance their infrastructure’s scalability and reliability.
What is Kubernetes Cluster?
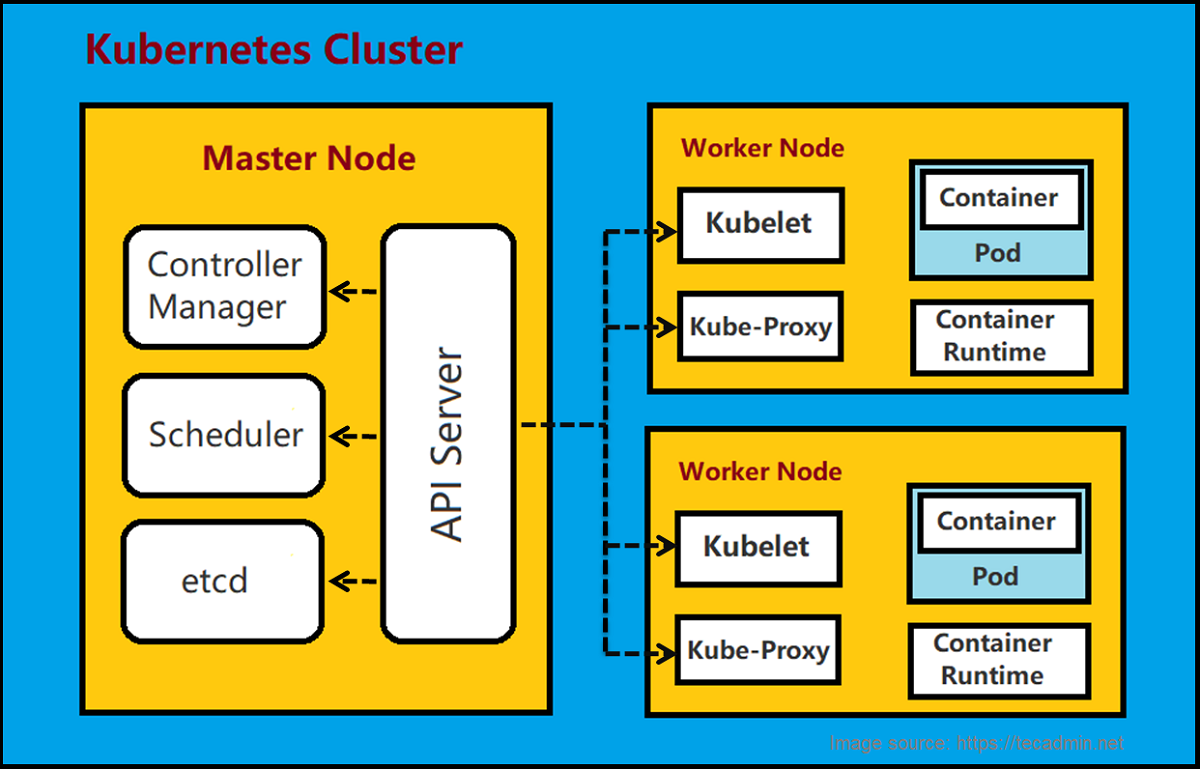
A Kubernetes cluster is a set of node machines for running containerized applications. This cluster consists of at least one master node and multiple worker nodes. The master node manages the state of the cluster, scheduling applications, maintaining their desired state, scaling applications, and rolling out new updates. Worker nodes host the Pods—containers running the application workloads. Kubernetes abstracts the underlying infrastructure, making it easier for developers to deploy, scale, and manage their applications without needing to consider the specifics of the host hardware. It automates many traditional IT tasks, facilitating a more efficient and reliable deployment and management process for containerized applications.

Prerequisites
Before diving into the setup process, ensure you have the following:
- Ubuntu Servers: At least two machines (one as the master node and others as worker nodes) running Ubuntu 20.04 or later. Each should have a minimum of 2 CPUs and 2GB of RAM, though more is recommended for production environments.
- SSH Access: Ensure you have SSH access to all nodes.
- Internet Connectivity: All nodes must have a reliable internet connection to download necessary packages.
- Docker: Docker should be installed on all nodes as Kubernetes will be managing Docker containers.
User with sudo privileges: Ensure you have a user with sudo privileges on all nodes.
Step 1: Preparing Your Ubuntu Servers
Once all your Ubuntu systems are up and running, prepare your systems to be the part of a Kubernetes cluster. This required installation of Docker daemon and configure it:
1.1. Update Your System
Start by updating your system packages to the latest versions:
sudo apt-get updatesudo apt-get upgrade -y
1.2. Install Docker on All Nodes
Install Docker, the container runtime, on all nodes:
sudo apt-get install docker.io -ysudo systemctl enable dockersudo systemctl start docker
1.3. Configure the Docker Daemon
Kubernetes requires a specific configuration for Docker. Create or edit the Docker daemon config file:
sudo mkdir -p /etc/dockerecho '{"exec-opts": ["native.cgroupdriver=systemd"]}' | sudo tee /etc/docker/daemon.jsonsudo systemctl restart docker
Step 2: Installing Kubernetes Components
Installing Kubernetes components involves setting up essential tools like kubeadm, kubelet, and kubectl. First, configure your package management tool to access Kubernetes packages. Then, install these components using your package manager. Ensure your system meets the prerequisites, such as Docker or another container runtime, before beginning the installation process.
2.1. Add Kubernetes Repository
On all nodes, add the Kubernetes signing key and repository:
curl -s https://packages.cloud.google.com/apt/doc/apt-key.gpg | sudo apt-key add -echo "deb http://apt.kubernetes.io/ kubernetes-xenial main" | sudo tee /etc/apt/sources.list.d/kubernetes.list
2.2. Install Kubernetes
Now, install Kubernetes components like kubelet, kubeadm, kubectl etc:
sudo apt-get updatesudo apt-get install kubelet kubeadm kubectl -ysudo apt-mark hold kubelet kubeadm kubectl
Step 3: Initializing the Kubernetes Cluster
On the master node, initialize the cluster with kubeadm:
sudo kubeadm init --pod-network-cidr=192.168.0.0/16
After initialization, follow the instructions to start using your cluster. This typically involves running commands to use the kubectl command as a non-root user and applying a CNI (Container Network Interface) plugin.
Step 4: Joining Worker Nodes to the Cluster
On each worker node, use the kubeadm join command provided at the end of the master node’s initialization output. This command will look something like this:
sudo kubeadm join :6443 --token --discovery-token-ca-cert-hash sha256:
Step 5: Deploying a Pod Network
Deploying a pod network within your Kubernetes cluster is crucial for enabling inter-pod communication across different nodes. Calico, a widely used networking and network policy provider, offers an efficient solution for this. To deploy Calico, you simply need to execute a command that applies its manifest file directly from the official Calico documentation.
Open your terminal and enter the following command:
kubectl apply -f https://docs.projectcalico.org/manifests/calico.yaml
This command instructs Kubernetes to download and apply the Calico manifest, setting up the pod network and ensuring your pods can seamlessly communicate with each other, maintaining the robustness and efficiency of your cluster’s networking capabilities.
Step 6: Testing Your Setup
After setting up your Kubernetes cluster and deploying a pod network, it’s crucial to verify that everything is functioning correctly. This step involves testing your cluster to ensure that it’s ready for deploying applications. Here’s how you can conduct a basic test of your Kubernetes cluster setup on Ubuntu:
6.1. Verifying Nodes Status
First, check the status of all nodes to ensure they are ready. Run the following command from the master node:
kubectl get nodes
This command should list all the nodes in your cluster, including the master and worker nodes, showing a status of “Ready” for each. This indicates that your nodes are part of the cluster and ready to run Kubernetes workloads.
6.2. Deploying a Test Application
To test if your cluster can run applications, deploy a simple Nginx pod:
- Create a Deployment: Deploy a simple Nginx deployment to test the scheduling and running of pods:
kubectl create deployment nginx --image=nginx - Exposing the Deployment: Expose the Nginx deployment to access it from outside the cluster:
kubectl expose deployment nginx --port=80 --type=NodePort - Checking the Deployment and Service: Verify that the deployment is running, and check the service to note the port exposed on the cluster nodes:
kubectl get deploymentskubectl get podskubectl get svc
6.3. Accessing the Test Application
After exposing the Nginx deployment, you can access it from any node in the cluster. Thekubectl get svc command will list the services and their details, including the port mapped to the Nginx service (look for the NodePort value).To access the Nginx homepage, open a web browser and navigate to http://<NODE_IP>:<NODE_PORT>, replacing <NODE_IP> with the IP address of any node in your cluster and <NODE_PORT> with the port number shown for the Nginx service.6.4. Verifying Cluster and Pod Communication
Ensure that pods can communicate with each other and with the outside world. You can execute a test by creating a temporary pod to run a curl command against the Nginx service:
kubectl run curl --image=radial/busyboxplus:curl -i --tty --rm -- sh
Once inside the shell of the temporary pod, use the following command to curl the Nginx service:
curl http://nginx
This command should return the HTML content of the Nginx welcome page, indicating successful inter-pod communication and external access setup.
6.5. Cleaning Up
After testing, clean up the resources to keep your cluster tidy:
- Delete the Deployment: Remove the Nginx deployment:
kubectl delete deployment nginx - Delete the Service: Remove the Nginx service:
kubectl delete svc nginx
By following this step, you've not only verified that your Kubernetes cluster on Ubuntu is correctly set up and operational but also gained hands-on experience deploying and managing applications.
Conclusion
Congratulations! You have successfully set up a Kubernetes cluster on Ubuntu. This setup provides a solid foundation for deploying and managing containerized applications. Remember, Kubernetes is highly customizable, and there's much more to explore beyond this basic setup. Dive into Kubernetes documentation, experiment with different configurations, and explore advanced features to fully leverage Kubernetes in your DevOps workflows.

