
Let’s Encrypt is a non-profit Certificate Authority (CA) managed by the Internet Security Research Group. It provides free SSL certificates for your domains to secure data on the transport layer. This tutorial will help you to install and secure Apache with Let’s encrypt on the Fedora system.
Prerequisites
- Running Fedora system with shell access
- A domain/sub domain pointed to server IP address via public DNS server. For this tutorial, we use webhost.tecadmin.net.
Step 1: Install Apache
First of all, Install the Apache webserver on your Fedora system. The default package repositories contain Apache packages. You can directly install them using the following command:
sudo dnf install httpd httpd-tools mod_ssl
Step 2: Create VirtualHost in Apache
For this tutorial, I have created an index.html file under the default document root. Similarly, you can place your application under the document root of your domain.
sudo echo "<h2>Welcome to Secure TecAdmin.net</h2>" > /var/www/html/index.html
After that, create a VirtualHost configuration file binding with port 80.
sudo vim /etc/httpd/conf.d/webhost.tecadmin.net.conf
    ServerAdmin admin@example.com
    ServerName webhost.tecadmin.net
    DocumentRoot /var/www/html

        Allowoverride all
Save and close the configuration file. Then restart the Apache service to reload the configuration file.
sudo systemctl restart httpd
Step 3: Setup Let’s Encrypt (Certbot) Client
The Certbot ACME is a client application recommended by Let’s Encrypt for systems with shell access. It provides hassle-free automation of certificate issuance, installation, and renewal.
You can install the certbot package along with certbot plugin for Apache using following command:
sudo dnf install python3-certbot-apache
Above command will add certbot utility in your system. Execute the below command to get more help about certbot command.
sudo certbot -h all
Step 4: Create Let’s Encrypt Certificate
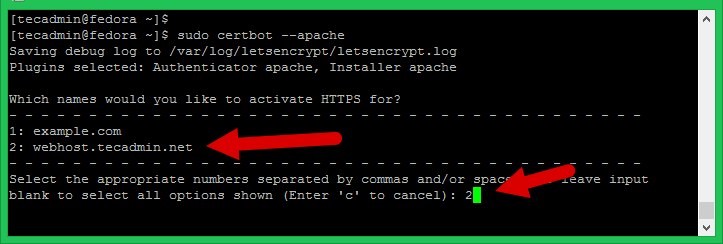
Now, you can request let’s encrypt to issue an SSL certificate for your domain. You need to run the certbot command for the Apache server as following:
sudo certbot --apache
This will list all the virtual hosts configured with Apache on current server. Select the appropriate number with the comma separated. See below screenshot:
Let’s encrypt will start the verification process for your domain. Make sure the domain you selected is pointed to this server via the public DNS server.
On successful verification, SSL will be issued for your domain. A separate SSL VirtualHost configuration file will be created for your domain.
Please choose whether or not to redirect HTTP traffic to HTTPS:
- 1: No redirect – Make no further changes to the webserver configuration.
- 2: Redirect – Make all requests redirect to secure HTTPS access.
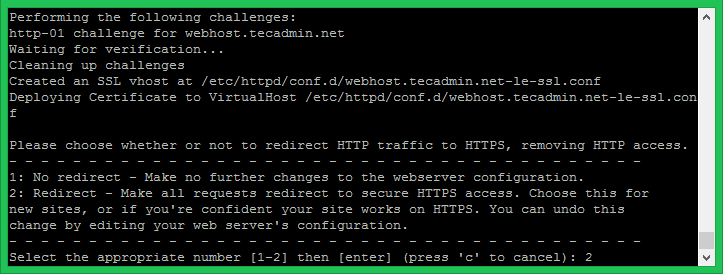
Enter a number of your choice and press enter. You can also change it latest by directly editing configuration files.
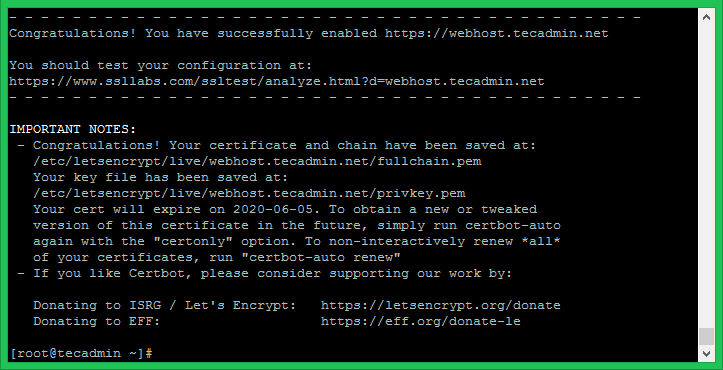
Once the SSL configuration completed successfully, you will see a congratulations message on your screen.
Step 5: Verify Certificate
The Let’s Encrypt SSL has been successfully configured for your domain. This certificate is issued for 3 months only, You can renew it before expiration.
Let’s check the certificate by accessing your site in a web browser.

Conclusion
You have successfully secured your website with free Let’s Encrypt SSL certificate. Follow our next tutorial to setup Let’s Encrypt Auto SSL renewal with crontab. The Fedora systems will have default TLS 1.2 and TLS 1.3 enabled.