
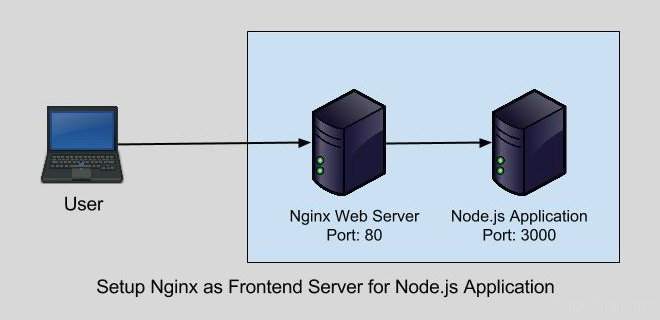
In the modern web development landscape, Node.js has emerged as a powerhouse for building scalable and efficient applications. However, when it comes to production environments, directly exposing your Node.js application to the internet might not be the best approach. Enter Nginx, a high-performance HTTP server and reverse proxy. Integrating Nginx with Node.js not only enhances security and manageability but also improves the performance of your applications through caching, load balancing, and much more. This guide will walk you through the steps to set up Nginx as a reverse proxy for your Node.js applications, ensuring a robust and efficient deployment.
Why Use Nginx with Node.js?
Before diving into the setup, it’s crucial to understand why Nginx is often paired with Node.js applications:
- Improved Performance: Nginx efficiently handles static content and redirects dynamic content requests to Node.js, reducing the load on your application server. >
- Enhanced Security: By serving as the front-facing server, Nginx can manage SSL/TLS termination and protect your application from various attacks.
- Load Balancing: Nginx can distribute incoming requests across multiple Node.js instances, improving reliability and uptime.
- Caching: Nginx can cache responses from Node.js, significantly speeding up response times for frequent requests.

Prerequisites
To follow this guide, you’ll need:
- A server with Nginx installed.
- A Node.js application running on your server.
Step 1: Install Nginx
If Nginx is not already installed on your server, you can install it using your operating system’s package manager. For Ubuntu/Debian systems, use:
sudo apt updatesudo apt install nginx
For CentOS/RHEL systems, use:
sudo yum install epel-releasesudo yum install nginx
After installation, ensure Nginx is running:
sudo systemctl start nginxsudo systemctl enable nginx
Step 2: Configure Nginx as a Reverse Proxy
- Create a new Nginx server block or modify the default one. Server blocks are located in
/etc/nginx/sites-available/on Ubuntu/Debian and/etc/nginx/conf.d/on CentOS/RHEL. For this guide, we’ll create a new file namedyourdomain.comin/etc/nginx/sites-available/.sudo nano /etc/nginx/sites-available/yourdomain.com - Add the following configuration to the file, adjusting server_name to your domain or IP address, and proxy_pass to the local address and port where your Node.js app is running.
# Define upstream for the Node.js backend server upstream myapp_backend { server 127.0.0.1:3000; # Address of the Node.js application keepalive 8; # Maintains a cache of opened connections } # Configuration for the Nginx server instance server { listen 80 default_server; # Listen on port 80 for IPv4 requests listen [::]:80 default_server; # Listen on port 80 for IPv6 requests server_name yourdomain.com www.yourdomain.com; # Domain names access_log /var/log/nginx/yourdomain.com.log; # Log file location # Define handling for requests to the root URL location / { proxy_set_header X-Real-IP $remote_addr; # Pass the client IP to the backend proxy_set_header X-Forwarded-For $proxy_add_x_forwarded_for; # Forwards the original IP of a client proxy_set_header Host $host; # Pass the host header proxy_set_header X-NginX-Proxy true; # Mark as a proxy request proxy_pass http://myapp_backend/; # Proxy pass to upstream backend proxy_redirect off; # Disable redirection adjustments # WebSocket support proxy_http_version 1.1; # Use HTTP/1.1 proxy_set_header Upgrade $http_upgrade; # Allow websockets proxy_set_header Connection "upgrade"; # Upgrade connection for websockets } # Optionally, handle other locations or define error pages # error_page 404 /404.html; # location = /404.html { # root /usr/share/nginx/html; # internal; # } } - Enable the server block by creating a symbolic link to it in the sites-enabled directory (Ubuntu/Debian):
sudo ln -s /etc/nginx/sites-available/yourdomain.com /etc/nginx/sites-enabled/ - Test the Nginx configuration for syntax errors:
sudo nginx -t - Reload Nginx to apply the changes:
sudo systemctl reload nginx
Step 3: Configure Your Node.js Application
Ensure your Node.js application is set to listen on the local interface (127.0.0.1) or localhost and the port specified in the proxy_pass directive of your Nginx configuration. This setup prevents direct access to the Node.js application, routing traffic through Nginx.
Step 4: Securing Your Application with SSL/TLS
For production environments, securing your application with an SSL/TLS certificate is essential. Let’s Encrypt provides free certificates, which can be easily set up with Certbot:
- Install Certbot and its Nginx plugin:
- Obtain and install a certificate for your domain:
sudo certbot --nginx -d yourdomain.comFollow the prompts, and Certbot will automatically update your Nginx configuration to use the new certificate.
sudo apt install certbot python3-certbot-nginx# Ubuntu/Debiansudo yum install certbot python3-certbot-nginx# CentOS/RHEL
Conclusion
You’ve now successfully set up Nginx as a reverse proxy for your Node.js application, improving its performance, security, and reliability. This setup not only enables you to serve your application more efficiently but also lays the groundwork for scaling your deployment in the future. Remember, continuous monitoring and adjustment of your Nginx and Node.js configurations will ensure optimal performance and security as your application evolves.
7 Comments
in doing this on ubuntu, the browser resolves the actual example.com domain (and not the node.js app)…what am I missing. Thx
RJ,
I was having the same issue. I resolved it by adding “10.0.2.15 example.com” to my /etc/hosts files, where 10.0.2.15 is the IP address of my Linux VM. Hope this helps.
”
127.0.0.1 localhost
127.0.1.1 minty
10.0.2.15 example.com
.
.
.
“
It works perfectly. I thought it would be harder than it actually is. Thanks!
iT IS NOT WORKING,
Hi Ashish, What issue are you facing?
I have updated the tutorial, hope this will work for you.
Thanks for this tuto, it helped me a lot configuring it in a server
it is not working