phpMyAdmin is a web tool made with PHP programming language to manage MySQL databases. It gives you an easy-to-use web interface to work with your databases. This guide will show you how to install phpMyAdmin on CentOS, RHEL, Fedora, Ubuntu, Debian, and other Linux systems. Before you install phpMyAdmin, make sure you have Apache, PHP, and MySQL set up on your server. If you haven’t installed them yet, check our tutorials to learn how.
Step 1: Download phpMyAdmin Archive
Download the latest phpMyAdmin source code and extract it on your system. Click here to download the latest or any older version of phpMyAdmin. After downloading, extract the archive. The latest version works with PHP version 7.1 or higher and MySQL/MariaDB version 5.5 or newer.
wget https://files.phpmyadmin.net/phpMyAdmin/5.2.1/phpMyAdmin-5.2.1-all-languages.zipunzip phpMyAdmin-5.2.1-all-languages.zipmv phpMyAdmin-5.2.1-all-languages /usr/share/phpmyadmin
Now, give the right permissions to the files for the web server. Usually, the Apache webserver runs under a user and group called www-data on Debian systems and apache on RedHat systems.
### Debian based system chown -R www-data:www-data /usr/share/phpmyadminchmod -R 755 /usr/share/phpmyadmin### RedHat based system chown -R apache:apache /usr/share/phpmyadminchmod -R 755 /usr/share/phpmyadmin
Step 2: Setup Apache for phpMyAdmin
Create a new Apache configuration file for phpMyAdmin. Use /etc/httpd/conf.d/phpmyadmin.conf for RedHat systems and /etc/apache2/conf-available/phpmyadmin.conf for Debian systems. Add the following settings in the file:
<Directory "/usr/share/phpmyadmin">
  Order Deny,Allow
  Deny from all
  Allow from localhost
  Allow from 127.0.0.1
  Allow from 192.168.1.0/24
</Directory>

Alias /phpmyadmin /usr/share/phpmyadmin
Alias /phpMyAdmin /usr/share/phpmyadmin
Replace 192.168.1.0/24 with your own LAN subnet IP address.
Step 3: Restart Apache Service
After creating the configuration file, restart or reload the Apache service. On production servers, it’s better to just reload.
sudo servicehttpd reload## RedHat based systems sudo serviceapache2 reload## Debian based systems
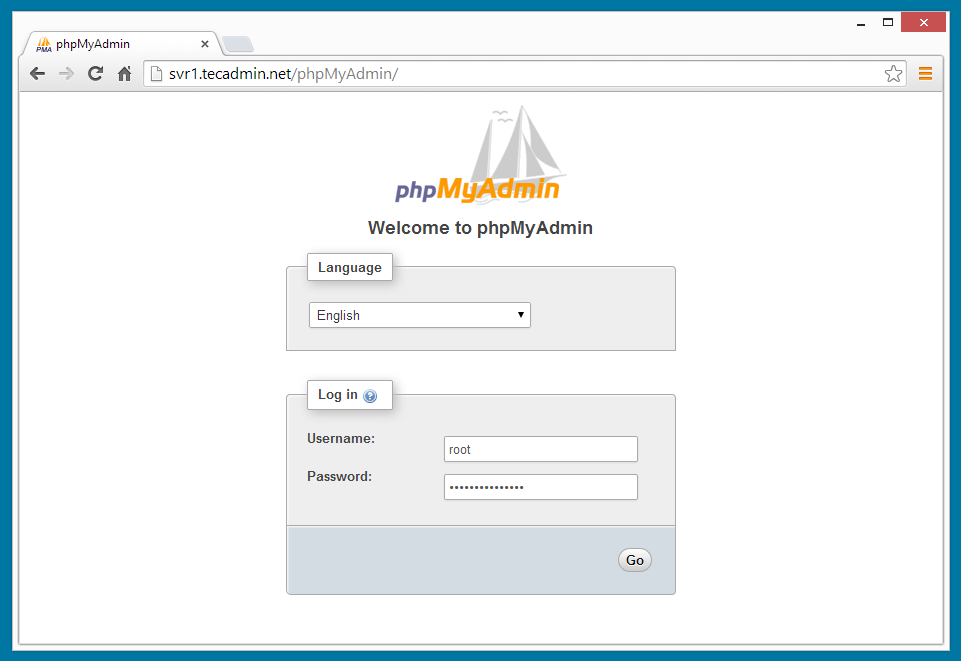
Step 4 – Access phpMyAdmin
Now, open your browser and access phpMyAdmin with this URL. Replace
URL: http://
Conclusion
Installing phpMyAdmin makes managing your MySQL databases much easier with its user-friendly web interface. By following the steps outlined in this guide, you can successfully install and configure phpMyAdmin on your Linux server. Make sure to download the latest version, set the right file permissions, and properly configure Apache. Once installed, you can easily access your databases through your web browser and manage them using your MySQL credentials. Congratulations on completing the installation!


22 Comments
On Linux mint 22 after creating the new conf file I needed to add the line
a2enconf phpmyadmin and then restart apache
My Experiments – Now Got Success
Installing phpMyAdmin 5.0
———————————–
Download phpMyAdmin Archive
Download latest phpMyAdmin source code and extract on your system using. (https://www.phpmyadmin.net/downloads/)
wget https://files.phpmyadmin.net/phpMyAdmin/5.0.0/phpMyAdmin-5.0.0-all-languages.zip
unzip phpMyAdmin-5.0.0-all-languages.zip
mv phpMyAdmin-5.0.0-all-languages phpmyadmin
Now set the proper permissions on files to be used with the web server. Generally, Apache web server runs under user and group named www-data on Debian based systems and apache on Redhat based systems.
### Debian based system
chown -R www-data:www-data /var/www/html/phpmyadmin
chmod -R 755 /var/www/html/phpmyadmin
### Redhat based system
chown -R apache:apache /var/www/html/phpmyadmin
chmod -R 755 /var/www/html/phpmyadmin
Setup Apache for phpMyAdmin
—————————-
Create a new Apache configuration file for phpMyAdmin /etc/httpd/conf.d/phpmyadmin.conf for RedHat based system and /etc/apache2/conf-available/phpmyadmin.conf for Debian based systems and add following settings there.
AddDefaultCharset UTF-8
# Apache 2.4
#Require ip 127.0.0.1
#Require ip ::1
Require all granted
# Apache 2.2
Order Deny,Allow
Deny from All
Allow from 127.0.0.1
Allow from ::1
Alias /phpmyadmin /var/www/html/phpmyadmin
Alias /phpMyAdmin /var/www/html/phpmyadmin
Restart Apache Service
————————
After creating a configuration file we need to restart or reload Apache service.
systemctl restart httpd.service
Setup phpMyAdmin
—————–
MySQL root user password update
mysql -u root -h localhost -p
mysql> ALTER USER ‘root’@’localhost’ IDENTIFIED WITH mysql_native_password BY ‘Sjcet123#’;
Warnings (Fix)
>> TempDir : This value should be double checked to ensure that this directory is neither world accessible nor readable or writable by other users on your
Solution was to create a folder called tmp like this: /var/www/html/phpmyadmin/tmp.
mkdir /var/www/html/phpmyadmin/tmp
>> ZIP : Zip decompression requires function (zip_open) which are unavailable on this system.
yum –enablerepo=remi-php73 install php-pecl-zip
Blowfish Password
——————
$cfg[‘blowfish_secret’] = ‘u=s|qeyn-?Pn]3erdN97{waRyq7[pkvY’;
Access phpMyAdmin
——————
Now you can access phpMyAdmin in a browser using the following URL.
URL: http://localhost/phpMyAdmin/
Login Details: Use MySQL username and password.
I am using Oracle Linux 7 (el)
Installed LAMP as per your tutorial – working fine.
Now, I followed How to Install PhpMyAdmin 4.8 on CentOS/RHEL 7/6 (https://tecadmin.net/install-phpmyadmin-on-centos/)
Downloaded latest version of phpMyAdmin (5.0)
After the complete steps.. while accessing http://localhost/phpmyadmin
showing this error…. Kindly help if possible… by email to me : krishnavaloor@gmail.com
———————————————–
Forbidden
You don’t have permission to access /phpmyadmin on this server.
————————————————-
Worked like a dream! Cheers Rahul
What is to replace with http://192.168.1.0/24/? Or how to change 192.168.1.0/24 with your LAN subnet IP addresses?
I installed phpMyAdmin-4.8.0.1 in /home/user/www/phpmyadmin.
config.inc.php already there. For fixing the eror i tried by editing ‘cookie’ wih http lke you told in the comment. but not fixed.
Getting error like the screenshot
http://imagehostnow.com/uploads/ccbc87e4b5/2717.jpg
Hi Sibi,
It’s showing php script on page. It means you don’t have PHP module for Apache. Try below command:
apt install libapache2-mod-php
Or use the module with the same version of your php like (libapache2-mod-php7.2 or libapache2-mod-php5.6) etc.
keep having 403 , I did “acces from all” since I dont need to filter the ip , it’s a local server
You can use “Allow from 127.0.0.1” in the configuration file. Also updated the tutorial accordingly.
Your problems may have different solutions.
1. If you have previosely installed another version of phpmyadmin, then even if you’ve uninstalled it, the phpmyadmin folder remained, and folowing this tutorial instead of renaming the folder into phpmyadmin, you’ve moved it in the same folder as subfolder…
Solution:
# cd phpmyadmin
# ls
Check if there is only one folder (the name of the phpmyadmin version) and if so:
# mv phpMyAdmin-4.2.10-all-languages /usr/share/
# rm -r phpmyadmin
And then the rest of the process from this tutorial starting from:
# mv phpMyAdmin-4.2.10-all-languages phpmyadmin
2. Solution
# cd /usr/share/phpmyadmin/
# mv config.sample.inc.php config.inc.php
# vi config.inc.php
Edit this line and change the ‘cookie’ to ‘http’
$cfg[‘Servers’][$i][‘auth_type’] = ‘cookie’;
Save the file restart httpd and try to connect.
I would suggest to comment the whole <directory part from phpMyAdmin.conf and generate a strong root password with
# mysql_secure_installation
So you can later authenticate as root user from your browser…
My comment wont do you any good, but better late than never. And also as a solution for all the other users which will have the same problem…
Hi Rahul,
Great post, and great site! It’s definitely helped me out a lot!
I have used this guide to install phpMyAdmin on my server, but I get a blank page when loading the url… First I had the 403 Access Forbidden error just as Ivan and Isma, but I changed the conf file as suggested, and now the page is just blank. Any help would be appreciated.
Thanks!
Same problem than Ivan here!
Impossible to solve the “Forbidden”
Hi Rahul,
Thank you for your reply.
Here is the file, as you can see it’s exactly as yours.
Order Deny,Allow
Deny from all
Allow from all
#Allow from 192.168.1.0/24
Alias /phpmyadmin /usr/share/phpmyadmin
Alias /phpMyAdmin /usr/share/phpmyadmin
Hello Rahul,
Firstly, let me thank you for your wonderful tutorials, I’ve learned very much with your help.
Even though in this ocassion it’s been impossible to access PhpMyAdmin, I´ve installed and reinstalled every thing from scratch over and over again, created new Instances on Amazon, etc, however the result is always the same, this frustrating message: “Forbidden
You don’t have permission to access /phpmyadmin/ on this server.”
I’d appreaciate very much any help you can provide to me.
Thank you in advance,
I’m using:
RHEL 7, MariaDB, PHP 5.4.30, Apache 2
(http://ec2-54-94-156-123.sa-east-1.compute.amazonaws.com/phpinfo.php)
Hi Ivan,
Post your /etc/httpd/conf.d/phpMyAdmin.conf file content.
Hi Ivan,
When you need to access phpMyAdmin from public network.. try to update phpMyAdmin.conf as below –
Order Deny,Allow
Deny from all
Allow from all
Hi Rahul,
I retry several more times, followed every step, but it’s simply impossible, error 403 persists. I’ll terminate the instances on AWS and start all over again for the fourth time.
Thanks anyways Rahul.
Hi Ivan,
If possible, provide me your server access. I can check it directly on your server. Contact me on my email.
I have installed phpmyadmin by above method but i got below error.
“The mysqli extension is missing. Please check your PHP configuration. See our documentation for more information.”
Tell me how to fix
Hi Siddharth,
Please install php-mysql extension first.
Hi,
whenever I’m installing phpmyadmin I’m getting an error it’s saying depencies need to install and If I installed the same also the same issue.
Please suggest for the same.
[root@dcal phpmyadmin]# tar -xvf phpMyAdmin-4.7.6-all-languages.zip
tar: This does not look like a tar archive
tar: Skipping to next header
tar: Exiting with failure status due to previous errors
[root@dcal phpmyadmin]# tar xvzf phpMyAdmin-4.7.6-all-languages.zip
gzip: stdin has more than one entry–rest ignored
tar: Child returned status 2
tar: Error is not recoverable: exiting now
[root@dcal phpmyadmin]# gunzip phpMyAdmin-4.7.6-all-languages.zip
gzip: phpMyAdmin-4.7.6-all-languages.zip: unknown suffix — ignored
[root@dcal phpmyadmin]# tar tvf phpMyAdmin-4.7.6-all-languages.zip
tar: This does not look like a tar archive
tar: Skipping to next header
tar: Exiting with failure status due to previous errors
[root@dcal phpmyadmin]# clear
[root@dcal phpmyadmin]#
[root@dcal phpmyadmin]#
[root@dcal phpmyadmin]#
[root@dcal phpmyadmin]#
login as: root
root@192.168.103.13‘s password:
Last login: Tue Mar 20 12:21:00 2018 from noc2-hcl-pc.iimb.ernet.in
[root@dcal ~]# yum install phpmyadmin
Loaded plugins: langpacks, product-id, search-disabled-repos, subscription-manager
This system is registered with an entitlement server, but is not receiving updates. You can use subscription-manager to assign subscriptions.
Resolving Dependencies
–> Running transaction check
—> Package phpMyAdmin.noarch 0:4.4.15.10-2.el7 will be installed
–> Processing Dependency: php-mbstring >= 5.3.7 for package: phpMyAdmin-4.4.15.10-2.el7.noarch
–> Processing Dependency: php-php-gettext for package: phpMyAdmin-4.4.15.10-2.el7.noarch
–> Processing Dependency: php-tcpdf for package: phpMyAdmin-4.4.15.10-2.el7.noarch
–> Processing Dependency: php-tcpdf-dejavu-sans-fonts for package: phpMyAdmin-4.4.15.10-2.el7.noarch
–> Running transaction check
—> Package php-php-gettext.noarch 0:1.0.12-1.el7 will be installed
–> Processing Dependency: php-mbstring for package: php-php-gettext-1.0.12-1.el7.noarch
—> Package php-tcpdf.noarch 0:6.2.13-1.el7 will be installed
–> Processing Dependency: php-bcmath for package: php-tcpdf-6.2.13-1.el7.noarch
–> Processing Dependency: php-composer(fedora/autoloader) for package: php-tcpdf-6.2.13-1.el7.noarch
–> Processing Dependency: php-mbstring for package: php-tcpdf-6.2.13-1.el7.noarch
–> Processing Dependency: php-tidy for package: php-tcpdf-6.2.13-1.el7.noarch
—> Package php-tcpdf-dejavu-sans-fonts.noarch 0:6.2.13-1.el7 will be installed
—> Package phpMyAdmin.noarch 0:4.4.15.10-2.el7 will be installed
–> Processing Dependency: php-mbstring >= 5.3.7 for package: phpMyAdmin-4.4.15.10-2.el7.noarch
–> Running transaction check
—> Package php-fedora-autoloader.noarch 0:1.0.0-1.el7 will be installed
—> Package php-php-gettext.noarch 0:1.0.12-1.el7 will be installed
–> Processing Dependency: php-mbstring for package: php-php-gettext-1.0.12-1.el7.noarch
—> Package php-tcpdf.noarch 0:6.2.13-1.el7 will be installed
–> Processing Dependency: php-bcmath for package: php-tcpdf-6.2.13-1.el7.noarch
–> Processing Dependency: php-mbstring for package: php-tcpdf-6.2.13-1.el7.noarch
—> Package php-tidy.x86_64 0:5.4.16-7.el7 will be installed
–> Processing Dependency: libtidy-0.99.so.0()(64bit) for package: php-tidy-5.4.16-7.el7.x86_64
—> Package phpMyAdmin.noarch 0:4.4.15.10-2.el7 will be installed
–> Processing Dependency: php-mbstring >= 5.3.7 for package: phpMyAdmin-4.4.15.10-2.el7.noarch
–> Running transaction check
—> Package compat-libtidy.x86_64 0:0.99.0-37.20091203.el7 will be installed
—> Package php-php-gettext.noarch 0:1.0.12-1.el7 will be installed
–> Processing Dependency: php-mbstring for package: php-php-gettext-1.0.12-1.el7.noarch
—> Package php-tcpdf.noarch 0:6.2.13-1.el7 will be installed
–> Processing Dependency: php-bcmath for package: php-tcpdf-6.2.13-1.el7.noarch
–> Processing Dependency: php-mbstring for package: php-tcpdf-6.2.13-1.el7.noarch
—> Package phpMyAdmin.noarch 0:4.4.15.10-2.el7 will be installed
–> Processing Dependency: php-mbstring >= 5.3.7 for package: phpMyAdmin-4.4.15.10-2.el7.noarch
–> Finished Dependency Resolution
Error: Package: php-tcpdf-6.2.13-1.el7.noarch (epel)
Requires: php-mbstring
Error: Package: php-php-gettext-1.0.12-1.el7.noarch (epel)
Requires: php-mbstring
Error: Package: phpMyAdmin-4.4.15.10-2.el7.noarch (epel)
Requires: php-mbstring >= 5.3.7
Error: Package: php-tcpdf-6.2.13-1.el7.noarch (epel)
Requires: php-bcmath
You could try using –skip-broken to work around the problem
You could try running: rpm -Va –nofiles –nodigest
I have tried all the packages lists.But same issue.Tried to install the seperate packages also same issue.
Please help me to resolve the issue.
Use unzip command to extract archive. I have corrected command in tutorial.