RAID stands for Redundant Array of Inexpensive (Independent) Disks. RAID-1 is also known as striping. RAID-1 required minimum two disks. The max data on RAID-1 can be stored to size of smallest disk in RAID array.
In this article we are using CentOS 6.5 running with VMWare. I have added two virtual disks as /dev/sdb and /dev/sdc for configuring RAID-1 partition. Each disk size is 10GB and we will one partition on both disks of 5GB which will created as /dev/sdb1 and /dev/sdc1.
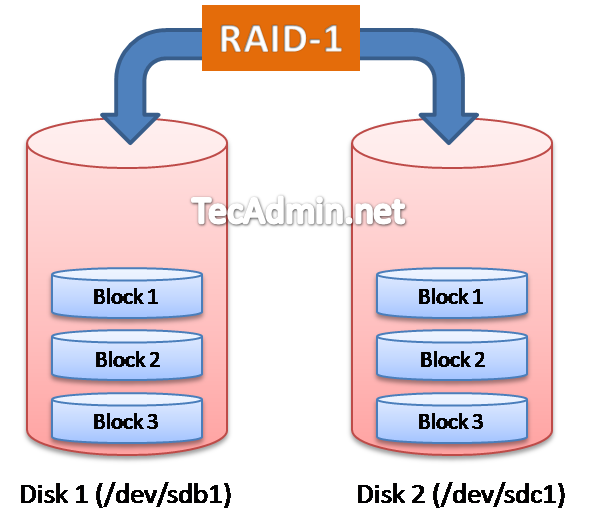
Know few things about RAID-1 as below.
Pros – Secure data from single disk failure as same data replicated to each disk
Cons – Storage overhead, required disk size if twice of data.
Minimum Disks Required – 2
Maximum Data Storage – Equal to smaller disk size (For example if we have two disks, One of size 200GB and second of size 250GB. So we can save only 200GB data on RAID )
Step 1: Create Disk Partitions
Firstly we are going to create logical partitions on both newly attached disks as /dev/sdb and /dev/sdc and will change system type of partition as Linux raid autodetect.
First use fdisk command to create partition on /dev/sdb disk as below
[root@server1 ~]# fdisk /dev/sdb

Device contains neither a valid DOS partition table, nor Sun, SGI or OSF disklabel
Building a new DOS disklabel with disk identifier 0x9452ab46.
Changes will remain in memory only, until you decide to write them.
After that, of course, the previous content won't be recoverable.

Warning: invalid flag 0x0000 of partition table 4 will be corrected by w(rite)

WARNING: DOS-compatible mode is deprecated. It's strongly recommended to
         switch off the mode (command 'c') and change display units to
         sectors (command 'u').

Command (m for help): n
Command action
   e   extended
   p   primary partition (1-4)
p
Partition number (1-4): 1
First cylinder (1-1305, default 1):
Using default value 1
Last cylinder, +cylinders or +size{K,M,G} (1-1305, default 1305): +5G


Command (m for help): t
Selected partition 1
Hex code (type L to list codes): fd
Changed system type of partition 1 to fd (Linux raid autodetect)

Command (m for help): w
The partition table has been altered!

Calling ioctl() to re-read partition table.

WARNING: If you have created or modified any DOS 6.x
partitions, please see the fdisk manual page for additional
information.
Syncing disks.
Now create the partitions on /dev/sdc disk same as above (created for /dev/sdb)
[root@server1 ~]# fdisk /dev/sdc
Step 2: Verify Partitions on Disk
Lets verify that you have created partitions correctly and they are of type “Linux raid autodetect“. In the below outputs we can see that /dev/sdb1 has been created in /dev/sdb disk and /dev/sdc1 is created on /dev/sdc disk.
Checking partitions on /dev/sdb
[root@server1 ~]# fdisk -l /dev/sdb

Disk /dev/sdb: 10.7 GB, 10737418240 bytes
255 heads, 63 sectors/track, 1305 cylinders
Units = cylinders of 16065 * 512 = 8225280 bytes
Sector size (logical/physical): 512 bytes / 512 bytes
I/O size (minimum/optimal): 512 bytes / 512 bytes
Disk identifier: 0x9452ab46

   Device Boot      Start         End      Blocks   Id  System
/dev/sdb1               1         654     5253223+  fd  Linux raid autodetect
Checking partitions on /dev/sdc also
[root@server1 ~]# fdisk -l /dev/sdc

Disk /dev/sdc: 10.7 GB, 10737418240 bytes
255 heads, 63 sectors/track, 1305 cylinders
Units = cylinders of 16065 * 512 = 8225280 bytes
Sector size (logical/physical): 512 bytes / 512 bytes
I/O size (minimum/optimal): 512 bytes / 512 bytes
Disk identifier: 0x00780ac9

   Device Boot      Start         End      Blocks   Id  System
/dev/sdc1               1         654     5253223+  fd  Linux raid autodetect
Step 3: Create RAID
After making partitions on both disks (/dev/sdb and /dev/sdc), Create RAID using following command
# mdadm --create /dev/md0 --level=1 --raid-devices=2 /dev/sdb1 /dev/sdc1
In the above command –level defined as 1, which shows that we are create RAID-1, –raid-devices defined as 2 which shows that we are adding 2 drives in RAID, and /dev/md0 is used for device name.
After creating raid device make the filesystem on RAID partition
[root@server1 ~]# mkfs.ext4 /dev/md0
Step 4: Check RAID Devices
To check all RAID devices on system use following command, this command provides a list of RAID portions which few details
[root@server1 ~]# cat /proc/mdstat

Personalities : [raid1]
md0 : active raid1 sdc1[1] sdb1[0]
      5252187 blocks super 1.2 [2/2] [UU]

unused devices:
To view full description of an RAID device run command as below. This command will show you the detailed information about defined RAID Array.
[root@server1 ~]# mdadm --detail /dev/md0
Step 5: Mount RAID Device
As we have successfully created an RAID array, Lets mount it on any mount point. Mounting is the similar to mount any other disks
[root@server1 ~]# mkdir /mnt/raid1
[root@server1 ~]# mount /dev/md0 /mnt/raid1
To mount it permanently after system reboot make entry in /etc/fstab file as below.
/dev/md0 /mnt/raid1 ext4 defaults 1 2
Also create the Raid configuration file by using following command, This command scan all raid arrays on system and add an entry in /ettc/mdadm.conf file.
# mdadm --detail --scan > /etc/mdadm.conf