
RAID stands for Redundant Array of Inexpensive (Independent) Disks. RAID-1 is also known as striping. RAID-1 required minimum two disks. The max data on RAID-1 can be stored to size of smallest disk in RAID array.
In this article we are using CentOS 6.5 running with VMWare. I have added two virtual disks as /dev/sdb and /dev/sdc for configuring RAID-1 partition. Each disk size is 10GB and we will one partition on both disks of 5GB which will created as /dev/sdb1 and /dev/sdc1.
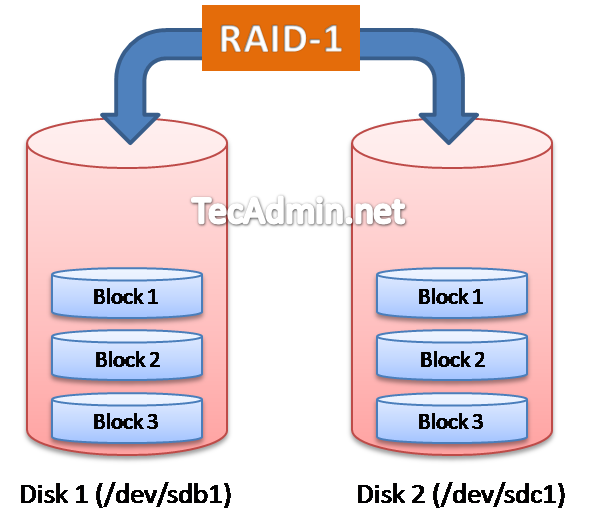
Know few things about RAID-1 as below.
Pros – Secure data from single disk failure as same data replicated to each disk
Cons – Storage overhead, required disk size if twice of data.
Minimum Disks Required – 2
Maximum Data Storage – Equal to smaller disk size (For example if we have two disks, One of size 200GB and second of size 250GB. So we can save only 200GB data on RAID )
Warning: Be careful while implementing RAID on system, In this tutorial you are going to use fdisk and mkfs command. Before doing it make sure you have taken backup of data on some remote backup disk.
Step 1: Create Disk Partitions
Firstly we are going to create logical partitions on both newly attached disks as /dev/sdb and /dev/sdc and will change system type of partition as Linux raid autodetect.
First use fdisk command to create partition on /dev/sdb disk as below
[root@server1 ~]# fdisk /dev/sdb

Device contains neither a valid DOS partition table, nor Sun, SGI or OSF disklabel
Building a new DOS disklabel with disk identifier 0x9452ab46.
Changes will remain in memory only, until you decide to write them.
After that, of course, the previous content won't be recoverable.

Warning: invalid flag 0x0000 of partition table 4 will be corrected by w(rite)

WARNING: DOS-compatible mode is deprecated. It's strongly recommended to
         switch off the mode (command 'c') and change display units to
         sectors (command 'u').

Command (m for help): n
Command action
   e   extended
   p   primary partition (1-4)
p
Partition number (1-4): 1
First cylinder (1-1305, default 1):
Using default value 1
Last cylinder, +cylinders or +size{K,M,G} (1-1305, default 1305): +5G


Command (m for help): t
Selected partition 1
Hex code (type L to list codes): fd
Changed system type of partition 1 to fd (Linux raid autodetect)

Command (m for help): w
The partition table has been altered!

Calling ioctl() to re-read partition table.

WARNING: If you have created or modified any DOS 6.x
partitions, please see the fdisk manual page for additional
information.
Syncing disks.
Now create the partitions on /dev/sdc disk same as above (created for /dev/sdb)
[root@server1 ~]# fdisk /dev/sdc
Step 2: Verify Partitions on Disk
Lets verify that you have created partitions correctly and they are of type “Linux raid autodetect“. In the below outputs we can see that /dev/sdb1 has been created in /dev/sdb disk and /dev/sdc1 is created on /dev/sdc disk.
Checking partitions on /dev/sdb
[root@server1 ~]# fdisk -l /dev/sdb

Disk /dev/sdb: 10.7 GB, 10737418240 bytes
255 heads, 63 sectors/track, 1305 cylinders
Units = cylinders of 16065 * 512 = 8225280 bytes
Sector size (logical/physical): 512 bytes / 512 bytes
I/O size (minimum/optimal): 512 bytes / 512 bytes
Disk identifier: 0x9452ab46

   Device Boot      Start         End      Blocks   Id  System
/dev/sdb1               1         654     5253223+  fd  Linux raid autodetect
Checking partitions on /dev/sdc also
[root@server1 ~]# fdisk -l /dev/sdc

Disk /dev/sdc: 10.7 GB, 10737418240 bytes
255 heads, 63 sectors/track, 1305 cylinders
Units = cylinders of 16065 * 512 = 8225280 bytes
Sector size (logical/physical): 512 bytes / 512 bytes
I/O size (minimum/optimal): 512 bytes / 512 bytes
Disk identifier: 0x00780ac9

   Device Boot      Start         End      Blocks   Id  System
/dev/sdc1               1         654     5253223+  fd  Linux raid autodetect
Step 3: Create RAID
After making partitions on both disks (/dev/sdb and /dev/sdc), Create RAID using following command
# mdadm --create /dev/md0 --level=1 --raid-devices=2 /dev/sdb1 /dev/sdc1
In the above command –level defined as 1, which shows that we are create RAID-1, –raid-devices defined as 2 which shows that we are adding 2 drives in RAID, and /dev/md0 is used for device name.
After creating raid device make the filesystem on RAID partition
[root@server1 ~]# mkfs.ext4 /dev/md0
Step 4: Check RAID Devices
To check all RAID devices on system use following command, this command provides a list of RAID portions which few details
[root@server1 ~]# cat /proc/mdstat

Personalities : [raid1]
md0 : active raid1 sdc1[1] sdb1[0]
      5252187 blocks super 1.2 [2/2] [UU]

unused devices:
To view full description of an RAID device run command as below. This command will show you the detailed information about defined RAID Array.
[root@server1 ~]# mdadm --detail /dev/md0
Step 5: Mount RAID Device
As we have successfully created an RAID array, Lets mount it on any mount point. Mounting is the similar to mount any other disks
[root@server1 ~]# mkdir /mnt/raid1
[root@server1 ~]# mount /dev/md0 /mnt/raid1
To mount it permanently after system reboot make entry in /etc/fstab file as below.
/dev/md0 /mnt/raid1 ext4 defaults 1 2
Also create the Raid configuration file by using following command, This command scan all raid arrays on system and add an entry in /ettc/mdadm.conf file.
# mdadm --detail --scan > /etc/mdadm.conf