This tutorial will help you to set up Selenium with ChromeDriver on Debian 9 and Debian 8. This tutorial also includes an example of a Java program that uses Selenium standalone server and ChromeDriver and runs a sample test case.
Xvfb (X virtual framebuffer) is an in-memory display server for a UNIX-like operating system (e.g., Linux). It implements the X11 display server protocol without any display. This is helpful for CLI applications like CI services.
Step 1 – Prerequisites
Login to your Debian system as sudo privileged user and execute the following commands to install the required packages on your system.
sudo apt-get update
sudo apt-get install -y curl unzip xvfb libxi6 libgconf-2-4
Also, install Java on your system. Use below command to install OpenJDK on your system, If you like install Oracle Java 8 on your Debian system.
sudo apt-get install default-jdk
Step 2 – Install Google Chrome
Now install Latest Google chrome on your Debian system using commands below. Google chrome headless feature opens multipe doors for the automation.
sudo curl -sS -o - https://dl-ssl.google.com/linux/linux_signing_key.pub | apt-key add -
sudo echo "deb [arch=amd64]  http://dl.google.com/linux/chrome/deb/ stable main" >> /etc/apt/sources.list.d/google-chrome.list
sudo apt-get -y update
sudo apt-get -y install google-chrome-stable
Step 3 – Install ChromeDriver
ChromeDriver is a standalone server which implements WebDriver’s wire protocol for Chromium. The WebDriver is an open source tool for automated testing of web apps across multiple browsers.
wget https://chromedriver.storage.googleapis.com/2.41/chromedriver_linux64.zip
unzip chromedriver_linux64.zip
You can find the latest ChromeDriver on its official download page. Now execute below commands to configure ChromeDriver on your system.
sudo mv chromedriver /usr/bin/chromedriver
sudo chown root:root /usr/bin/chromedriver
sudo chmod +x /usr/bin/chromedriver
Step 4 – Download Required Jar Files
The Selenium Server is required to run Remote Selenium WebDrivers. You need to download the Selenium standalone server jar file using the below commands or visit here to find the latest version of Jar file.
wget https://selenium-release.storage.googleapis.com/3.13/selenium-server-standalone-3.13.0.jar
Also, download the testng-6.8.7.jar file to your system.
wget http://www.java2s.com/Code/JarDownload/testng/testng-6.8.7.jar.zip
unzip testng-6.8.7.jar.zip
Step 5 – Start Chrome via Selenium Server
Your server setup is ready. Start the Chrome via standalone selenium server using Xvfb utility.
Run Chrome via Selenium Server
xvfb-run java -Dwebdriver.chrome.driver=/usr/bin/chromedriver -jar selenium-server-standalone.jar
Use -debug option at end of command to start server in debug mode.
You can also Start Headless ChromeDriver by typing the below command on terminal.
chromedriver --url-base=/wd/hub
Your Selenium server is now running with Chrome. Use this server to run your test cases written in Selenium using the Google Chrome web browser. The next step is an optional step and doesn’t depend on Step 5.
Step 6 – Sample Java Program (Optional)
This is an optional step. It describes running a single test case using Selenium standalone server and ChromeDriver. Let’s create a Java program using the Selenium server and Chrome Driver. This Java program will open a specified website URL and check if the defined string is present on the webpage or not.
Create a Java program by editing a file in text editor.
vim TecAdminSeleniumTest.java
Add the below content to the file.
1 2 3 4 5 6 7 8 9 10 11 12 13 14 15 16 17 18 19 20 21 22 23 24 25 26 27 | import java.io.IOException; import org.openqa.selenium.WebDriver; import org.openqa.selenium.chrome.ChromeOptions; import org.openqa.selenium.chrome.ChromeDriver; import org.testng.annotations.Test; public class TecAdminSeleniumTest { public static void main(String[] args) throws IOException, InterruptedException { System.setProperty("webdriver.chrome.driver", "/usr/bin/chromedriver"); ChromeOptions chromeOptions = new ChromeOptions(); chromeOptions.addArguments("--headless"); chromeOptions.addArguments("--no-sandbox"); WebDriver driver = new ChromeDriver(chromeOptions); driver.get("https://google.com"); Thread.sleep(1000); if (driver.getPageSource().contains("I'm Feeling Lucky")) { System.out.println("Pass"); } else { System.out.println("Fail"); } driver.quit(); } } |
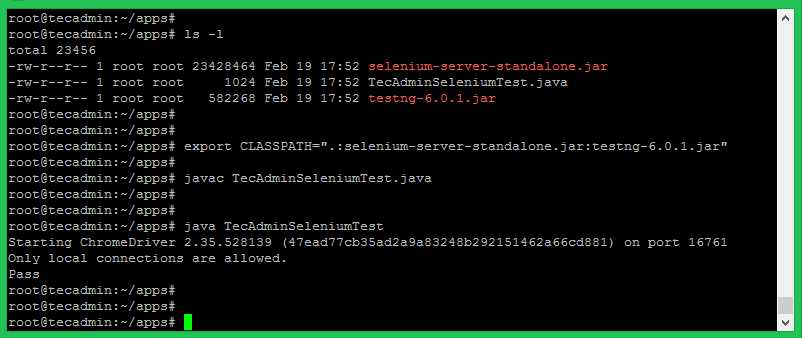
You can change the URL “https://google.com” with any other URL of your choice, Then also change the search string like “I’m Feeling Lucky” used in the above Java program. Save your java program and execute it. First, you need to set the Java CLASSPATH environment variable including the selenium-server-standalone.jar and testng-6.8.7.jar. Then compile the java program and run it.
export CLASSPATH=".:selenium-server-standalone.jar:testng-6.8.7.jar"
javac TecAdminSeleniumTest.java
java TecAdminSeleniumTest
You will see the results below. If the defined search string is found, You will get the message “Pass” and if the string is not found on the webpage, you will get the “Fail” message on the screen.


2 Comments
I have some issue:
javac TecAdminSeleniumTest.java
/home/pawel/lib/client-combined-3.14.0-sources.jar(org/openqa/selenium/interactions/internal/Locatable.java):24: error: cannot access Locatable
public interface Locatable extends org.openqa.selenium.interactions.Locatable {
^
bad source file: /home/pawel/lib/client-combined-3.14.0-sources.jar(org/openqa/selenium/interactions/Locatable.java)
file does not contain class org.openqa.selenium.interactions.Locatable
Please remove or make sure it appears in the correct subdirectory of the sourcepath.
/home/pawel/lib/client-combined-3.14.0-sources.jar(org/openqa/selenium/remote/RemoteWebDriverBuilder.java):22: error: cannot find symbol
import static org.openqa.selenium.remote.http.HttpMethod.POST;
^
symbol: static POST
location: class
can you help me please
Thanks!
However I believe you missed a hyphen in step 2 first line to the right of the pipe:
…. | apt-key add –