The Ubuntu 17.10 and later systems use the Netplan as a new command-line utility for managing network interfaces. It works with the Systemd-networkd or NetworkManager renderes. Netplan configuration files are written in YAML format, allowing you simple-to-complex networking configurations. Which work from the Desktop to the server and from the cloud to IoT devices.
This article will help you to configure static IPv4 addresses on Ubuntu systems using the Netplan command-line tool. We have recently tested this article with Ubuntu 24.04 LTS system.
Step 1: Check the Network Interface Name
The first step is to find the network interface name, which can vary depending on your system setup. You can use either nmcli utility or ip command to find the network interface name. Both of them are described below:
- To find the interface name type using nmcli:
sudo nmcli device statusDEVICE TYPE STATE CONNECTION eth0 ethernet connected Wired connection 1 lo loopback unmanaged -- - You can also check the interface name using the
ipcommand:sudo ip a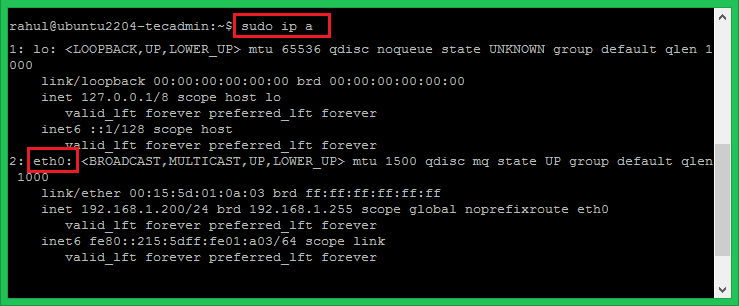
Checking the network interface name
The above output shows that the system is configured with the network interface name eth0. This can be different on your system. So please verify the system network interface name with the ip a command as shown above.
Step 2: Configuring the Static IP Address using Netplan
Once you found the correct interface name, the second step is to create a network configuration file.
Netplan stores all the configuration files under /etc/netplan directory. As you already have the network interface name found in the above commands. Now, we will configure the static IP address to that interface using the NetPlan utility.
- Let’s, create a configuration file and edit it in your favorite text editor:
sudo vi /etc/netplan/01-netcfg.yaml - Add the network configuration in YAML format. The below configuration uses 4 spaces due to strict indentation followed by the YAML.
network:
  version: 2
  renderer: networkd
  ethernets:
    eth0:
      addresses:
        - 192.168.0.210/24
      nameservers:
        addresses:
          - 8.8.8.8
          - 8.8.4.4
      routes:
        - to: default
          via: 192.168.0.254
In the above configuration:
eth0– is the network interface name192.168.0.210/24– is the IPv4 address to set on interface. Make sure to define CIDR. You can add multiple IP address as well.routes via 192.168.0.254– Set the gateway IP address of the network8.8.8.8, 8.8.4.4– is the IP address of the Google DNS servers.
Make sure the IPv4 address belongs to the system network and has the correct gateway Ip address.
- Once confirmed, press
ESCand:wqto save file content and close it. - Now, execute the following command to apply the changes:
sudo netplan applyThis will configure the static IPv4 address on the network interface. Now the system will be accessible with the new IP address you configured above.
Conclusion
In this tutorial, you have learned to configure the network interface on Ubuntu systems using Netplan. In this article we have simply created a Netplan configuration file with required IP address, DNS resolvers and route.
