
There are times when you might need to change the WordPress site URL in your website’s database. This could be due to moving your site to a new domain, changing your domain’s structure, or fixing a broken site after an update. In this tutorial, we will walk you through the steps needed to change your WordPress URL in the database using phpMyAdmin, a popular MySQL database management tool.
Please ensure you have backed up your site and database before proceeding with this tutorial. Changes to the database can have serious consequences if not done correctly. The steps involves:
- Identify WordPress database name
- Prepare SQL queries
- Execute SQL queries
- Verify changes
Let’s follow steps one by one carefully:
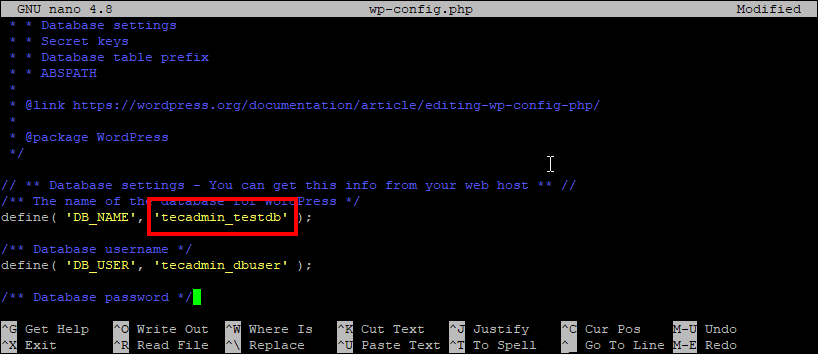
Step 1: Identify WordPress Database Name
Locate the database being used by your WordPress installation. You can find this information in the `wp-config.php` file, which is located in the root directory of your WordPress installation. Look for a line similar to the following:

Step 2: Prepare SQL Queries
Assuming that all the tables have wp_ as prefix. In case of changes, update the queries accordingly.
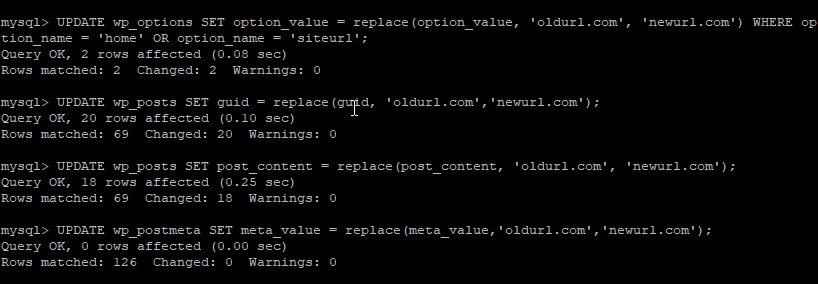
UPDATE wp_options SET option_value = replace(option_value, 'oldurl.com', 'newurl.com') WHERE option_name = 'home' OR option_name = 'siteurl';

UPDATE wp_posts SET guid = replace(guid, 'oldurl.com','newurl.com');

UPDATE wp_posts SET post_content = replace(post_content, 'oldurl.com', 'newurl.com');

UPDATE wp_postmeta SET meta_value = replace(meta_value,'oldurl.com','newurl.com');
Replace ‘oldurl.com’ with your current URL and ‘newurl.com’ with the new URL you want to set. Also make sure to set the correct table prefix.
Step 3: Execute SQL Queries
You have the option to run SQL statements either through a command line interface or via phpMyAdmin. Select the method that best suits your needs and comfort level.
- Using SQL CLI
If you have command line access to your server, you can use a command like the following to connect to your database:
mysql -u username -p your_database_nameReplace ‘username’ with your MySQL username, and ‘your_database_name’ with the actual name of your database. You’ll be prompted for your password.
Once connected, run each of the SQL queries one by one.
Changing WordPress Site URL using SQL CLI - Using phpMyAdmin
If you have access to phpMyAdmin, log in and select the appropriate database on the left side. Then, click on the ‘SQL’ tab at the top. Paste the SQL queries one by one into the text box, and click ‘Go’ to execute each query.
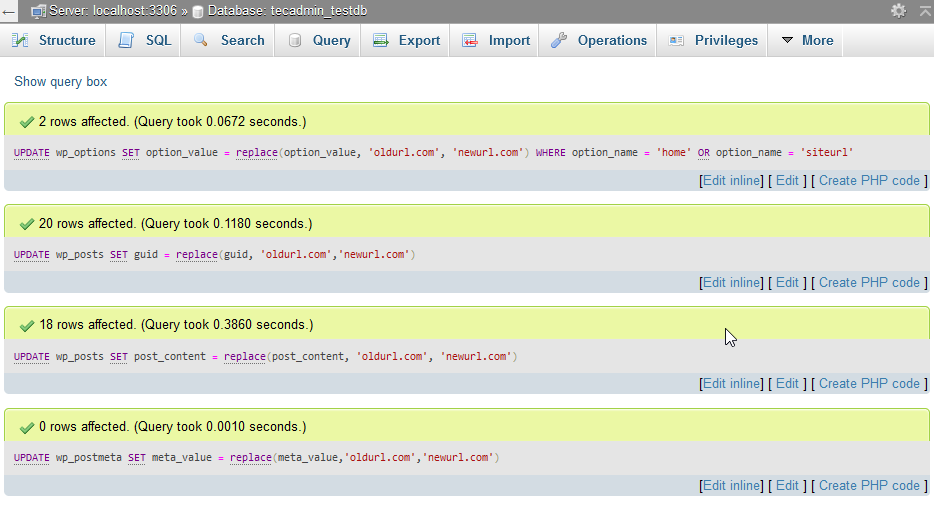
Changing WordPress Domain using phpMyAdmin


Step 4: Verify Changes
After executing the queries, verify that the changes have been applied successfully by checking the following:
- Visit your WordPress site using the new URL to confirm it is working as expected.
- Log in to your WordPress admin dashboard and check that links and media are correctly displayed with the new URL.
Conclusion
You have now successfully changed your WordPress URL in the database using phpMyAdmin. After completing these steps, you should visit your website and verify that everything is working correctly. Check your pages, posts, and media files to ensure they are loading properly and that all internal links have been updated.
If you encounter any issues after following this tutorial, you may need to clear your site’s cache (if you are using a caching plugin) or your browser cache. Additionally, it’s important to update any hardcoded URLs in your theme files, custom scripts, or stylesheets, as these changes will not be made automatically through the database.
Remember that making changes to your database can be risky, so always back up your site and database before making any modifications. By following the steps outlined in this tutorial, you can effectively change your WordPress URL in the database and ensure a smooth transition to your new domain or site structure.

