Securing your website or application is crucial in today’s digital landscape, and one way to ensure security is through the use of Secure Sockets Layer (SSL) certificates. SSL certificates provide encryption and authentication, ensuring that data transmitted between a client and server remains private and secure. In some cases, it may be necessary to create a self-signed SSL certificate, which can be useful for testing, development, or internal purposes. In this article, we’ll provide a step-by-step guide on how to create a self-signed SSL certificate using the Linux command line.
Step 1: Install OpenSSL
The first step in creating a self-signed SSL certificate is to install the OpenSSL package, which provides the necessary tools for generating SSL certificates. On most Linux distributions, you can install OpenSSL using the package manager. For example, on Ubuntu or Debian-based systems, you can run the following command:
sudo apt updatesudo apt install openssl
For CentOS, Fedora, or RHEL-based systems, use the following command:
sudo yum install openssl
Step 2: Generate a Private Key
Once you have OpenSSL installed, the next step is to generate a private key. The private key is an essential component of the SSL certificate, as it is used to sign and decrypt data. Run the following command to generate a 2048-bit RSA private key:
openssl genrsa -out example.key 2048
Replace “example.key” with your desired file name. Make sure to keep this private key secure, as it is critical for maintaining the security of your SSL certificate.

Step 3: Create a Certificate Signing Request (CSR)
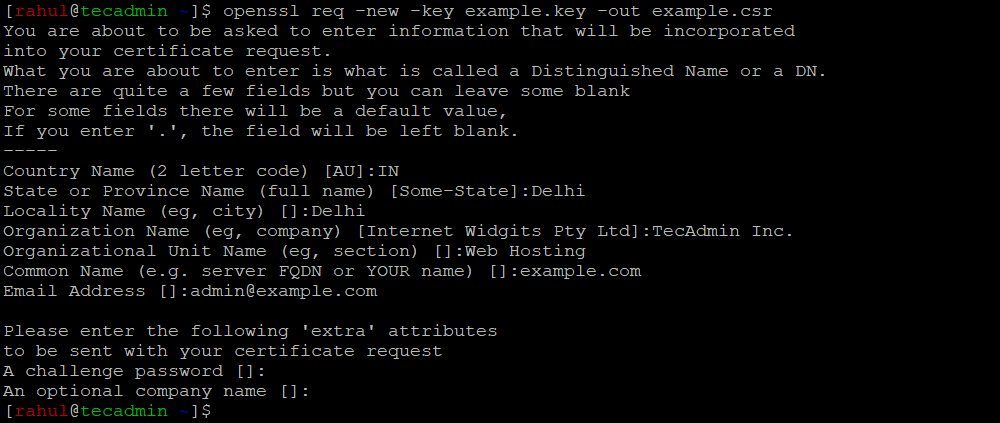
Next, you’ll need to create a Certificate Signing Request (CSR) that includes information about your server and organization. The CSR is required to generate the SSL certificate. Run the following command to create a CSR:
openssl req -new -key example.key -out example.csr
Replace “example.key” with the name of your private key and “example.csr” with your desired CSR file name. You will be prompted to enter various details, such as your country, state, locality, organization name, common name (domain name), and email address. Fill in these details accurately, as they will be used in your SSL certificate.
Step 4: Generate the Self-Signed SSL Certificate
Now that you have a CSR, you can generate your self-signed SSL certificate using the following command:
openssl x509 -req -days 365 -in example.csr -signkey example.key -out example.crt
Replace “example.csr” with your CSR file name, “example.key” with your private key file name, and “example.crt” with your desired SSL certificate file name.

The command options are:
| Option | Description |
|---|---|
| x509 | The command used to perform x509 certificate operations, such as signing, generating, and displaying information. |
| -req | Specifies that the input file should be treated as a certificate signing request (CSR) rather than a certificate. |
| -days 365 | Sets the validity period of the certificate in days (in this case, 365 days). You can change this value as needed. |
| -in | Specifies the input file to be used, which is the CSR file (“example.csr” in this case). Replace “example.csr” with the appropriate file name. |
| -signkey | Indicates the private key that will be used to sign the certificate. In this case, it is the “example.key” file. Replace “example.key” with the appropriate file name. |
| -out | Specifies the output file for the generated certificate. In this case, it is the “example.crt” file. Replace “example.crt” with the desired file name. |
Step 5: Configure Your Web Server to Use the SSL Certificate
Finally, you’ll need to configure your web server to use your newly created self-signed SSL certificate. The process may vary depending on the web server you are using (e.g., Apache, Nginx, etc.). Make sure to update the server configuration with the appropriate file paths for your SSL certificate and private key.
Conclusion
Creating a self-signed SSL certificate using the Linux command line is a straightforward process that can be accomplished with just a few commands. While self-signed SSL certificates should not be used for production environments, they can be an invaluable tool for testing, development, or internal applications. By following this step-by-step guide, you can easily generate a self-signed SSL certificate and configure your web server to use it.
Keep in mind that self-signed SSL certificates may trigger security warnings in web browsers, as they are not signed by a trusted Certificate Authority (CA). For production environments, it is highly recommended to use an SSL certificate issued by a trusted CA to ensure the best security and user experience.
In summary, mastering the Linux command line to create self-signed SSL certificates is a valuable skill that can help you maintain the security and privacy of your applications during development and testing. By familiarizing yourself with OpenSSL commands and understanding the importance of SSL certificates, you’ll be well-equipped to manage and secure your web services effectively.