AWStats is a free and open-source log analyzer that provides detailed insights into the traffic of your Apache web server. With AWStats, you can track website visits, referring websites, search engines, operating systems, browsers, and much more. It’s an effective tool for website owners, system administrators, and developers to monitor the performance of their website and make informed decisions to optimize it.
This article provides a step-by-step guide on how to set up AWStats on CentOS, RHEL, and Fedora systems. The guide covers all the necessary prerequisites, including installing the required dependencies and the AWStats software, configuring AWStats to analyze Apache logs, setting up Apache to work with AWStats, and updating the AWStats database to analyze Apache logs.
Prerequisites
- A VPS or dedicated server with a Linux operating system installed.
- Apache web server installed and configured.
- Perl and other required dependencies installed.
Step 1: Installing AWStats
To install AWStats on your system, follow these steps:
- Connect to your server via SSH
- Install the required dependencies using the following command:
sudo dnf install perl-Time-HiRes perl-libwww-perl - Download the latest version of AWStats using the following command:
wget https://downloads.sourceforge.net/awstats/awstats-7.9.tar.gz - Extract the downloaded archive using the following command:
tar xvzf awstats-7.9.tar.gz - Move the extracted folder to the Apache web server’s root directory:
mv awstats-7.9 /var/www/html/awstats
Step 2: Configuring AWStats
Once AWStats is installed, you need to configure it to analyze your Apache logs. Here’s how:
- Copy the example configuration file to a new file:
mkdir /etc/awstatscp /var/www/html/awstats/wwwroot/cgi-bin/awstats.model.conf /etc/awstats/awstats.example.com.confReplace “example.com” in the above command with the name of your domain.
- Edit the newly created configuration file using your preferred text editor:
nano /etc/awstats/awstats.example.com.confModify the following variables in the configuration file:
- LogFile: The path to your Apache log file. (/var/log/httpd/access.log)
- SiteDomain: The domain name of your website. (example.com)
- DirData: The directory where AWStats will store its data.
- Save the changes and close the text editor.
Step 3: Setting Up Apache
To set up Apache to work with AWStats, follow these steps:
- Create a new Apache virtual host file:
nano /etc/httpd/conf.d/awstats.example.com.confReplace “example.com” in the above command with the name of your domain.
- Add the following code to the virtual host file:
<VirtualHost *:80> ServerName awstats.example.com DocumentRoot /var/www/html/awstats/wwwroot ScriptAlias /awstats/ /var/www/html/awstats/wwwroot/cgi-bin/ <Directory /var/www/html/awstats/wwwroot/cgi-bin/> Options ExecCGI AllowOverride None Order allow,deny Allow from all </Directory> <Directory /var/www/html/awstats/wwwroot/> Options None AllowOverride None Order allow,deny Allow from all </Directory> </VirtualHost> - Save the changes and close the text editor.
Step 4: Analyzing Apache Logs
To analyze your Apache logs with AWStats, follow these steps:
- Run the following command to update the AWStats database:
cd /var/www/html/awstats/perl tools/awstats_updateall.pl now -config=example.com -awstatsprog=./wwwroot/cgi-bin/awstats.plReplace “example.com” in the above command with the name of your domain.
- Access the AWStats dashboard by visiting “http://awstats.example.com/awstats/awstats.pl?config=example.com” in your web browser.
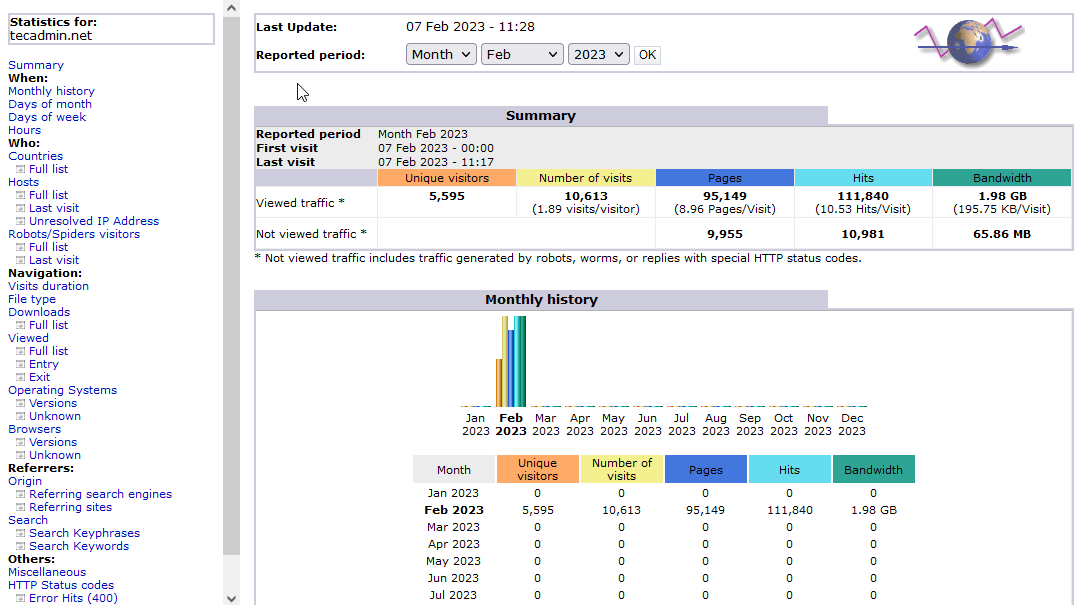
- You should now see the AWStats dashboard displaying valuable insights into your website’s traffic, including the number of visitors, pages viewed, referring websites, and more.
Step 5: Schedule to auto update
Schedule a cron job to regularly update the AWStats database using newly created log entries. Add a new cron job in crontab like below. Read examples of cron scheduling
# Cronjob to update logs every hour
0 * * * * cd /var/www/html/awstats/ && perl tools/awstats_updateall.pl now -config=example.com -awstatsprog=./wwwroot/cgi-bin/awstats.pl
Conclusion
In this article, we showed you how to install and set up AWStats on CentOS, RHEL, and Fedora systems. With this powerful log analyzer tool, you can gain valuable insights into your website’s traffic and make informed decisions to improve your website’s performance.


15 Comments
I am getting below error while trying to access awstats url from browser.
Invalid file path. Please check the correct URL.
Please help.
Also Please update about
How to enable username and password for access the awstat report
Thanks
Hi ,
The same Question i also have . Very simple and good article .BUt importantly we have to secure .Please share how to setup user name and password for Awstat
Thanks
Howdy, nice web site you’ve in here.
Hi,
Please could you guide, How to configure Awstats with Nginx.
I have configure all with Niginx, but unable to view it on browser, Am sure there would be a perl base configuration required for same.
Please advice.
How to do this same thing on a server which is running multiple domain under one shared IP address ??
How to configure AwStats for each domain ??
Would be great if you please update the tutorial for the same..
Good article. Saved my time.
Awesome Blog. I followed the steps, it is working on my site now,thanks
Hi.
the bellow command bug whith centos 6.5
crontab -l 0 2 * * * /usr/bin/perl /usr/share/awstats/wwwroot/cgi-bin/awstats.pl -config=tecadmin.net -update
crontab : option invalide — ‘c’
crontab: usage error: unrecognized option
Very good info. Lucky me I discovered your website by accident (stumbleupon).
I’ve bookmarked it for later!
your stupid plugin that spams the clipboard on copy is snipping the text so i cant copy and paste the config file… very annoying at least let the whole thing get copied
Try using nano instead of vim when i was a noob it kinda pissed me off too..
Great guide btw rahul 🙂
Hey very interesting blog!
Awesome Blog. I add this Post to my bookmarks.
nice article, very well written….