
Ubuntu is a favored operating system for many developers due to its powerful, flexible nature, and its ability to support multiple versions of Java is particularly valuable. Java, a critical platform for many applications and development projects, can sometimes require specific versions for different tasks. This ultimate guide walks you through configuring Java versions on Ubuntu, ensuring you have the right tools for your development needs.
Step 1: Checking Your Current Java Version
Before making any changes, it’s essential to know which Java version is currently in use. Open your terminal and type:
java -version
This command will display the version details of the currently active Java.
Step 2: Selecting the Default Java Version
Switching between Java versions is as simple as changing the default version using update-alternatives.
- Change Java Version: Run:
sudo update-alternatives --config javaSelect the version you want to switch to by typing its selection number.
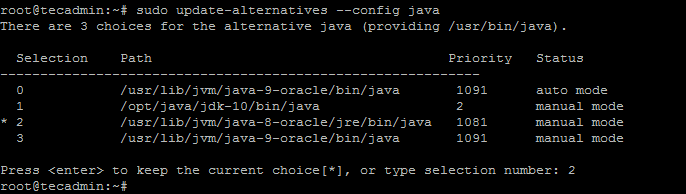
Switching Java Version on Ubuntu Based on the provided screenshot, Java 10 has been established as the default Java version on your system.
- Verify the Change: Confirm the switch by checking the Java version:
java -version

Step 3: Setting JAVA_HOME Environment Variable
Some applications require the JAVA_HOME environment variable. To set it:- Open your profile script: Edit
~/.bashrc or nano~/.zshrc, depending on your shell. - Add the following line at the end:
export JAVA_HOME=$(dirname $(dirname $(readlink -f $(which java)))) - Save and close the file.
- Apply the changes: To reload current environment type:
source ~/.bashrc## or source ~/.zshrc
Step 4: Tips and Tricks
- Check Java Compiler Version: Use
javac -versionto check the installed Java compiler version. - Use SDKMAN!: SDKMAN! is a tool for managing parallel versions of multiple Software Development Kits on most Unix-based systems. It provides an easy way to switch between different Java versions.
- Automate with Scripts: If you frequently switch Java versions, consider writing a shell script to automate the process.
Conclusion
Configuring Java versions on Ubuntu doesn't have to be complicated. By following this guide, you can effortlessly install, manage, and switch between different Java versions, tailoring your development environment to your project needs. Whether you're working on a complex Java application or experimenting with different Java frameworks, having the right Java version at your fingertips is essential for a smooth development process.
2 Comments
Thank you for this quick solution.
Thanks for this. Was having problems with running R under Spark with Ubuntu 18.04 – did not like Java 11, required Java 8. Problem solved – via this workaround! Cheers!