Keeping your system’s time accurate is essential, especially if you’re running servers, scheduling tasks, or working with networks. One of the most common ways to ensure your Ubuntu system is synchronized with the correct time is by using an NTP (Network Time Protocol) server. This guide will walk you through the steps to synchronize time with an NTP server on Ubuntu in simple, easy-to-follow instructions.
What is NTP?
NTP (Network Time Protocol) is a protocol that helps synchronize the clock of your computer with a remote server that provides the correct time. This ensures that your system’s clock is always accurate, even if it’s off by a few seconds or minutes.
Steps to Synchronize Time with an NTP Server on Ubuntu
Step 1: Update Your System
Before starting, it’s always a good idea to update your system’s package list to ensure you have the latest version of the software. Open a terminal and run the following command:
sudo apt update
This command will check for the latest updates for all the software installed on your system.
Step 2: Install NTP on Ubuntu
To synchronize time using NTP, you’ll first need to install the NTP package on your Ubuntu system. You can do this by running the following command:
sudo apt install ntp
This will install the NTP service, which will automatically sync your system clock with NTP servers.
Step 3: Check if NTP is Running
Once NTP is installed, it’s important to check if the service is running. You can do this with the following command:
sudo systemctl status ntp
If the NTP service is active, you should see the status as “active (running).” If it’s not running, you can start the service with this command:
sudo systemctl start ntp
Step 4: Configure NTP (Optional)
By default, NTP is configured to synchronize with servers from the Ubuntu NTP pool, which should work fine for most users. However, if you want to use specific NTP servers (for example, if you are in a specific region or organization), you can modify the NTP configuration.
To do this, open the NTP configuration file with this command:
sudo nano /etc/ntp.conf
In this file, you’ll see a list of NTP servers. You can add or remove servers as needed. When you’re done editing, press CTRL + X to exit, and press Y to save the changes.
Step 5: Restart the NTP Service
After making any changes to the configuration, you’ll need to restart the NTP service for the changes to take effect. Run the following command:
sudo systemctl restart ntp
Step 6: Verify Time Synchronization
To check if your system’s time is correctly synchronized with the NTP server, use the following command:
ntpq -p
This will show a list of NTP servers your system is using and how well your system’s time is synchronized. Look for the * symbol next to one of the servers, which indicates that your system is using that server for time synchronization.
Step 7: Enable Automatic Time Sync (Optional)
If you want to ensure your system’s time always stays synchronized automatically, you can enable automatic time synchronization with the systemd-timesyncd service, which is installed by default on most Ubuntu systems. First, make sure the service is enabled and running with the following commands:
sudo timedatectl set-ntp onsudo systemctl enable systemd-timesyncdsudo systemctl start systemd-timesyncd
The timedatectl command only changes the system clock, which is the main clock used by your operating system and apps. The hardware clock (RTC) is a separate clock that keeps time even when the system is off. To sync the hardware clock with the system clock, run this command:
sudo timedatectl set-local-rtc 1
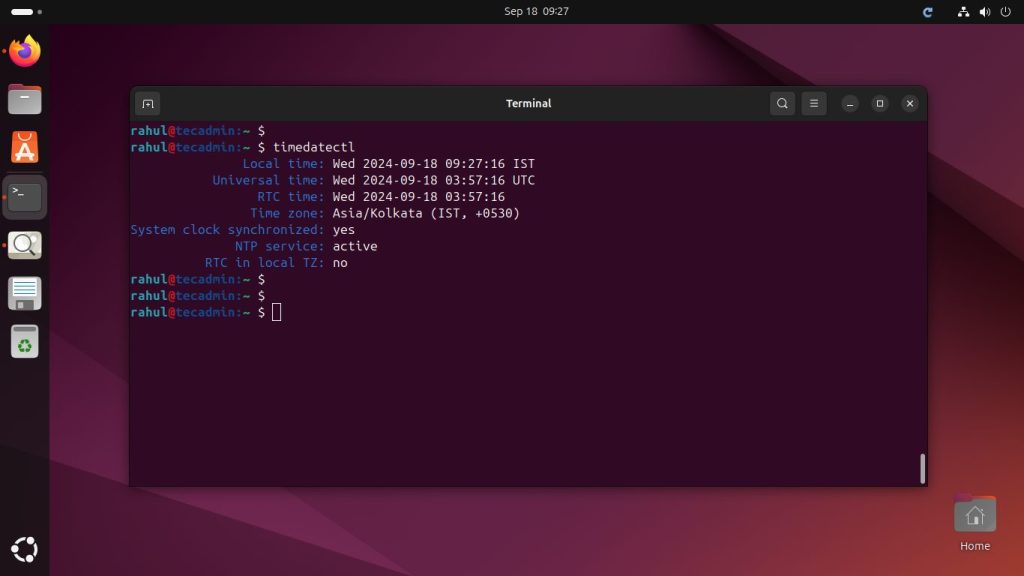
You can verify the status of the NTP synchronization by running the following command:
timedatectl
The output of the command should show the NTP synchronization status, as well as the time offset from the NTP server, if available.
Conclusion
Congratulations! You’ve now successfully set up time synchronization with an NTP server on your Ubuntu system. Keeping your system’s time accurate is crucial, especially for tasks that rely on precise timing. By following this guide, you’ll ensure that your Ubuntu machine stays in sync with accurate, reliable NTP servers.
If you run into any issues or need further assistance, feel free to ask!