VLC Media Player, developed by VideoLAN, is a versatile open-source multimedia player that supports a vast array of audio and video formats. Beyond its capability as a player, it comes packed with additional functionalities, including the ability to capture clips from videos – a feature that is surprisingly underused.
This article will take you through a comprehensive, step-by-step guide on how to utilize VLC Media Player’s video clipping feature. Whether you’re a video editor, a content creator, or someone simply looking to create highlight reels from your favorite shows, this guide will help you master the art of video clipping.
Step 1: Open VLC Media Player
Before getting started, ensure you have the latest version of VLC Media Player installed on your device. It is available for free download on the official VLC website for various platforms, including Windows, Mac OS X, and Linux.
Once VLC is installed, open the application, click on ‘Media’ in the toolbar at the top, and select ‘Open File’. Browse your files and select the video from which you want to capture a clip.
Step 2: Activate Advanced Controls
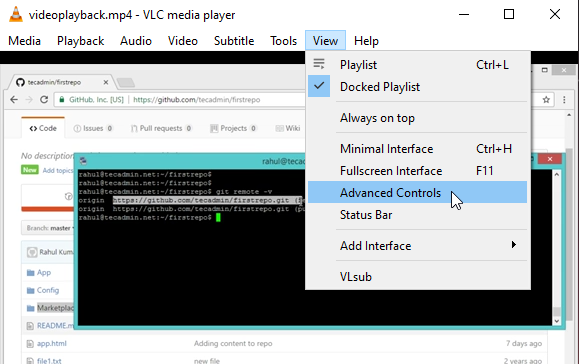
By default, VLC doesn’t show the advanced controls needed for clipping. To make these controls visible, navigate to the menu bar, click ‘View’, and then select ‘Advanced Controls’. You’ll see extra options appear above the standard play/pause controls at the bottom of the VLC window.

Step 3: Start Recording
Play the video as usual and use the time slider at the bottom to locate the part you want to clip. You can pause and play the video as needed to find the exact starting point.
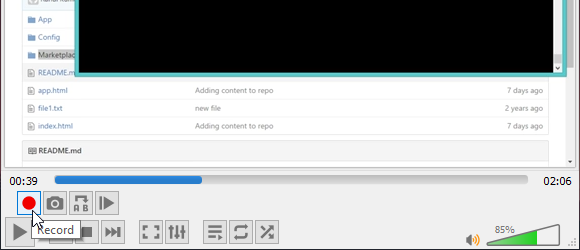
Once you’ve located the starting point of your clip, press the ‘Record’ button in the advanced controls (it looks like a red circle). VLC will start recording the video from this point.

Step 4: End the Recording
Play the video until you reach the end of the section you want to clip, then click the ‘Record’ button again to stop the recording. The clip is automatically saved as an .mp4 file in your ‘Videos’ or ‘My Videos’ folder for Windows users, or in your ‘Movies’ folder for Mac users.
Step 5: Review and Edit the Clip
Navigate to the folder where the clip was saved and play it to make sure it covers the correct section of the video. If it’s not perfect, don’t worry! You can easily repeat the process until you get the clip exactly as you want it.
Extra Tips for Video Clipping with VLC
- The default format for clips is .mp4, but VLC also allows you to record in different formats. To change the format, navigate to ‘Tools’, select ‘Preferences’, click ‘Input / Codecs’, and then change the ‘Record directory or filename’ setting.
- You can quickly access the clipping feature by using the shortcut keys. Press ‘Shift+R’ to start and stop the recording.
- VLC also allows you to take snapshots. Just press ‘Shift+S’ in Windows/Linux or ‘Command+Alt+S’ on a Mac.
Conclusion
In conclusion, VLC Media Player offers more than just playing your videos; it’s a powerful, user-friendly tool for video editing tasks like clipping. The next time you need to capture a video clip, remember that you don’t necessarily need high-end video editing software. With this guide and a little practice, you’ll be a master of the art of video clipping with VLC Media Player in no time. Happy editing!
