As the trend toward secure web traffic continues to increase, more sites than ever are using SSL/TLS certificates to ensure secure communication between servers and clients. Among the many options for obtaining these certificates, Let’s Encrypt stands out as a reliable, free, automated, and open Certificate Authority (CA). They provide a convenient wildcard certificate, which is handy when you have a site with multiple subdomains. This article will provide a step-by-step guide on how to renew your Let’s Encrypt wildcard certificate using DNS validation.
Prerequisites
Before proceeding, you will need:
- A domain name with a wildcard certificate issued by Let’s Encrypt.
- Access to your domain’s DNS settings (this may be through a domain registrar or a DNS provider).
- A server running a Unix-like operating system.
- Let’s Encrypt’s certbot installed on your server.
Please note: It’s essential to start the renewal process well before your certificate expires to ensure uninterrupted secure connections to your website.
Step 1: Check the Existing Certificate
First, verify the expiry date of your existing wildcard SSL certificate using the following command:
sudo certbot certificates
This command will provide a list of all certificates managed by certbot along with their domain names, expiration dates, and other relevant information.
Step 2: Initiate the Certificate Renewal Process
To initiate the renewal process, you will use the certbot command with the certonly flag and specify that you want to use the manual plugin and dns-01 challenge. Here’s an example command for a domain called “example.com”:
/usr/local/bin/certbot certonly \
    --manual \
    --preferred-challenges=dns \
    --email [email protected] \
    --server https://acme-v02.api.letsencrypt.org/directory \
    --agree-tos \
    -d '*.example.com'
Step 3: Verify Domain Ownership
Let’s Encrypt will require you to prove that you control the domain for which you’re requesting the certificate renewal. You’ll be asked to add a TXT record in your domain’s DNS settings.
The prompt will look something like this:
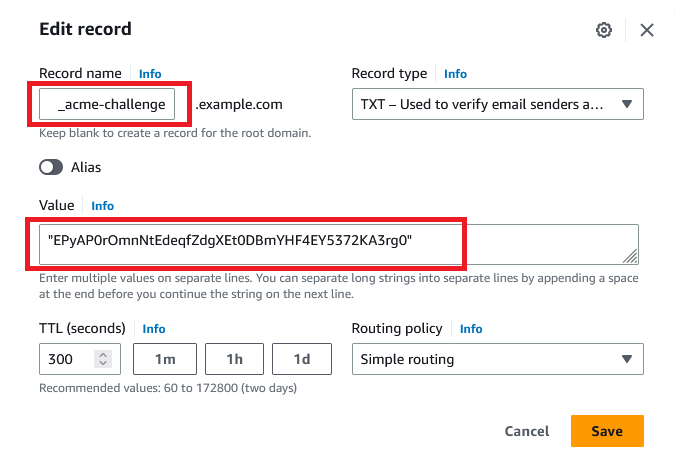
1 2 3 4 5 6 7 | Please deploy a DNS TXT record under the name: _acme-challenge.example.com. with the following value: EPyAP0rOmnNtEdeqfZdgXEt0DBmYHF4EY5372KA3rg0 |
Before continuing, verify the record is deployed.
Step 4: Update DNS Settings
Log in to your DNS provider’s dashboard and add a new TXT record. The host should be “_acme-challenge”, and the TXT value should be the random value provided by Let’s Encrypt.

After you’ve saved this record, you’ll need to wait for a while to allow the DNS changes to propagate across the internet. This can take anywhere from a few minutes to several hours.
Step 5: Continue the Verification Process
Once you’ve waited for the DNS changes to propagate, return to your server terminal and hit “Enter” to continue the process.
If the DNS TXT record has propagated correctly, Let’s Encrypt will verify your domain and issue a new wildcard certificate. You’ll see a message like this:
1 2 3 4 5 | Successfully received certificate. Certificate is saved at: /etc/letsencrypt/live/example.com/fullchain.pem Key is saved at: /etc/letsencrypt/live/example.com/privkey.pem This certificate expires on 2023-09-18. These files will be updated when the certificate renews. |
Step 6: Configure Your Server
Now you’ll need to update your server’s configuration file to use the new certificate and key. The exact process for this will depend on your server software. You’ll typically need to point your configuration at the fullchain.pem and privkey.pem files mentioned in the message from Let’s Encrypt.
Step 7: Test Your Renewed Certificate
Finally, you’ll want to verify that your website is using the new certificate. You can do this by visiting your website and inspecting the SSL certificate details in your web browser.
Conclusion
Let’s Encrypt’s automated process is a godsend for anyone managing a website, especially when you’re dealing with multiple subdomains and need a wildcard certificate. Renewing your certificate requires a few steps, but once you’ve done it a couple of times, it will become second nature.
Remember to set a reminder to renew your certificate, as Let’s Encrypt certificates are valid for 90 days. Keep in mind that Let’s Encrypt has a rate limit on certificate renewals, so it’s better to renew earlier than later to avoid potential disruptions to your website.
Happy encrypting!
